
Operation Manual


6
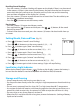
3. If the cu is located correctly, the Velcro will be on the outside of the
cu and metal ring will not touch your skin. (Fig. 5)
4. Put your left arm through the cu loop. The bottom of the cu should be
approximately 2-3 cm above elbow. The tube should lie over the brachial
artery on the inside of the arm. (Fig. 6)
5. Pull the cu so that the top and bottom edges are
tightened around your arm.
6. When the cu is positioned properly, press the Velcro
rmly against the pile side of the cu. (Fig. 7)
7. Sit on a chair and place your arm on the table so that
the cu is at the same level as your heart. (Fig. 8)
8. Relax your arm with your palm upward. (Fig 9)
9. Ensure there are no kinks in the air tube.
Taking a Measurement
1. Wrap the cu around the arm (see “Applying the Arm Cu” section above).
2. Sit upright on the chair to have a correct posture.
3. Press the (2) button. All elements of the display indicate ‘888’
during the rst 3 seconds. The measuring blood pressure symbol
will then ash on the display and the air pressure will automatically
pump up to certain pressure level and start measurement. (Fig. 10)
Do not move or talk in the midst of taking blood pressure measurement.
4. After the air pressure has increased, it will slowly decrease. When the
pulse is detected, the HEART RATE symbol will start ashing.
After taking blood pressure measurement, the product will turn o automatically
after 1 minute.
Memory Function
Your blood pressure monitor can store the reading of 48 measurements
(BP 5000 and BP 5010: 99 measurements).
Storing Measurement Data
After each blood pressure measurement, the Systolic pressure, Diastolic
pressure, Pulse rate and the time & date of specic day will be
automatically stored. The memory stores the latest 48 measurement
data (BP 5000 and BP 5010: 99 measurement data).
Once the memory is full, the oldest values will be overwritten. (Fig. 11)
Fig. 5
Fig. 11
Fig. 10
Fig. 6
Fig. 7
Fig. 8
Fig. 9