
Product Manual
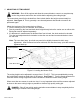
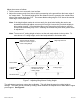
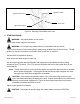
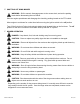
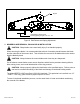


Table Of Contents

BRPFC112HE, REV B 15 REV 3/20
Backing up with one wing mower is easy. Backing becomes a greater challenge as additional
wing mowers are towed. Avoid backing up by planning ahead. Make loops instead of backing.
WARNING: Look down, to the sides, and behind before and while backing to avoid
backing over something or someone. Care should also be taken while backing so that the
wing mower or mowers do not jackknife and damage hitches.
WARNING: Stop the mower blades on both the tow vehicle and all wing mowers if the tow
vehicle becomes stuck or stops going forward because of loss of traction. Shut off the
engines on the wing mowers before attempting to push or pull the tow vehicle.
CAUTION: Do not turn too sharply when the wing mowers are pulled in tandem or pulled
behind a zero turn mower. Sharp turns can force the mowers into each other causing
damage to the hitches.
Listen to the wing mower engines while mowing. The engines should run free and not work too
hard. Working the engine too hard will cause overheating and premature failure.
Do not allow material to build up on the air inlet to the engine cooling system. If the wing
mowers are towed with one on the left and one on the right side, there will be a lot of material
blowing around the right wing mower engine. Special care should be taken to make sure the
engine is getting enough inlet air. Do not allow the engine cooling fins under the shroud to be
blocked. Air flow over the engine will be restricted causing the engine to overheat.
CAUTION: If the mower’s engine dies while in use, remove the wing mower from the uncut
area before attempting to engage the clutch. Inspect the blades for any obstructions that
may prevent blade engagement. Failure to follow these instructions may result in
premature clutch and belt failure or a fire.
G. DRIVE BELT REMOVAL AND TENSION (See Figure 9)
WARNING: Shut off engine and allow mower blades to stop turning before making any
adjustments or repairs.
Remove the safety shields.
Loosen the nuts on the spring-loaded idler; adjust the nut until the belt can be slipped off the
idler and drive sheaves.
Slip the belt down under the drive sheave and off the blade spindle sheaves.
Install the new belt and adjust the tension as follows:
Adjust the spring-loaded idler springs to a compressed length of 15/16” initially for a few hours
until the belt runs in; then adjust the spring to 1-1/8” to 1-1/4” compressed length.