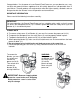
Food Processor with Blender Use and Care Instruction Manual Model BP100 Read Instruction Manual Before Use EURO-PRO Operating LLC Boston, MA, 02465 1 (800) 798-7398 www.euro-pro.
IMPORTANT SAFEGUARDS Read Instruction Manual Before Use When using electrical appliances, basic safety precautions should always be followed, including the following: 1. Read all instructions before using the appliance. It is suggested that you keep these instructions in a safe place for future reference. 2. Your voltage must correspond to the voltage printed on the bottom of the appliance. 3.
Congratulations! As the owner of a new Bravetti Food Processor, you are about to use a very versatile and powerful kitchen appliance that will quickly become an indispensable item in your kitchen. Bravetti products are engineered to meet the highest quality standards and are designed to offer the ultimate in ease of operation and convenience. IMPORTANT INFORMATION Please read all the following instructions carefully.
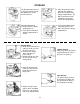
Food Processor with Blender Voltage: 120V., 60 Hz Wattage: 800 Watts MAIN COMPONENTS AND ACCESSORIES 1. 2. 3. Processor Body Safety Cover Safety Cover/Blender Location 4. On/Off Speed Control Dial 5. Pulse Button 6. Drive Shaft 7. Storage Compartment 8. Blender 9. Blender Lid 10. Measuring Cap 11. Processor Bowl 12. 13. 14. 15. 16. 17. 18. 19. 20. 21. 22. 23.
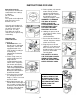
STORAGE The Bravetti food processor is designed so that most of the attachments can be stored on-board. 3. Place the protective cover (24) onto the chopping blade (23) and place into storage compartment. The highest part of the blade should be placed at the back of the compartment. Storage Compartment 1. Lift the lid of the storage compartment (7). 2. Place whisk head (26) in storage compartment as shown. 4. Push shaft of whisk beater (27) firmly into the hole. 5.
INSTRUCTIONS FOR USE Operating Controls The processor and blender control dials have settings as follows: Off/1-9 + Max Pulse The speed can be adjusted while the processor or blender is in use. 5. Fit the spindle (12) onto the motor shaft (6) and the appropriate attachments onto the spindle. Refer to the following section “Fitting & Using the Tools”. WARNING: TO REDUCE THE RISK OF INJURY, NEVER PLACE THE CUTTING BLADE ON THE BASE WITHOUT FIRST PUTTING THE BOWL PROPERLY IN PLACE.
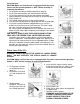
FITTING & USING THE TOOLS In general, all attachments which are fitted within the processor bowl must be firmly attached to the spindle (12). Always adjust the attachments until you are sure that they are correctly fitted. Chopping Blade (23) 1. Fit the processor bowl and spindle as detailed previously. 2. Remove the chopping blade protective cover (24) from the metal chopping blade. 3. Fit the blade over the spindle and press firmly into place. WARNING: USE EXTREME CAUTION - BLADES ARE SHARP.
Plastic Dough Blade (25) CAUTION: Make sure that the unit is unplugged from the power source and the operating button is “OFF” before inserting or removing attachments. 1. Fit the processor bowl and spindle as described previously on page 4. 2. Fit the plastic dough blade over the spindle and press firmly into place. 3. Place the ingredients into the bowl. 4. Fit the lid and click into place as described in the “Setting Up” section (page 4). 5. Plug in the processor. 6.
Slicing & Shredding Blades CAUTION: Make sure that the unit is unplugged from the power source and the operating button is “OFF” before inserting or removing attachments. 1. Place the blade of your choice on the blade holder (17). Inserting the longer tab on the side of the blade first. 2. Press the other end of the blade until it clicks into place. 3. Fit the processor bowl and spindle as detailed on the page 4. 4.
Juice Extractor CAUTION: Make sure that the unit is unplugged from the power source and the operating button is “OFF” before inserting or removing attachments. 1. Fit the processor bowl as detailed previously (page 4). 2. Fit the juice extractor/filter (28) into the processor bowl. 3. Fit the juice extractor lid (29) over the extractor and rotate counter clockwise ensuring that the lid tab has clicked into place. 4. Plug in processor. 5. Turn speed control to low (use only on low speed). 6.
Blender (8) CAUTION: Make sure that the unit is unplugged from the power source and the operating button is “OFF” before inserting or removing attachments and before cleaning. TO REMOVE THE BLENDER, YOU MUST FIRST UNLOCK AND REMOVE THE PROCESSOR LID (A). THEN UNLOCK ANS RMOVE THE BLENDER (B) BY TWISTING CLOCKWISE. 1. Remove the processor bowl and lid. 2. Remove the safety cover (2). This can only be done once the processor lid has been removed. 3.
RE-SETTABLE THERMAL SAFETY DEVICE Your Bravetti Food Processor has been designed with a unique safety system which prevents damage to the unit’s motor and drive system, should you inadvertently overload your appliance. The safety system will automatically cut the electric power to the appliance when the device senses an overload or excessive temperature in the motor or drive system. Should this occur during use and the appliance stops functioning, follow the re-setting procedure below: 1. 2. 3. 4. 5. 6.
CLEANING AND MAINTENANCE CAUTION: Make sure that the unit is unplugged from power source and control button is on “OFF” before inserting or removing any attachments and before cleaning. • Never immerse the unit, cord or plug in water or any other liquid. • Clean the motor block with a damp cloth only. • Only the stainless steel blades can be washed in the dishwasher. • All other parts can be cleaned in warm sudsy water using regular dishwashing liquid.
BP100 ONE (1) YEAR LIMITED WARRANTY EURO-PRO OPERATING LLC warrants this product to be free from defects in material and workmanship for a period of one (1) year from the date of purchase when utilized for normal household use. If your appliance fails to operate properly while in use under normal household conditions within the warranty period, return the complete appliance and accessories, freight prepaid. For Customer Service support, call 1 (800) 7987398 or visit our website www.euro-pro.com.