Thank You for purchasing the SD-‐100U CAR DVD/CD PLAYER USER MANUAL V1.2 Bravo View Technology 20153 Paseo Del Prado Walnut, CA 91789 United States of America 909-‐869-‐0699 www.bravoview.
TABLE OF CONTENTS Table of Contents…………………………………………….………………………………………….………2 Package Contents………………………………….………………..………….…….……………….………..3 Specifications…………………………………………………..…………….………………….…….………….3 Important Information…………………………………………………………………..……..…….………4 Introduction……………………………………………………………………………….……………….………5 Care & Maintenance…………………………………………………………………….………………..……6 Remote Control……………………………………………………………………………………………….
THANK YOU FOR YOUR PURCHASE! PLEASE TAKE A MOMENT TO GET FAMILIAR WITH THE PACKAGE CONTENTS Car DVD/CD Player 3ft A/V Cable Infrared Remote Sensor Mounting Brackets Wire Harness Remote Control PRODUCT SPECIFICATIONS DISC TYPE DVD±R / DVD± RW / CD-‐R/RW DIC FORMATS MP3 / MP4 / HDCD / WMA / JPEG / VCD / SVCD / DIVX
IMPORTANT INFORMATION Before operating/installing your Car DVD Player, please read these instructions carefully. 1. 2. 3. 4. 5. 6. 7. To ensure the safety of this product during transportation, the internal mechanism was fixed with security screws. Please remove these screws before use.
INTRODUCTION The Bravo View SD-‐100U is a full-‐featured Car DVD/CD Player designed specifically for the mobile environment. It’s intended for use with other multimedia products such as roof-‐mount and headrest LCD screens as well many other mobile video solutions. SD-‐100U is equipped with one 3.5mm Audio/Video input.
CARE AND MAINTENANCE Handling and Cleaning DVD’s and CD’s Avoid leaving fingerprints on the discs when handling it; always handle a disc by its edges. Always store discs in their protective cases. Always ensure that discs are clean and dry before inserting. Protect discs from heat and direct sunlight.
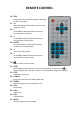
REMOTE CONTROL 1. POWER 2. AUX IN Press POWER to turn the unit ON or OFF. Switches to 3.5mm AUX input 3. 4. SETUP For DVD setup, please refer to the “SYSTEM SETTINGS” section. I Skip to previous chapter or track. 5. SUBTITLE 6. Changes the SUBTITLE language on a multi-‐ subtitle language DVD disc.
REMOTE CONTROL 16. OSD Playing time and track information is displayed on the front display. 17. I While playing push this button to skip to next chapter or track. 18. In the MENU mode this button serves as a cursor button to select up. 19. In the MENU mode this button serves as a cursor button to select right. 20.
FRONT PANEL DESCRIPTION 1. 2. 3. 4. 5. 6. 7. Eject Enter Up (VOL+) Disc Slot Play/Pause Power On / Off Left Button (Previous) 8. 9. 10. 11. 12. 13. 14.
REAR PANEL DESCRIPTION OPTIONAL NOTE: For Wireless Headphones to work properly, the White & Red RCA output must be connected to your System’s audio inputs.
BASIC OPERATION Power On/Off and Playback 1). Press power button on remote control or on the front panel of the player. 2). Insert the disc into the disc slot, with label side facing upward. 3).
BASIC OPERATION Forward/Reverse When you press FWD/REV under the Play mode, the unit will start to forward/reverse. You can play discs at various speeds. With each consecutive press of FWD/REV, the playback speed changes. There are 4 speed levels for DVD discs in FWD/REV: X2, X4, X6, X8.
SYSTEM SETTINGS System Setup Menu You can press Setup key on the remote control to bring up the System Setup Menu when the unit is under the stop/playback mode. Language Set Press up /down / Left / Right direction button to select an item, and then press ENTER.
SYSTEM SETTINGS Subtitle User can set subtitle language (DVD disc) option Note: Some disc can use subtitle display different from menu set. Audio User can set initials dub language by dub language set (DVD disc). Option Note: Some DVD disc dub language will be different from set dub language.
SYSTEM SETTINGS View Mode The user can choose 4 display modes. Fill: the picture will be stretched over entire screen.
SYSTEM SETTINGS Rating Set Press up / down/ Left / Right direction button to select an item, than press ENTER. Set Password The password option is initialized locked, and you cannot set the ratings limit or change the password. In order for the Ratings feature work, the password mode must be turned on.
SYSTEM SETTINGS Misc set Press up /down / Left / Right direction button to select an item, and then press ENTER. Use Default settings: Choose this option to resume all the setup options to default settings. Auto play DVD: The DVD will skip the title menu and directly play the contents.
INSTALLATION PROFESSIONAL INSTALLATION RECOMMENDED! 5. DC 12V/24V 1. Wire Harness 3. Remote IR Sensor Input 1. 2. 2. AUX 3.5mm Audio/Video Input 4.
INSTALLATION PROFESSIONAL INSTALLATION RECOMMENDED! 3. 4. 5. Remote IR Sensor Input Plug the supplied the remote sensor jack directly. The IR sensor should be placed in a direct line of sight in the vehicle. This will allow the remote to control the DVD player remotely.
Limited Warranty Bravo View Technology warrants this product (including any accessory and/or cable) against defects in material or workmanship as follows: 1. Labor. For a period of 1 Year from original date of purchase, if the product is determined to be defective, Bravo View will repair or replace the product at no charge. 2. Parts.