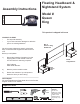
Assembly Instructions Floating Headboard & Nightstand System DATE STAMP Model # Queen King This product is shipped in 2 boxes CONTACT US FIRST • • For help with assembly If you have received a damaged or defective part or are missing hardware. We will process replacement parts in 2 business days or less.Parts are shipped via UPS Ground or mail. Before you call please: 1) Box A Queen or King Headboard Record the following information from the shipping label on the outside of the box.
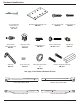
Hardware Identification 3½’’ Wood Screw Queen size (7) King size (8) RM-0888 Mending Plate (Package of 4) RM-0887 24mm Green Twister Dowel (12) RM-0501 15mm Zinc Cam (large) (12) RM-0103 Wood Dowel (4) RM-0069 Allen Key RM-0313 Euro Screw (16) RM-0074 Black Round Grommit (2) RM-0885 #8 - 5/8” Screw (24) RM-0394 60 mm JCB Bolt (8) RM-0801 nickel 1” Euro Screw (4) RM-0467 JRN Nut (8) RM-0312 Chrome Handle & screws (2) RM-0824 See page 10 for Drawer Hardware & Parts 2 LEFT Gray Cabinet Sli
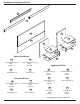
Headboard & Nightstand Parts H4 H3 H1 N2 N3 H2 N6 N1 N5 N3 N4 N6 Queen Headboard N5 N4 H2 H1 Top Headboard Panel (1) black espresso Bottom Headboard Panel (1) black espresso H3 H4 Wall Stabilizer (2) Back Panel (1) King Headboard H1 Top Headboard Panel (1) black espresso H3 Wall Stabilizer (2) H2 Bottom Headboard Panel (1) black espresso H4 Back Support (1) Nightstand Parts N1 Left Wall Panel (1) black espresso N2 Right Wall Panel (1) black espresso N3 N4 Nightstand Top (2
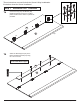
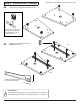
These instructions are used for both the Queen & King headboards. Illustrations show the Queen Headboard Step 1 1a Estimated Time: 15 Minutes Connect the Top (H1) and Bottom (H2) Headboard Panels using the 4 mending plates and #8 screws. Holes on panels are predrilled. H2 H1 1b Top Attach the Back Support (H4) to the Bottom headboard panel (H2) using the 1” Euro screws.
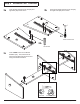
Step 2 2a Assemble both nightstands using the following steps Estimated Time: 10 Minutes Insert cams into Nightstand sides (N5) & (N6) N6 N5 Insert cams in the unlocked position, with the opening facing toward the hole for the twister dowel.
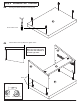
Step 3 3a Estimated Time: 10 Minutes 3b Insert wooden dowels into the left (N5) and right sides (N6) where shown Screw green twister dowels into the left (N5) and right sides (N6) where shown N6 2c N5 Green Twister Dowel 2b Wood Dowel 3c Insert LARGE cams into the Bottom Stabilizer (N4). Then, attach the left (N5) and right (N6) sides and lock cams using a flat head screwdriver.
Step 4 4a Estimated Time: 10 Minutes Screw green twister dowels into the top (N3) N3 Green Twister Dowel 4b Attach sides to the top (N3) then, tighten cams.
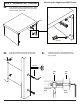
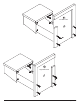
Step 5 5a Attaching the Nightstand Wall Panels Estimated Time: 15 Minutes Insert JRN Nuts into the Nightstand sides. Make sure the hole on the JRN nut is lined up with the hole at the back of the side. Flush JRN Nut 5b Insert the JCB Bolts through the back of each Wall Panel until it connects with the JRN Nut.
N1 Left Wall Panel N2 Right Wall Panel Page of 20
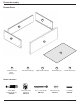
Drawer Assembly Drawer Parts D3 D4 D2 D1 D5 D1 D2 D3 D4 D5 Drawer Front (2) black espresso Left Drawer Side (2) Right Drawer Side (2) Drawer Back (2) Drawer Bottom (2) Drawer Hardware 34mm Black Twister Dowel (8) RM-0500 12mm Zinc Cam (small) (8) RM-0715 #8 - 1½” Screws (8) RM-0504 Euro Screw (16) RM-0074 ¾” Nail (8) RM-0022 Page 10 of 20
Step 6 6a Estimated Time: 5 Minutes per Drawer Insert small cams into drawer sides D3 D2 Insert cams in the unlocked position, with the opening facing toward the hole for the twister dowel.
6c Attach drawer sides to drawer back with 1½” Hi Lo screws D2 D4 D3 6d Attach drawer front and tighten cams #8 - 1½” Hi Lo Screws D1 Left Drawer Side Right Drawer Side Right Drawer Side Left Drawer Side Unlocked Locked Turn 210° Unlocked Locked Turn 210° Page 12 of 20
6e Turn drawer upside down and slide drawer bottom into grooves Grooves D5 D4 6f Secure the drawer bottom to the drawer back with nails D5 Use 4 nails per drawer C D5 Page 13 of 20
6g Attach drawer slides to left and right drawer sides using Euro screws Left Drawer Side 6h Euro Screw Right Drawer Side Attach pull with supplied screws Page 14 of 20
Step 7 Estimated Time: 30 Minutes Determining the Height to Mount your Headboard Hanging the Headboard: 2 people required If you have a Platform Storage Bed: The Wall Space Needed Bottom of the Wall Stabilizer should be a MINIMUM of 36” from the floor Wall Stabilizer All other Bed types: a) Determine the desired height for the TOP of the nightstand b) Add 11½ inches to determine the height for the BOTTOM of the Wall Stabilizer With Headboard & Nightstands Mounted Queen Headboard 100.
7a With a pencil, mark the following on the wall: stud finder a) Height of the BOTTOM of the Wall Stabilizers b) Width of both Wall Stabilizers mounted c) The center point between the Wall Stabilizers d) location of wood studs Center point between Wall Stabilizers The finished assembly will extend 4 inches past the Wall Stabilzers on each side Height to BOTTOM of Wall Stabilzers 16” 7b Line up and position one of the Wall Stabilizers to the left of the center line with the Bottom edge along the hori
7c Line up and position one of the Wall Stabilizers to the left of the center line with the Bottom edge along the horizontal line and attach with the wood screws provided. Position Wall Stabilizer with “notch” facing the wall 16” 7d Repeat Steps 8b & 8c to attach the second Wall Stabilizer.
7e Mounting the Headboard Carefully lower the Headboard onto the Wall Stabilizers until it fits tightly. Make sure the headboard is centered on the two Wall Stabilizers.
7f Mounting the Nightstands Carefully lower the Left & Right nightstands onto the Wall Stabilizer and slide towards the center until they connect with the headboard.
7g Add grommits to each Nightstand Wall Panel (N1) & (N2) Feed cords through the Wire Management opening on each Nightstand Wall Panel.