TR444 OM REV 899 9/16/04 8:29 AM Page 11 IMPORTANT NOTICE ® If any parts are missing or defective, DO NOT return this product. Please call our Customer Service Department for assistance. 800-233-9054 Monday - Friday 8am - 5pm CST Thank You INSTRUCTION MANUAL ® If after reading this instruction booklet you still have questions about using the Breadman® Automatic Bread Machine, please write or call: Salton, Inc. 550 Business Center Drive Mt.
TR444 OM REV 899 9/16/04 8:29 AM Page 10 ONE-YEAR LIMITED WARRANTY . . . . . . . . . . . . . . . . . . . . . . . . . . . . . . . . . . . .8 - 10 This Salton, Inc. product warranty extends to the original consumer purchaser of the product. Warranty Duration: This product is warranted to the original consumer purchaser for a period of one (1) year from the original purchase date. Warranty Coverage: This product is warranted against defective materials or workmanship.
TR444 OM REV 899 9/16/04 NOTES 8:29 AM Page 12 IMPORTANT SAFEGUARDS When using the Breadman® Automatic Bread Baker, basic safety precautions should always be followed, particularly the following: 11. Do not let the cord hang over the edge of a table or counter, or touch hot surfaces. Do not place on an unsteady or cloth-covered surface. 1. READ ALL INSTRUCTIONS BEFORE USE. 12. Do not place the appliance near a hot gas or electric burner, in a heated oven, or in a microwave oven. 2.
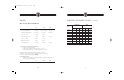
TR444 OM REV 899 9/16/04 8:29 AM Page 1 YOUR BREADMAN® AUTOMATIC BREAD BAKER 4. 5. 1. 8. 7. 2. e hit d Me W 3. nch Fre le ho W heat W e lux De pid Ra e hit W ht Lig & it Fru Nut e hit W rk Da 11. d ea h ug Do Kn e Ris ke lb. Ba 1 m lb. 2.0 er Size Tim af Lo lb. op t St Se 6. ar W 1.5 lect Se t ar St 1. Cover 2. Viewing Window 3. Steam Vent 4. Handle 5. Bread Pan 6. Control Panel 7. Drive Shaft 8. Kneading Paddle 9. Power Supply Cord 10.
TR444 OM REV 899 9/16/04 8:29 AM Page 2 TROUBLE SHOOTING (continued) Symptom Possible Solutions The bread didn’t rise at all Make sure yeast is not left out. Also check the date code on the yeast and that it is always the last ingredient put into the Pan. Make sure the yeast doesn’t come into contact with salt or any liquid ingredients.
TR444 OM REV 899 9/16/04 8:29 AM Page 3 USING THE BREADMAN® AUTOMATIC BREAD BAKER Before using the Breadman® for the first time, carefully read all of the instructions included in this manual. With your new Breadman® : • You can use commonly available pre-packaged bread mixes. Follow the instructions on the package. • You can bake a loaf of bread from scratch. See the Recipe and Menu Planner included with your Breadman® for lots of tasty options.
TR444 OM REV 899 9/16/04 8:29 AM Page 4 TROUBLE SHOOTING USING THE BREADMAN® Symptom Possible Solutions Display Window shows nothing Make sure the machine is plugged in. If nothing appears in the Display Window, unplug and plug in again. START button doesn’t start the machine Can’t set the Timer Make sure the machine is plugged in. If nothing appears in the Display Window, press SELECT to choose your Baking Cycle. (You must select a Baking Cycle before pressing START.
TR444 OM REV 899 9/16/04 8:29 AM Page 5 KNEADING AND BAKING CYCLES DELUXE RAPID BREAD RECIPE The Breadman® Automatic Bread Baker has several Baking Cycles from which you can choose: IMPORTANT Weather conditions such as temperature, altitude or accuracy in measuring can effect the outcome of a loaf. We recommend that you use warm water (115˚F - 120˚F/45˚C - 50˚C) for best results on the Deluxe Rapid Cycle. We also recommend using a Quick Rise or Rapid Rise Yeast.
TR444 OM REV 899 9/16/04 8:29 AM Page 6 RECIPE KNEADING AND BAKING CYCLES Rich Country Buttermilk Bread 1 lb. Non Fat Buttermilk Deluxe Rapid 1-1/2 lbs. 2 lbs. 3/4 cup 1 cup + 2 Tbl. 1-1/2 cups Unbleached Bread Flour 2-1/2 cups 3-1/4 cups 4-1/4 cups Sea Salt 1-1/2 tsp. 2 tsp. Butter or Canola Oil 2 Tbl. 3 Tbl. Honey 3 Tbl. 1/4 cup 1/4 tsp. 1/2 tsp. 1-1/4 tsp. 1-1/2 tsp. 1 tsp. 2 Tbl. Baking Soda1/4 tsp. Active Dry Yeast 1/4 cup 1-3/4 tsp. Dough Baking Phase Knead 1 1.
TR444 OM REV 899 9/16/04 8:29 AM Page 7 HOW TO MAKE BREAD OR DOUGH CLEANING INSTRUCTIONS Always use the freshest ingredients available. By carefully following the simple recipes that come with the Breadman®, you will be able to bake delicious bread every time. The Bread Pan and Kneading Paddle have non-stick surfaces that make cleaning easy. 1. After baking each loaf of bread, unplug the Breadman® and discard any crumbs. STEP 4 STEP 1 Open the Lid and remove the Bread Pan.
TR444 OM REV 899 9/16/04 8:29 AM Page 8 USING THE TIMER For Best Results (continued) • Take care to measure ingredients accurately, using a good set of measuring cups and spoons, or a good scale. Make sure to level all dry ingredients as you measure them. Inaccurate measuring could cause unexpected results in your loaf of bread. • In particular, be precise in measuring the water. • Use fresh ingredients. • Since moisture is an enemy to flour, be sure to store your flour in an airtight container.
TR444 OM REV 899 9/16/04 8:29 AM Page 9 STEP 9 When your bread is done, the Breadman® will beep. This indicates that the Baking phase is completed. Press the STOP Button, then put on your oven mitts and remove the Bread Pan. STEP 10 USING THE TIMER Remove the loaf from the Bread Pan. Turn over the Bread Pan a few inches from the countertop and gently shake out the loaf. It’s best to remove the loaf as soon as the machine is done baking.
TR444 OM REV 899 9/16/04 8:29 AM Page 9 STEP 9 When your bread is done, the Breadman® will beep. This indicates that the Baking phase is completed. Press the STOP Button, then put on your oven mitts and remove the Bread Pan. STEP 10 USING THE TIMER Remove the loaf from the Bread Pan. Turn over the Bread Pan a few inches from the countertop and gently shake out the loaf. It’s best to remove the loaf as soon as the machine is done baking.
TR444 OM REV 899 9/16/04 8:29 AM Page 8 USING THE TIMER For Best Results (continued) • Take care to measure ingredients accurately, using a good set of measuring cups and spoons, or a good scale. Make sure to level all dry ingredients as you measure them. Inaccurate measuring could cause unexpected results in your loaf of bread. • In particular, be precise in measuring the water. • Use fresh ingredients. • Since moisture is an enemy to flour, be sure to store your flour in an airtight container.
TR444 OM REV 899 9/16/04 8:29 AM Page 7 HOW TO MAKE BREAD OR DOUGH CLEANING INSTRUCTIONS Always use the freshest ingredients available. By carefully following the simple recipes that come with the Breadman®, you will be able to bake delicious bread every time. The Bread Pan and Kneading Paddle have non-stick surfaces that make cleaning easy. 1. After baking each loaf of bread, unplug the Breadman® and discard any crumbs. STEP 4 STEP 1 Open the Lid and remove the Bread Pan.
TR444 OM REV 899 9/16/04 8:29 AM Page 6 RECIPE KNEADING AND BAKING CYCLES Rich Country Buttermilk Bread 1 lb. Non Fat Buttermilk Deluxe Rapid 1-1/2 lbs. 2 lbs. 3/4 cup 1 cup + 2 Tbl. 1-1/2 cups Unbleached Bread Flour 2-1/2 cups 3-1/4 cups 4-1/4 cups Sea Salt 1-1/2 tsp. 2 tsp. Butter or Canola Oil 2 Tbl. 3 Tbl. Honey 3 Tbl. 1/4 cup 1/4 tsp. 1/2 tsp. 1-1/4 tsp. 1-1/2 tsp. 1 tsp. 2 Tbl. Baking Soda1/4 tsp. Active Dry Yeast 1/4 cup 1-3/4 tsp. Dough Baking Phase Knead 1 1.
TR444 OM REV 899 9/16/04 8:29 AM Page 5 KNEADING AND BAKING CYCLES DELUXE RAPID BREAD RECIPE The Breadman® Automatic Bread Baker has several Baking Cycles from which you can choose: IMPORTANT Weather conditions such as temperature, altitude or accuracy in measuring can effect the outcome of a loaf. We recommend that you use warm water (115˚F - 120˚F/45˚C - 50˚C) for best results on the Deluxe Rapid Cycle. We also recommend using a Quick Rise or Rapid Rise Yeast.
TR444 OM REV 899 9/16/04 8:29 AM Page 4 TROUBLE SHOOTING USING THE BREADMAN® Symptom Possible Solutions Display Window shows nothing Make sure the machine is plugged in. If nothing appears in the Display Window, unplug and plug in again. START button doesn’t start the machine Can’t set the Timer Make sure the machine is plugged in. If nothing appears in the Display Window, press SELECT to choose your Baking Cycle. (You must select a Baking Cycle before pressing START.
TR444 OM REV 899 9/16/04 8:29 AM Page 3 USING THE BREADMAN® AUTOMATIC BREAD BAKER Before using the Breadman® for the first time, carefully read all of the instructions included in this manual. With your new Breadman® : • You can use commonly available pre-packaged bread mixes. Follow the instructions on the package. • You can bake a loaf of bread from scratch. See the Recipe and Menu Planner included with your Breadman® for lots of tasty options.
TR444 OM REV 899 9/16/04 8:29 AM Page 2 TROUBLE SHOOTING (continued) Symptom Possible Solutions The bread didn’t rise at all Make sure yeast is not left out. Also check the date code on the yeast and that it is always the last ingredient put into the Pan. Make sure the yeast doesn’t come into contact with salt or any liquid ingredients.
TR444 OM REV 899 9/16/04 8:29 AM Page 1 YOUR BREADMAN® AUTOMATIC BREAD BAKER 4. 5. 1. 8. 7. 2. e hit d Me W 3. nch Fre le ho W heat W e lux De pid Ra e hit W ht Lig & it Fru Nut e hit W rk Da 11. d ea h ug Do Kn e Ris ke lb. Ba 1 m lb. 2.0 er Size Tim af Lo lb. op t St Se 6. ar W 1.5 lect Se t ar St 1. Cover 2. Viewing Window 3. Steam Vent 4. Handle 5. Bread Pan 6. Control Panel 7. Drive Shaft 8. Kneading Paddle 9. Power Supply Cord 10.
TR444 OM REV 899 9/16/04 NOTES 8:29 AM Page 12 IMPORTANT SAFEGUARDS When using the Breadman® Automatic Bread Baker, basic safety precautions should always be followed, particularly the following: 11. Do not let the cord hang over the edge of a table or counter, or touch hot surfaces. Do not place on an unsteady or cloth-covered surface. 1. READ ALL INSTRUCTIONS BEFORE USE. 12. Do not place the appliance near a hot gas or electric burner, in a heated oven, or in a microwave oven. 2.
TR444 OM REV 899 9/16/04 8:29 AM Page 10 ONE-YEAR LIMITED WARRANTY . . . . . . . . . . . . . . . . . . . . . . . . . . . . . . . . . . . .8 - 10 This Salton, Inc. product warranty extends to the original consumer purchaser of the product. Warranty Duration: This product is warranted to the original consumer purchaser for a period of one (1) year from the original purchase date. Warranty Coverage: This product is warranted against defective materials or workmanship.
TR444 OM REV 899 9/16/04 8:29 AM Page 11 IMPORTANT NOTICE ® If any parts are missing or defective, DO NOT return this product. Please call our Customer Service Department for assistance. 800-233-9054 Monday - Friday 8am - 5pm CST Thank You INSTRUCTION MANUAL ® If after reading this instruction booklet you still have questions about using the Breadman® Automatic Bread Machine, please write or call: Salton, Inc. 550 Business Center Drive Mt.