DE GB FR ES BRESSER Researcher Trino Durchlicht-Mikroskop BRESSER Researcher Trino Transmission-type Microscope Bedienungsanleitung Instruction Manual Mode d’emploi Instrucciones de uso BRESSER Researcher Trino Microscope en lumière transmise Art.-No.
WARNUNG! Für die Arbeit mit diesem Gerät werden häufig scharfkantige und spitze Hilfsmittel eingesetzt. Bewahren Sie deshalb dieses Gerät sowie alle Zubehörteile und Hilfsmittel an einem für Kinder unzugänglichen Ort auf. Lassen Sie Kinder nur unter Aufsicht mit dem Gerät arbeiten! Verpackungsmaterial (Plastiktüten, Gummibänder, etc.) von Kindern fernhalten! Caution! To work with this microscope, sharp and pointed aids are being used.
Fig.
Allgemeine Informationen Zu dieser Anleitung Lesen Sie bitte aufmerksam die Sicherheitshinweise in dieser Anleitung. Verwenden Sie dieses Produkt nur wie in der Anleitung beschrieben, um Schäden am Gerät oder Verletzungen zu vermeiden. Bewahren Sie die Bedienungsanleitung auf, damit Sie sich jederzeit über alle Bedienungsfunktionen neu informieren können.
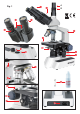
Alle Teile (Fig. 1) Bild erhalten. Merken Sie sich die auf der Skala angezeigte Einstellung für spätere Beobachtungen.
8. Auswechseln der Sicherung (Fig. 2) B Fig. 2 Zur elektrischen Sicherheit ist das Mikroskop mit einer Sicherung ausgestattet. Falls diese einmal durchgebrannt sein sollte können Sie diese wie folgt auswechseln: Ziehen Sie den Netzstecker heraus und legen Sie das Mikroskop vorsichtig auf die Seite. Lösen Sie die Schraube „FUSE“ (1) vorsichtig heraus. Nehmen Sie hierzu am besten einen kleinen Schraubendreher. Wenn Sie die Schraube lösen, drücken Sie diese etwas ins Gehäuse hinein.
10. Technische Daten Garantie Trinokularer Einblick Mikroskoptisch (mit Nonius-Einstellung) Okulare: DIN WF 10x Objektive: DIN 4x / 10x / 40x / 100x Vergrößerung: 40x -1000x Beleuchtung: LED Zubehör: Immersionsöl, Sicherung Die Garantiezeit beträgt 2 Jahre und beginnt am Tag des Kaufs. Bitte bewahren Sie den Kassenbon als Nachweis für den Kauf auf. Während der Garantiezeit werden defekte Geräte von Ihrem Fachhändler vor Ort angenommen und ggf. eingeschickt.
General Information About this Instruction Manual Please read the safety instructions in this manual carefully. To avoid damage to the unit and the risk of injury, only use this product as described in the manual. Keep the instruction manual handy so that you can easily look up information on all the functions. CAREFUL! Children must not have access to the included chemicals and liquids. Do not drink the chemicals. Wash hands thoroughly with running water after use.
All parts (Fig. 1) Begin with a simple observation. Turn the nosepiece (6) onto the smallest magnification and insert the 10x eyepieces. Now, place a prepared slide under the objective on the microscope table (7). Move the preparation on the table with the two adjusting screws (8 and 9). Now, look through the eyepieces (1) and turn the coarse adjustment (12) carefully until the image becomes visible. The definition is applied by the fine adjustment (13).
9. Oil immersion 10. Technical data: Directions for observation with oil immersion. Put a drop of immersion oil (16) onto the upper lens of condenser and raise the condenser by using the height adjustment (11) until the oil touches the slide from below. Centre your object, with middle magnification, and with the light illumination on. Move the nosepiece with the coarse focusing wheel up high and screw in the 100x objective. Take a drop of immersion oil and place it on the preparation.
Declaration of Conformity Warranty Product Type: Product Name: Article No.: The period of warranty is 2 years, beginning on the day of purchase. Please keep the cash receipt as evidence of purchase. Microscopes which become defective during the warranty period can be returned to the dealer where the microscope was bought. The repaired microscopes or a new pair will then be returned to you, free of charge.
Informations générales A propos de ce manuel Veuillez lire attentivement les consignes de sécurité présentées dans ce manuel. N’utilisez ce produit comme décrit dans ce manuel, afin d’éviter tout risque de blessure ou de dommage sur l’appareil.Conservez le manuel d’utilisation afin de pouvoir revoir à tout moment les informations concernant certaines fonctionnalités.
Nomenclature (Fig.1) 5.
sur l’écran en ajustant la hauteur de la contre-bague (B) sur l’extension tube. Tournez le tube d’extension pour ajuster la mise au point du MicrOkular. Resserrez une fois l’image nette obtenue. Utilisation avec un appareil photo reflex: Il vous faut un adaptateur photo et d’une bague T2 spécifique à chaque marque et modèle de boitier. Après avoir relié l’adaptateur et sa bague T2 à votre appareil, l’ensemble est inséré dans le tube d’extension (A).
Déclaration de conformité Garantie Type de produit : Désignation : Référence : La période de garantie est de 2 ans et débute le jour de l’achat. Veuillez conserver le ticket de caisse comme preuve de l‘achat. Pendant la période de garantie, les appareils défectueux sont acceptés sur place par votre vendeur spécialisé et seront éventuellement envoyés. Vous obtenez en échange et gratuitement un appareil nouveau ou réparé.
Informaciones de carácter general Sobre este manual Lea atentamente las indicaciones de seguridad recogidas en este manual. Emplee este producto exclusivamente de la forma descrita en el manual, con el fin de evitar daños en el aparato o lesiones. Conserve el manual de instrucciones para poder volver a informarse en todo momento sobre las funciones de manejo.
Componentes • C uanto mayor sea el número de aumentos, mayor será la intensidad de luz necesaria para poder obtener una buena calidad de imagen. • Se recomienda que las observaciones con el objetivo de 100x se hagan en aceite de inmersión.
Para realizarlo, primero enfoque el objeto en el ocular. A continuación, observe la imagen proyectada por el microocular en la pantalla. Desenrosque el anillo de sujeción del tubo de extensión (B), y gírelo hasta ajustar el enfoque del microocular. Una vez enfocado, vuelva a apretarlo. Para un enfoque óptimo, utilice los objetivos de 10x o 40x. Cuando utilice una cámara reflex hágalo con un adaptador de fotografía y un anillo específico de cámaras T2.
Declaración de conformidad Garantía Tipo de producto: Denominación del producto: N.º de artículo: El período de garantía es de 2 años y comienza el día de adquisición del producto. Así pues, deberá guardar el ticket de compra como justificante. Durante este período de garantía su proveedor recogerá in situ el equipo defectuoso y, en su caso, lo enviará al servicio de reparación. A continuación, usted recibirá un equipo nuevo o reparado de forma totalmente gratuita.
ANL5723100MSP0611BRESSER Meade Instruments Europe GmbH & Co. KG Gutenbergstr. 2 · DE-46414 Rhede · Germany Tel. +49 (0) 28 72 - 80 74-210 Fax +49 (0) 28 72 - 80 74-222 www.bresser.de · service@bresser.de Irrtümer und technische Änderungen vorbehalten. Errors and technical changes reserved. Sous réserve d’erreurs et de modifications techniques. Queda reservada la posibilidad de incluir modificaciones o de que el texto contenga errores.