GRILL THERMOMETER BT4 art. no.
DE GB FR IT ES RU Bedienungsanleitung................................. 4 INSTRUCTION mANUAL................................. 13 Mode d’emploi........................................... 21 Istruzioni per l’uso..................................29 Instrucciones de uso...............................38 Руководство по эксплуатации.............. 47 GARANTIE & SERVICE / WARRANTY & SERVICE Garantie et Service / Garantía y servicio Garanzia e assistenza...............................
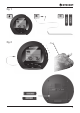
Fig. 1 A B C Fig.
Zu dieser Anleitung Diese Bedienungsanleitung ist als Teil des Gerätes zu betrachten. Lesen Sie vor der Benutzung des Geräts aufmerksam die Sicherheitshinweise und die Bedienungsanleitung. Bewahren Sie diese Bedienungsanleitung für die erneute Verwendung zu einem späteren Zeitpunkt auf. Bei Verkauf oder Weitergabe des Gerätes ist die Bedienungsanleitung an jeden nachfolgenden Besitzer/Benutzer des Produkts weiterzugeben. Dieses Produkt dient ausschließlich der privaten Nutzung.
BRAND-/EXPLOSIONSGEFAHR! Setzen Sie das Gerät keinen hohen Temperaturen aus. Benutzen Sie nur die empfohlenen Batterien. Gerät und Batterien nicht kurzschließen oder ins Feuer werfen! Durch übermäßige Hitze und unsachgemäße Handhabung können Kurzschlüsse, Brände und sogar Explosionen ausgelöst werden! HINWEIS! Bauen Sie das Gerät nicht auseinander! Wenden Sie sich im Falle eines Defekts an Ihren Fachhändler. Er nimmt mit dem Service-Center Kontakt auf und kann das Gerät ggf. zwecks Reparatur einschicken.
den App Store oder Google play herunter und starten Sie Ihr Kochexperiment. Das BRESSER Grill Thermometer BT4 kann auch eigenständig ohne App verwendet werden. 1. Batterien Öffnen Sie das Batteriefach und entfernen Sie den kleinen Plastikstreifen zwischen den Batterien. HINWEIS: Ein längerer Piepton des Grillthermometers zeigt an, dass die Batterien korrekt eingelegt wurden. Das Gerät ist betriebsbereit. 2.
4. Grillthermometer mit der App verbinden Halten Sie die SYNC-Taste (Rückseite des Thermometers, Fig. 2) für etwa 2 Sekunden gedrückt, um die Smartphone-Suche zu starten. Drücken Sie CONNECT in der App, um beide Geräte zu verbinden. Wurden App und Gerät korrekt verbunden, erscheint das gelbe BBiQ-Icon in der linken oberen Ecke der App. DE GB FR IT ES Garantie / Warranty RU 5.
Veal / Beef (Kalb / Rind) Chicken (Huhn) Pork (Schwein) Lamb (Lamm) W.DONE MEDIUM M.RARE RARE BEEF 76 71 63 60 VEAL 76 71 71 N/A PORK 76 71 N/A N/A CHICKEN 82 N/A N/A N/A LAMB 76 71 63 N/A Halten Sie die SET-Taste am Thermometer für etwa 3 Sekunden gedrückt bis das Fleisch-Symbol blinkt. Wählen Sie eine der 5 Fleischsorten durch drücken der + oder - Taste und drücken Sie die SET-Taste, um Ihre Wahl zu bestätigen.
HINWEIS: Stecken Sie den Temperaturfühler immer in die dickste Stelle des zu garenden Fleisches. Stellen Sie sicher, dass das Kabel des Fühlers nur dort entlang geführt wird, wo es keinen Flammen oder Temperaturen über 380˚ C (716˚ F) ausgesetzt ist. HINWEIS: Um die Lebensdauer der Batterien zu erhöhen, entfernen Sie stets den Temperaturfühler nach jeder Benutzung vom Thermometer. So wird das Gerät ausgeschaltet. 6.
7. Timer (Eieruhr) Wir haben der App eine einfache Timer-Funktion (Eieruhr) hinzugefügt. Stellen Sie die Alarmzeit ein. Drücken Sie START TIMER. Der Timer startet den Countdown und löst einen ein Alarmsignal aus, wenn die Alarmzeit abgelaufen ist. 8. Technische Daten Stromversorgung: 2 Typ LR03 (AAA) 1.5V Batterien Temperatur-Messbereich: 0° C bis +240° C Maximale Hitzebeständigkeit des Kabels: 380° C 30 Meter kabellose Verbindung im offenen Gelände.
schwache oder verbrauchte Batterien immer durch einen komplett neuen Satz Batterien mit voller Kapazität. Verwenden Sie keine Batterien unterschiedlicher Marken, Typen oder unterschiedlich hoher Kapazität. Entfernen Sie Batterien aus dem Gerät, wenn es längere Zeit nicht benutzt wird! DE GB FR IT Entsorgen Sie die Verpackungsmaterialien sortenrein. Informationen zur ordnungsgemäßen Entsorgung erhalten Sie beim kommunalen Entsorgungsdienstleister oder Umweltamt.
EG-Konformitätserklärung Hiermit erklärt die Bresser GmbH, dass sich dieses Gerät (Grill Thermometer BT4 / Art.Nr.: 70-50110) in Übereinstimmung mit den grundlegenden Anforderungen und den anderen relevanten Vorschriften der Richtlinie 1999/5/EG befindet.
About this Instruction Manual These operating instructions are to be considered a component of the device. Please read the safety instructions and the operating instructions carefully before use. Keep these instructions for renewed use at a later date. When the device is sold or given to someone else, the instruction manual must be provided to the new owner/user of the product. DE GB FR IT ES RU This product is intended only for private use.
the event of contact, rinse the affected region immediately with a plenty of water and seek medical attention. RISK OF FIRE/EXPLOSION! Do not expose the device to high temperatures. Use only the recommended batteries. Do not short-circuit the device or batteries, or throw them into a fire. Excessive heat or improper handling could trigger a short-circuit, a fire or an explosion. NOTE! Do not disassemble the device. In the event of a defect, please contact your dealer.
Simply download the free BRESSER BBiQ app from App Store or Google play to start your cooking experience. The BRESSER Grill Thermometer BT4 also works as stand alone cooking thermometer. DE GB FR IT ES Open the battery compartment and remove the small plastic strip from the batteries. NOTE: A long beep from the grill thermometer will indicate that the batteries are correctly inserted. The device is now ready for use. 2.
4. Connect the Grill Thermometer to the App Hold down the SYNC button for 2 sec. (flat side of the device / Fig. 2) to start searching for phone. Press CONNECT on the BBiQ App to pair the units. If the units are paired correctly the yellow BBiQ Icon will show in the left top corner. 5. Start using the Grill Thermometer We have programmed different cooking temperatures for well-known meats. So it is easy for you to start cooking immediately.
Veal / Beef Chicken Pork Lamb DE GB FR IT MEDIUM M.RARE RARE 76 71 63 60 W.DONE MEDIUM M.RARE RARE VEAL 76 71 71 N/A PORK 76 71 N/A N/A CHICKEN 82 N/A N/A N/A LAMB 76 71 63 N/A BEEF ES RU Hold down the SET Button for 3 sec, until you see the Meat Icon flashing. Choose one of the 5 meat types by using the +/- buttons and press the SET button to confirm. Choose how you want the meat cooked - Well done, Medium, Medium rare or Rare by using the +/- buttons.
When the desired temperature is reached the alarm will start. To stop the alarm press the DISCONNECT button or remove the probe from the Grill thermometer device. NOTE: Remember to insert the probe into the thickest part of the meat. Be sure to route the probe wire where it will not be directly exposed to flames or temperatures exceeding 380 ˚C (716 ˚F). NOTE: To increase battery life time, always remove the temperature probe from the thermometer after use. This will turn off the device. 6.
to count down and sound an alarm / notification when the time is up. DE GB 8. Technical data FR Power supply: 2 Type LR03 (AAA) 1.5V Batteries IT Temperature measuring range: 0 °C to +240 °C Maximum heat resistance for the wire: 380 °C ES 30 meter wireless transmission range in open area. RU 9. Cleaning and Maintenance Before cleaning the device, disconnect it from the power supply (remove batteries)! Only use a dry cloth to clean the exterior of the device.
local waste-disposal service or environmental authority for information on the proper disposal. Do not dispose of electronic devices in the household garbage! As per Directive 2002/96/EC of the European Parliament on waste electrical and electronic equipment and its adaptation into German law, used electronic devices must be collected separately and recycled in an environmentally friendly manner.
A propos de ce manuel Le présent mode d‘emploi doit être considéré comme faisant partie intégrante de l’appareil. Avant d’utiliser l’appareil, veuillez lire attentivement les consignes de sécurité et le mode d’emploi. Conservez celui-ci afin de pouvoir le réutiliser ultérieurement le cas échéant. En cas de revente ou de cession de l’appareil, le mode d’emploi doit être remis à tout propriétaire ou utilisateur suivant du produit.
des blessures par brûlure due à l’acidité du produit ! Evitez tout contact de l’électrolyte avec la peau, les yeux et les muqueuses. En cas de contact avec l‘acide, rincez abondamment et immédiatement les parties du corps concernées en utilisant de l’eau claire et consultez un médecin dans les meilleurs délais. RISQUE D’EXPLOSION / D’INCENDIE ! Ne pas exposer l’appareil à des températures trop élevées. N’utilisez que les batteries conseillées.
Premières étapes DE GB FR IT Il vous suffit de télécharger l’appli gratuite BRESSER BBiQ à partir de l’App Store ou de Google play pour commencer votre expérience culinaire. Le BRESSER Grill Thermometer BT4 peut également être utilisé seul, sans appli. ES 1. Piles Garantie / Warranty Le BRESSER Grill Thermometer BT4 est un nouveau thermomètre pour BBQ sans fil pour votre smartphone.
4. Reliez le thermomètre de BBQ à l’appli. Appuyez pendant environ 2 sec sur la touche SYNC (arrière du thermomètre / graph. 2) afin de démarrer la recherche smartphone. Appuyez sur CONNECT dans l’appli afin de connecter les deux. Une fois l’appli et l’appareil correctement connectés, apparait en haut à gauche sur l’appli.
5. Utilisation du thermomètre de BBQ Nous avons programmé divers niveaux de cuisson pour les sortes de viande les plus courantes afin que vous puissiez commencer à faire la cuisine de façon simple et rapide. Vous pouvez faire votre choix parmi les sortes de viande suivantes et régler manuellement le niveau/la température de cuisson. Chicken (Poulet) Pork (Porc) W.DONE MEDIUM M.
La température cible préréglée clignote à présent. Il vous est possible de la modifier manuellement ou bien de la confirmer tout simplement en appuyant sur la touche SET. Vous pouvez maintenant insérer le capteur de température dans la viande et commencer à la préparer. Une fois la température souhaitée atteinte, un signal d’alarme retentit. Pour arrêter cette alarme, appuyez sur DISCONNECT dans l’appli ou bien retirez le capteur de température du thermomètre.
7. Minuteur Nous avons ajouté à l’appli une simple fonction de minuterie (Minuteur). DE GB Réglez l’heure d’alarme. Appuyez sur START TIMER. Le minuteur commence le compte à rebours et déclenche un signal d’alarme une fois le temps écoulé. FR 8. Données techniques RU IT ES Alimentation électrique : 2 piles de type LR03 (AAA) de 1,5 V Liaison sans fil sur 30 mètres en terrain dégagé.
CE sur les appareils électriques et électroniques et ses transpositions aux plans nationaux, les appareils électriques usés doivent être collectés séparément et être recyclés dans le respect des réglementations en vigueur en matière de protection de l’environnement. En conformité avec les règlements concernant les piles et les piles rechargeables, jeter ces produits avec les déchets ménagers normaux est strictement interdit.
Informazioni sul presente manuale Questo manuale d’uso va considerato parte integrante dell’apparecchio. Prima di usare l’apparecchio, leggere con attenzione le indicazioni di sicurezza e il manuale d’uso. Conservare il manuale d’uso per poterlo utilizzare di nuovo in un secondo momento. Se si vende o si cede l’apparecchio, consegnare il manuale d’uso ad ogni successivo possessore/ utilizzatore del prodotto.
inserire le batterie rispettare la polarità indicata. Le batterie scariche o danneggiate possono causare irritazioni se vengono a contatto con la pelle. Se necessario indossare un paio di guanti di protezione adatto. PERICOLO DI INCENDIO/ESPLOSIONE! Non esporre l’apparecchio a temperature elevate. Utilizzare esclusivamente le batterie consigliate.
smartphone. Con l'ausilio del chip Bluetooth a bassa energia integrato, il Suo smartphone si trasformerà in un vero e proprio assistente in cucina wireless. È sufficiente scaricare l'app gratuita BRESSER BBiQ dall'App Store o da Google Play e iniziare gli esperimenti in cucina. Il BRESSER Grill Thermometer BT4 è utilizzabile anche da solo, senza app. DE GB FR IT ES RU Aprire il vano batterie ed estrarre la piccola striscia di plastica tra le batterie.
4. Collegamento del termometro per grill con l'app Tenere premuto il tasto SYNC (sul retro del termometro / Fig. 2) per circa 2 secondi per avviare la ricerca dello smartphone. Premere CONNECT nell'app per collegare i due elementi. Se il collegamento tra l'app e il dispositivo è stato eseguito correttamente, nell'angolo in alto a sinistra dell'app appare .
5. Utilizzo del termometro per grill Abbiamo programmato diversi livelli di cottura per i tipi di carne più comuni in modo da consentirle di iniziare a cucinare in modo facile e veloce. È possibile scegliere tra i seguenti tipi di carne o impostare manualmente il livello/la temperatura di cottura: DE GB FR IT Veal / Beef (Vitello / Manzo) Chicken (Pollo) Pork (Maiale) Lamb (Agnello) ES BEEF VEAL W.DONE MEDIUM M.RARE RARE 76 71 63 60 W.DONE MEDIUM M.
Ora la temperatura preimpostata lampeggia. La si può cambiare manualmente o semplicemente confermare premendo il tasto SET. A questo punto è possibile inserire la termosonda nella carne e iniziare la cottura. Una volta raggiunta la temperatura desiderata, si attiva un segnale acustico. Per bloccare l'allarme, premere DISCONNECT nell'app o estrarre la termosonda dal termometro. NOTA: inserire la termosonda sempre nel punto più spesso della carne da cuocere.
7. Timer DE Abbiamo aggiunto all'app una semplice funzione timer. Impostare l'orario di allarme. Premere START TIMER. Il timer inizia il conto alla rovescia e attiva ein un segnale di allarme allo scadere del tempo impostato. GB FR IT ES 8. Dati tecnici RU Alimentazione: 2 batterie LR03 (AAA) da 1,5V Collegamento wireless a 30 metri in ambienti aperti. Requisiti di sistema Smartphone o PC tablet con Apple iOS (versione 7 o superiore) o Android (versione 4.2.2 o superiore) e Bluetooth 4.
batterie scariche o usate sempre con una serie di batterie nuove completamente cariche. Non utilizzare batterie di marche, tipi o livelli di carica diversi. Togliere le batterie dall’apparecchio nel caso non venga utilizzato per un periodo prolungato! 10. Smaltimento Smaltire i materiali di imballaggio in maniera differenziata. Le informazioni su uno smaltimento conforme sono disponibili presso il servizio di smaltimento comunale o l’Agenzia per l’ambiente locale.
Dichiarazione di conformità CE Per la presente Bresser GmbH, afferma che questa unità (Grill Thermometer BT4 / Art.No.: 70-50110), è coerente e conforme ai requisiti essenziali ed alle altre disposizioni pertinenti della direttiva 1999/5/EG.
Sobre este manual El presente manual de instrucciones se debe considerar parte integrante del aparato. Antes de utilizar el aparato, lea detenidamente las indicaciones de seguridad y el manual de instrucciones. Guarde el presente manual de instrucciones por si necesita volver a utilizarlo más tarde. En caso de venta o entrega a terceros del aparato, se debe entregar el manual de instrucciones al siguiente propietario/usuario del producto. Este producto sirve exclusivamente para el uso privado.
¡PELIGRO DE INCENDIO/EXPLOSIÓN! No exponga el aparato a altas temperaturas. Utilice exclusivamente las pilas recomendadas. ¡No cortocircuitar ni arrojar al fuego el aparato o las pilas! El calor excesivo y el manejo inadecuado pueden provocar cortocircuitos, incendios e incluso explosiones. ¡NOTA! No desmonte el aparato. En caso de que exista algún defecto, le rogamos que se ponga en contacto con su distribuidor autorizado.
smartphone. Su smartphone será su asistente personal en la cocina gracias al uso del chip Bluetooth de bajo consumo de energía. Descargue el App gratuito BRESSER BBiQ de la APP STORE o de GOOGLE PLAY y empiece sus experimentos culinarios. El termómetro para la carne BRESSER BT4 puede usarse también sin la necesidad de bajarse un app. 1. Pilas Abra la tapa del compartimento de las pilas y extraiga las tiras de plástico posicionadas entre las pilas.
DE GB FR IT ES 4. Conectar el termómetro para la carne con el App RU Pulse CONNECT en el App para conectar los dos dispositivos. Si el App y el dispositivo se han conectado en la exitosamente, aparecerá el icono amarillo de BBiQ esquina superior de la parte izquierda de su App. 41 Garantie / Warranty Mantenga presionado el botón SYNC (en la parte trasera del termómetro / Fig. 2) durante 2 segundos aproximadamente para iniciar la búsqueda del smartphone.
5. Uso del termómetro para la carne Hemos programado distintos niveles de cocción para los tipos de carne más habituales para que pueda empezar fácil y rápidamente a cocinar. Puede escoger entre los siguientes tipos de carne o programar el nivel de temperatura y de cocción manualmente: Veal / Beef (Ternera/ vacuno) Chicken (Pollo) Pork (Cerdo) Lamb (Cordero) W.DONE MEDIUM M.
Ahora puede introducir el sensor de temperatura en la carne y empezar a cocinar. Cuando la carne alcanza la temperatura deseada, el sensor emite una señal de alarma. Para parar la alarma, pulse DISCONNECT en el App o extraiga el sensor de temperatura del termómetro. ADVERTENCIA: introduzca el sensor de temperatura siempre en la pieza de carne más gruesa. Asegúrese de que el cable del sensor no se encuentra cerca de lugares con llamas o expuesto a temperaturas más altas de 380˚ C (716˚ F).
7. Temporizador Hemos programado para el App una sencilla función de temporizador (timer). Configurar la alarma. Pulse el botón START TIMER. El temporizador inicia la cuenta atrás y emite una señal de alarma una vez transcurrido el tiempo programado. 8. Datos técnicos Alimentación de corriente: 2 pilas tipo LR03 (AAA) 1.5V Rango de medición de la temperatura: 0° C hasta +240° C Resistencia al calor máxima del cable: 380° C Conexión sin cables de 30 metros en campo abierto.
siempre las pilas agotadas o muy usadas por un juego completo de pilas nuevas con plena capacidad. No utilice pilas de marcas o modelos distintos ni de distinto nivel de capacidad. ¡Hay que retirar las pilas del aparato si no se va a usar durante un periodo prolongado! DE GB FR IT Elimine los materiales de embalaje separados por tipos. Obtendrá información sobre la eliminación reglamentaria en los proveedores de servicios de eliminación municipales o en la agencia de protección medioambiental.
Declaración de conformidad de la Unión Europea (CE) Por la presente Bresser GmbH, declara que esta unidad (Grill Thermometer BT4 / Art.No.: 70-50110), se encuentra acorde y de conformidad con los requisitos esenciales y otras disposiciones pertinentes de la Directiva 1999/5/EG.
Данное руководство по эксплуатации является частью устройства. Перед использованием устройства внимательно прочитайте инструкции по технике безопасности и руководство по эксплуатации. Сохраните руководство по эксплуатации для последующего использования. При продаже или передаче устройства руководство по эксплуатации необходимо передать следующему владельцу (пользователю). Данное устройство предназначено исключительно для личного использования.
стать причиной ожога! Не допускайте попадания кислоты из аккумуляторных батарей на кожу, в глаза и слизистые оболочки. В случае попадания кислоты немедленно промойте пораженные места большим количеством чистой воды и обратитесь к врачу. ОПАСНОСТЬ ПОЖАРА / ВЗРЫВА Не допускайте нагревания устройства до высокой температуры. Используйте только рекомендованные батарейки.
Термометр BRESSER Grill Thermometer BT4 — это новый беспроводной кулинарный термометр для смартфона. Встроенный чип Bluetooth с малым потреблением энергии преобразует ваш смартфон в настоящее беспроводное устройство для шеф-повара. Просто скачайте бесплатное приложение BRESSER BBiQ в App Store или Google play — и можно приступать к приготовлению пищи. Термометр BRESSER Grill Thermometer BT4 также работает как автономный кулинарный термометр. 1.
4. Подключение термометра к приложению Нажмите и 2 секунды удерживайте кнопку SYNC (на плоской стороне устройства / Fig. 2), чтобы начать поиск телефона. Нажмите CONNECT в приложении BBiQ App, чтобы соединить оба устройства. Если они соединились правильно, в левом верхнем углу появится желтый значок BBiQ .
5. Использование термометра Мы запрограммировали разные температуры приготовления для основных видов мяса. Поэтому вы с легкостью можете приступить к стряпне. Можно выбрать один из перечисленных видов мяса или установить нужную температуру вручную: Chicken (Курица) Pork (Свинина) W.DONE MEDIUM M.
Индикатор температуры начнет мигать. Нажмите кнопку SET для подтверждения выбора или измените температуру на нужную вам вручную. Теперь можно вставить температурный датчик в мясо и начать готовить. Когда мясо нагреется до нужной температуры, прозвучит сигнал. Чтобы выключить сигнал, нажмите кнопку DISCONNECT или выньте датчик из термометра. ПРИМЕЧАНИЕ: Помните, что датчик нужно ставить в самую толстую часть куска мяса.
7. Таймер DE В приложении есть функция простого таймера. GB Установите время сигнала. Нажмите START TIMER. Таймер начнет отсчет, по истечении времени прозвучит сигнал. FR 8. Технические характеристики ES Питание: 2 батарейки LR03 (AAA) 1,5 В RU IT Дальность действия беспроводного сигнала: 30 м (без препятствий). Требования к системе Смартфон или планшет с Apple iOS (версия 7 или выше) или Android (версия 4.2.2 или выше) и Bluetooth 4.0 Smart Ready 9.
Заменяйте весь комплект разряженных или использованных батареек целиком. Не устанавливайте батарейки разных марок, типов или емкостей. Если устройство не будет использоваться в течение длительного времени, выньте из него батарейки! 10. УТИЛИЗАЦИЯ Утилизируйте упаковку как предписано законом. При необходимости проконсультируйтесь с местными властями. Не выбрасывайте электронные детали в обычный мусорный контейнер.
Сертификат соответствия ЕС Фирма Bresser GmbH подтверждает соответствие устройства (Grill Thermometer BT4 / Art.No.: 7050110) требованиям директивы 1999/5/EG.
DE GARANTIE & SERVICE Die reguläre Garantiezeit beträgt 2 Jahre und beginnt am Tag des Kaufs. Um von einer verlängerten, freiwilligen Garantiezeit wie auf dem Geschenkkarton angegeben zu profitieren, ist eine Registrierung auf unserer Website erforderlich. Die vollständigen Garantiebedingungen sowie Informationen zu Garantiezeitverlängerung und Serviceleistungen können Sie unter www.bresser.de/garantiebedingungen einsehen.
FR Garantie et Service **Numéro d’appel local en Allemagne (le montant des frais par appel téléphonique dépend du tarif de votre opérateur téléphonique) ; les appels depuis l’étranger entrainent des coûts plus élevés. NL Garantie & Service De reguliere garantieperiode bedraagt 2 jaar en begint op de dag van aankoop. Om gebruik te maken van een verlengde vrijwillige garantieperiode zoals aangegeven op de geschenkverpakking is aangegeven dient het product op onze website geregistreerd te worden.
ES Garantía y servicio El período regular de garantía es dos anos iniciándose en el día de la compra. Para beneficiarse de un período de garantía más largo y voluntario tal y como se indica en la caja de regalo es necesario registrarse en nuestra página web. Las condiciones de garantía completas así como informaciones relativas a la ampliación de la garantía y los servicios pueden encontrarse en www.bresser.de/warranty_terms.
На сайте BRESSER размещены дополнительные материалы о данном продукте (руководство по эксплуатации, технические характеристики и пр.), которые можно просмотреть, пройдя по указанной ссылке или считав данный QR-код при помощи любого мобильного устройства. Garantie / Warranty www.bresser.
www.bresser.de/start/bresser Bresser GmbH Gutenbergstr. 2 · DE-46414 Rhede Germany www.bresser.de · service@bresser.de Irrtümer und technische Änderungen vorbehalten. · Errors and technical changes reserved. · Sous réserve d’erreurs et de modifications techniques. · Vergissingen en technische veranderingen voorbehouden. · Con riserva di errori e modifiche tecniche. · Queda reservada la posibilidad de incluir modificaciones o de que el texto contenga errores.