
User Manual


12
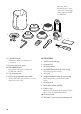
FIRST USE
Initial Start Up
• Ensure the water filter is securely fitted inside
the water tank.
• Fill the water tank with cold, preferably
filtered water up to the MAX mark.
When replacing the water tank, ensure to
push down completely to lock into place.
NOTE
Always check the water level before use and
replace water daily. We recommend using
cold, filtered water. We do not recommend the
use of de-mineralized or distilled water or any
other liquid as this may affect the taste of the
espresso and how the machine is designed to
function.
• Ensure the hopper is locked into position.
• Plug the power cord into a 110/120V
power outlet.
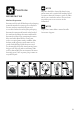
• Press the POWER button to switch the
machine on. The POWER button light will
flash while the machine is heating.
NOTE
If the hopper is not correctly locked into
position, the FILTER SIZE LED’s will flash.
• A pumping sound will be heard.
This is normal.
• When the machine has reached the correct
operating temperature, the POWER button
light will stop flashing and all button lights
on the control panel will illuminate. The
machine is now in STANDBY mode, ready
for the next step ‘Flushing The Machine’.
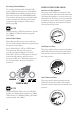
Flushing the Machine
It is recommended to complete a water
flushing operation, without ground coffee, to
ensure the machine has been conditioned.
When the machine has reached STANDBY
mode, follow these steps:
1. Press 2 CUP button to run hot water
through the group head.
2. Position the steam wand tip over the drip
tray. Rotate the STEAM/HOT WATER
dial to the STEAM position and run steam
through the steam wand for 10 seconds.
STEAM STANDBY HOT WATER
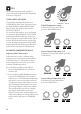
3. Rotate the STEAM/HOT WATER dial
to the HOT WATER position and run water
through the hot water outlet for 10 seconds.
STEAM STANDBY HOT WATER
4. Repeat steps 1–3 until the water tank
is empty.