
Owner`s manual


OM-BRII/90I.PUB Page 14 Rev. Date: Nov 27, 2003
Printed: February 8, 2005
Assembly—General
Assembly Instructions for Briarwood II/90 Insert
There will be local building and fire codes which could affect this installation. Be sure you check with your local building inspector, fire inspector or other
local authorities having jurisdiction in your area before you begin installation. This insert is certified only for installation into a masonry fireplace which
has been carefully inspected and is in good condition.
Blaze King recommends that you use a qualified Blaze King installer to assemble and properly install your Briarwood insert. Technicians are certified
by the HPA in the USA and by WETT in Canada.
Provide protection for the hearth to prevent damage while sliding the heavy insert in and out of the fireplace opening.
1] Carefully remove and inspect the insert parts from the shipping packages. Ensure there is no freight damage and you have all the parts required.
2] Remove the 4 bolts in the back of the shield box, remove the 5 #10 screws from the top of the shield box and slide the shield box off of the firebox.
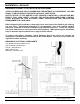
3] Place the outer shield box (Fig. 6) into your fireplace opening and ensure that the bottom of the box is level with or slightly higher than your hearth.
Use only non-combustible material to fill any space under the shield box. Exact placement of the shield box will be established in the next steps
and is determined by the overall shape of your fireplace.
4] IF YOU HAVE PURCHASED THE OPTIONAL GOLD TRIM KIT PROCEED TO “OPTIONAL INSTALLATION INSTRUCTIONS” ON THE NEXT
PAGE TO INSTALL THE TRIM BEFORE PROCEEDING TO THE NEXT STEP.
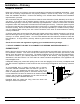
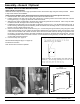
5] The shroud (fig 8) is shipped with the side extensions removed, they must be assembled on the shroud at this time. To attach the side extensions
place the short side of the “L” shaped extension against the back of the shroud and attach with 3 screws (see Fig. 5 for correct placement of side
extensions). Slide the shroud (fig 8) complete with the side extensions (fig 4) into the shield box. The side extensions (fig 4) and the inside flange
on the shroud, must slide inside the shield box.
6] Slide the assembly in until the shroud (fig 8) is against the front face of the fireplace. The shield box is adjustable to fit most fireplaces and flues.
When the shield box is in the best location proceed to the next step.
7] When you are sure of the correct placement, secure the side extensions to the shield box using 3 sheet metal screws through the pre punched
holes in the shield box. Note: you will have to pre-drill 1/8” holes in the side extensions using the shield box holes as templates.
8] While you have the shroud in place measure carefully to ensure you have adequate minimum clearances to all combustible material. Clearances
to combustibles are listed on the appliance label.
9] Disassemble the shroud (fig 8) from the side extensions (fig 6) and carefully set the shroud aside. The shield box is now sitting at its final position
and the side extensions are firmly attached to the shield box.
10] Remove the shield box assembly, (which now has the side extensions (fig 4) attached to it), from the fireplace opening. Leave the side extensions
(fig 4) securely attached to the shield box (fig 6) in the correct position as established in step 7.
11] Slide the firebox (fig 7) into the shield box (fig 6) and attach it to the firebox using 4 bolts and washers through the back of the shield box. It may
be necessary to remove the shield box top to allow the firebox flue collar to slide into the shield box. Replace the shield box top when the firebox
is in place inside the shield box.
12] Your insert comes without a fan. An electrical harness is provided for future installation. (Note: It is necessary to use the grommets where the wire
passes through the holes on each of the shroud parts to avoid damage to the wire.) IF YOU PURCHASED THE OPTIONAL FANS GO TO
“OPTIONAL INSTALLATION INSTRUCTIONS” ON THE NEXT PAGE BEFORE PROCEEDING TO INSTALL THE FANS.
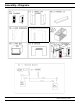
13] If you have not purchased the optional fans you must now install the fan housing pieces (fig. 1). The housing attaches with 2 screws top & bottom
with the large round hole facing out.
14] Blaze King strongly recommends that you install a complete Stainless Steel flue liner system. This is the safest installation and will ensure proper
draft control for best burn conditions and consistency.
15] If you have the flue liner installed check to ensure it is the proper length etc. If you decide to use an adapter plate in the throat of your existing
fireplace you should install it at this time and install the connector pipe as required. You must follow all local building and fire codes regarding this
installation. Proceed only after you have completed the required work on the flue system.
16] Carefully slide the complete assembly (firebox mounted inside the shield box) into the fireplace opening at the same position as previously
determined. The unit weighs approx. 300 lbs. and you will require help. Be careful not to damage the wire running around the back of the box, do
not allow it to get pinched under the shield box as you slide the assembly into the fireplace opening. You will need to protect the hearth so it does
not get damaged when sliding the unit in or out.
17] Connect the flue system to the insert firebox flue collar using three sheet metal screws. Place a bead of furnace cement around the flue collar
connection and ensure the flue pipe is properly connected, secured and sealed.
18] Re install the shroud front and carefully adjust the firebox placement to ensure the required fit around the shroud and against the fireplace facing.
When sliding the shroud into place ensure that the rear flange on the shroud goes under the top of the shield box. Attach the shroud to the side
extensions using three sheet metal screws and flat washers on each side. (Fig 8)
19] Install the fan front covers (fig 2), attach rheostat knob if fan kit installed, and connect the AC cord as required. See electrical diagrams (Fig 11).
20] Install the shroud lid (fig 3) using four sheet metal screws to attach it to the shroud and the fan covers.
21] Install the hearth protection in front of your insert as required by the minimum clearances noted on the appliance safety label. Do not fire your
insert unless you have the proper clearances and protection of combustible material as required by the safety label.
22] Recheck your installation carefully. Have your installation inspected by the authority having jurisdiction. See the operation manual for firing
instructions and have a nice cozy winter.