
User Guide
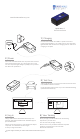

1 | Charging
Connect the included mini-USB to a power source and
charge the Spark Nano 7 for at least 5 hours. The red power
light will blink while the device is charging and turn solid once
charging is complete.
2 | Power
Disconnect the GPS tracker from the power source. Press
and hold the Power button for 3 seconds to turn on the
unit. The red power light will light up briey to let you know
the device has powered on.
3 | Test Drive
Take the Spark Nano 7 for a 20-30 minute test drive so that it
may establish a GPS connection.
During the drive, keep the unit on your front dashboard facing
upwards towards the sky.
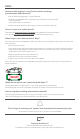
4 | Log In
Using a web browser visit brickhousesecurity.com/
gps-login OR open the BrickHouse TrackView App on
your mobile device.
Check your email account for an email with the subject
“Important: Your Password for GPS Login”
to nd your login information.
5 | View Tracking
Once you login you will be able to see the tracking
reports from your test drive.
You are now ready to begin tracking!
Get the most out of your BrickHouse Security GPS
tracker by customizing your account with
GeoFences and Alerts.
www.BrickHouseSecurity.com
Spark Nano 7
Quick Start Guide
Don’t forget to activate your tracker! Visit activate.brickhousesecurity.com.
!