
User's Manual

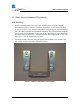
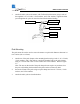
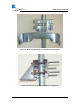
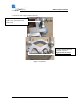
Table Of Contents
- Installation of E60 products
- General
- Equipment Packing & Unpacking
- Equipment Inventory for E60 products
- Qty Description
- Qty Description
- Installation Tools
- Radio Mount Installation E60 products
- Wall Mounting
- Pole Mounting
- 3.5.1 Antenna Mount Installation E60X products
- Radio Installation
- Cable Installation
- Antenna Alignment E60 systems
- Test Cable
- Operation of E60, E60X radios & configuration of network equipment
- Troubleshooting

TM
GE60 Installation Manual
580-00507, rev 1 20 of 46
3.5 Radio Mount Installation E60 products
Wall Mounting
1. Install 4 mounting bolts in the wall at the desired location using the template
provided (see Figure 3-4 below). The bolts (normally ⅜-16) should extend 0.8 to
3.0 inches (2cm to 7.5cm) from the wall and be strong enough to secure the radio to
the wall under foreseeable environmental conditions. The environmental conditions
may include, but not limited to, wind, rain, ice, etc. Depending on the wall material
the mount is being attached to, a different size bolt may be appropriate. In this case,
bolts up to ¾ inch in diameter may be used.
2. Secure the mount to the bolts using the appropriate sized nuts, lock washers, and
flat washers for the bolts used to mount the bracket.
Figure 3-1: Mount in ‘Wall Mount’ Configuration