
User's Manual

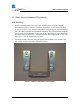
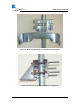
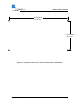
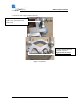
Table Of Contents
- Installation of E60 products
- General
- Equipment Packing & Unpacking
- Equipment Inventory for E60 products
- Qty Description
- Qty Description
- Installation Tools
- Radio Mount Installation E60 products
- Wall Mounting
- Pole Mounting
- 3.5.1 Antenna Mount Installation E60X products
- Radio Installation
- Cable Installation
- Antenna Alignment E60 systems
- Test Cable
- Operation of E60, E60X radios & configuration of network equipment
- Troubleshooting

TM
GE60 Installation Manual
580-00507, rev 1 21 of 46
3. Attach the radio yoke to the mount, with Teflon shim in-between, using 2 each of
the supplied ⅜-16 x ¾ bolts, ⅜ lock washers, and ⅜ flat washers. Tighten the bolts
just enough that the yoke can move back and forth without binding.
Pole Mounting
The pole mount kit can be used to secure the mount to a pole with diameters between 2.0
to 4.5 inches (50 to 115 mm).
1. Attach two of the pole clamps to the mounting bracket using 4 each ⅜-16 x ¾ bolts,
⅜ lock washers, and ⅜ flat washers. Attach the threaded rods to the pole clamps
using 8 ⅜-16 nuts and 4 each ⅜ lock washers and ⅜ flat washers. Refer to Figure
3-3.
Note: The nuts on the inside of the pole clamps do not require any washers since
they are only holding the threaded rods in place and to not bare any load.
2. Secure the mount to the pole using two pole clamps and 4 each ⅜-16 nuts, ⅜ lock
washers, and ⅜ flat washers.
3. Attach the radio yoke as described above.
3/8-16x3/4 Bolts
Mountin
g
Bracket
Teflon Shim
Radio Yoke
3/8 Lock Washe
r
3/8 Flat Washe
r