Portable Generator Operator’s Manual This generator is rated in accordance with CSA (Canadian Standards Association) standard C22.2 No. 100-04 (motors and generators). BRIGGS & STRATTON POWER PRODUCTS GROUP, LLC JEFFERSON, WISCONSIN, U.S.A. Manual No.
Thank you for purchasing this quality-built Briggs & Stratton generator. We are pleased that you’ve placed your confidence in the Briggs & Stratton brand. When operated and maintained according to the instructions in this manual, your Briggs & Stratton generator will provide many years of dependable service. This manual contains safety information to make you aware of the hazards and risks associated with generators and how to avoid them.
Table of Contents Operator Safety . . . . . . . . . . . . . . . . . . . . . . . . . . . . . . . . . 4 Equipment Description. . . . . . . . . . . . . . . . . . . . . . . . . . . . . . . . . . . . . . . . . 4 Safety Rules. . . . . . . . . . . . . . . . . . . . . . . . . . . . . . . . . . . . . . . . . . . . . . . . . 4 Assembly . . . . . . . . . . . . . . . . . . . . . . . . . . . . . . . . . . . . . 7 Unpack Generator . . . . . . . . . . . . . . . . . . . . . . . . . . . . . . . . . . . . . . . . . . . .
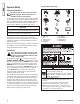
Operator Safety Hazard Symbols and Meanings Equipment Description Read this manual carefully and become familiar with your generator. Know its applications, its limitations and any hazards involved. The generator is an engine–driven, revolving field, alternating current (AC) generator. It was designed to supply electrical power for operating compatible electrical lighting, appliances, tools and motor loads. The generator’s revolving field is driven at about 3,600 rpm by a single-cylinder engine.
WARNING The engine exhaust from this product contains chemicals known to the State of California to cause cancer, birth defects, or other reproductive harm. WARNING Certain components in this product and related accessories contain chemicals known to the State of California to cause cancer, birth defects, or other reproductive harm. Wash hands after handling. WARNING Generator produces hazardous voltage.
WARNING Contact with muffler area can result in serious burns. Exhaust heat/gases can ignite combustibles, structures or damage fuel tank causing a fire. • DO NOT touch hot parts and AVOID hot exhaust gases. • Allow equipment to cool before touching. • Keep at least 5 feet (1.5 m) of clearance on all sides of generator including overhead.
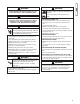
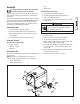
Assembly Read entire operator’s manual before you attempt to assemble or operate your new generator. Your generator requires some assembly and is ready for use after it has been properly serviced with the recommended fuel and oil. If you have any problems with the assembly of your generator, please call the generator helpline at 1-800-743-4115. If calling for assistance, please have the model, revision, and serial number from the data tag available.
Add Engine Oil 1. Place generator on a flat, level surface. 2. Clean area around oil fill and remove yellow oil fill cap. 3. Using oil funnel (optional), slowly pour contents of provided oil bottle into oil fill opening. NOTICE Improper treatment of generator can damage it and shorten its life. • DO NOT attempt to crank or start the engine before it has been properly serviced with the recommended oil. This may result in an engine failure. 4. Replace oil fill cap and fully tighten.
System Ground Generator Location The generator has a system ground that connects the generator frame components to the ground terminals on the AC output receptacles. The system ground is connected to the AC neutral wire (the neutral is bonded to the generator frame). Special Requirements There may be Federal or State Occupational Safety and Health Administration (OSHA) regulations, local codes, or ordinances that apply to the intended use of the generator.
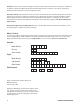
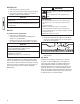
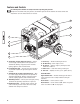
Features and Controls Read this Operator’s Manual and safety rules before operating your generator. Compare the illustrations with your generator, to familiarize yourself with the locations of various controls and adjustments. Save this manual for future reference. K J H A B C G D F E A - 120 Volt AC, 20 Amp, Duplex Receptacles — May be used to supply electrical power for the operation of 120 Volt AC, 20 Amp, single phase, 60 Hz electrical, lighting, appliance, tool, and motor loads.
Cord Sets and Receptacles Use only high quality, well-insulated, grounded extension cords with the generator’s 120 Volt duplex receptacle. Inspect extension cords before each use. Check the ratings of all extension cords before you use them. Extension cord sets used should be rated for 125 Volt AC loads at 20 Amps or greater for most electrical devices. Some devices, however, may not require this type of extension cord. Check the operator’s manuals of those devices for the manufacturer’s recommendations.
Operation Starting the Engine Disconnect all electrical loads from the generator. Use the following start instructions: 1. Make sure unit is on a level surface. IMPORTANT: Failure to start and operate the unit on a level surface will cause the unit not to start or shut down during operation. 2. Turn fuel valve to “On” position. Fuel valve handle should be vertical (pointing toward ground) for fuel to flow. 3. Push choke lever to “Choke” position.
Connecting Electrical Loads 1. Let engine stabilize and warm up for a few minutes after starting. 2. Plug in and turn on the desired 120/240 Volt AC, single phase, 60 Hz electrical loads. NOTE: • DO NOT connect 240 Volt loads to the 120 Volt duplex receptacles. • DO NOT connect 3-phase loads to the generator. • DO NOT connect 50 Hz loads to the generator. • DO NOT OVERLOAD THE GENERATOR. See Don’t Overload Generator. NOTICE Stopping the Engine 1.
Don’t Overload Generator Capacity You must make sure your generator can supply enough rated (running) and surge (starting) watts for the items you will power at the same time. Follow these simple steps: 1. Select the items you will power at the same time. 2. Total the rated (running) watts of these items. This is the amount of power your generator must produce to keep your items running. See Wattage Reference Guide. 3. Estimate how many surge (starting) watts you will need.
Maintenance Maintenance Schedule Follow the hourly or calendar intervals, whichever occurs first. More frequent service is required when operating in adverse conditions noted below.
Engine Maintenance WARNING Unintentional sparking can result in fire or electric shock. WHEN ADJUSTING OR MAKING REPAIRS TO YOUR GENERATOR • Disconnect the spark plug wire from the spark plug and place the wire where it cannot contact spark plug. WHEN TESTING FOR ENGINE SPARK • Use approved spark plug tester. • DO NOT check for spark with spark plug removed. Adding Engine Oil 1. Make sure generator is on a level surface. 2. Check oil level as described in Checking Oil Level. 3.
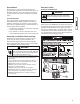
Service Air Cleaner Your engine will not run properly and may be damaged if you run it with a dirty air cleaner. Replace the air cleaner every 25 hours of operation or once each year, whichever comes first. Replace more often if operating under dirty or dusty conditions. To service the air cleaner, follow these steps: 1. Loosen screws (A) and remove air cleaner cover (B). D Service Spark Arrester The engine exhaust muffler has a spark arrester screen.
Air Cooling System Over time debris may accumulate in cylinder cooling fins and cannot be observed without partial engine disassembly. For this reason, we recommend you have an authorized Briggs & Stratton service dealer clean the cooling system (A) per recommended intervals (see Maintenance Schedule in beginning of Maintenance section). Equally important is to keep top of engine free from debris. See Clean Debris.
Storage The generator should be started at least once every seven days and allowed to run at least 30 minutes. If this cannot be done and you must store the unit for more than 30 days, use the following guidelines to prepare it for storage. Generator Storage • Clean the generator as outlined in Cleaning. • Check that cooling air slots and openings on generator are open and unobstructed. Long Term Storage Instructions Fuel can become stale when stored over 30 days.
Troubleshooting Problem Engine is running, but no AC output is available. Engine runs good at no-load but “bogs down” when loads are connected. Engine will not start; or starts and runs rough. Cause 1. 2. 3. 4. 1. Short circuit in a connected load. 2. Engine speed is too slow. 3. Generator is overloaded. 1. 2. 3. 4. 5. 1. 2. 3. 4. 5. Rocker switch set to “Off”. Fuel Valve is in “Off” position. Dirty air cleaner. Out of fuel. Stale fuel. 6. Spark plug wire not connected to spark plug. 7.
Warranties Emissions Control System Warranty Briggs & Stratton Corporation (B&S), the California Air Resources Board (CARB) and the United States Environmental Protection Agency (U.S. EPA) Emissions Control System Warranty Statement (Owner’s Defect Warranty Rights and Obligations) California, United States and Canada Emissions Control Defects Warranty Statement The California Air Resources Board (CARB), U.S.
2. Length of Coverage B&S warrants to the initial owner and each subsequent purchaser that the Warranted Parts shall be free from defects in materials and workmanship which caused the failure of the Warranted Parts for a period of two years from the date the engine is delivered to a retail purchaser. 3.
BRIGGS & STRATTON POWER PRODUCTS GROUP, LLC PORTABLE GENERATOR OWNER WARRANTY POLICY Effective February 1, 2006 replaces all undated Warranties and all Warranties dated before February 1, 2006 LIMITED WARRANTY Briggs & Stratton Power Products Group, LLC will repair or replace, free of charge, any part(s) of the portable generator that is defective in material or workmanship or both. Transportation charges on product submitted for repair or replacement under this warranty must be borne by purchaser.
Portable Generator Product Specifications Starting Wattage . . . . . . . . . . . . . . . . . . . . . . . .8,500 watts Wattage . . . . . . . . . . . . . . . . . . . . . . . . . . . . . . 5,500 watts AC Load Current: at 120 Volts . . . . . . . . . . . . . . . . . . . . . . . . . . .45.8 Amps at 240 Volts . . . . . . . . . . . . . . . . . . . . . . . . . . .22.9 Amps Phase . . . . . . . . . . . . . . . . . . . . . . . . . . . . . . .Single phase Rated Frequency . . . . . . . . . . . . . . . . . . . . . . . . .
Generador Portátil Manual del Operario Este generador está clasificado conforme a la norma C22.2 No. 100-04 (motores y generadores) de la CSA (Canadian Standards Association [Asociación canadiense de normalización]). BRIGGS & STRATTON POWER PRODUCTS GROUP, LLC JEFFERSON, WISCONSIN, U.S.A.
Muchas gracias por comprar este generador Briggs & Stratton de gran calidad. Nos alegra que haya depositado su confianza en la marca Briggs & Stratton. Siempre que sea utilizado de acuerdo con las instrucciones de este manual, su generador Briggs & Stratton le proporcionará muchos años de buen funcionamiento. Este manual contiene información sobre seguridad para hacerle consciente de los riesgos asociados a los generadores y mostrarle cómo evitarlos.
Tabla de Contenido Seguridad de operario . . . . . . . . . . . . . . . . . . . . . . . . . . . . 4 Descripción del equipo . . . . . . . . . . . . . . . . . . . . . . . . . . . . . . . . . . . . . . . . 4 Reglas de seguridad . . . . . . . . . . . . . . . . . . . . . . . . . . . . . . . . . . . . . . . . . . 4 Montaje . . . . . . . . . . . . . . . . . . . . . . . . . . . . . . . . . . . . . . 7 Desembalaje del generador . . . . . . . . . . . . . . . . . . . . . . . . . . . . . . . . . . . . .
Seguridad de operario Símbolos de peligro y sus significados Descripción del equipo Lea atentamente este manual y familiarícese con el generador. Conozca sus aplicaciones, limitaciones y riesgos. Este generador funciona en base a un motor de campo eléctrico giratorio y de corriente alterna (CA). Fue diseñado con la finalidad de proveer energía eléctrica para lámparas eléctricas, aparatos, herramientas y cargas de motor compatibles. El campo giratorio del generador se mueve a unas 3.
ADVERTENCIA ADVERTENCIA El escape del motor de este producto contiene elementos químicos reconocidos en el Estado de California por producir cáncer, defectos de nacimiento u otros daños de tipo reproductivo. La combustible y sus vapores son extremadamente inflamables y explosivos. El fuego o una explosión pueden causar quemaduras severas e inclusive la muerte.
ADVERTENCIA Las velocidades de operación en exceso, aumentan los riesgos de heridas y daños al generador. Los gases y el calor de escape pueden inflamar los materiales combustibles y las estructuras o dañar el depósito de combustible y provocar un incendio. Las velocidades bajan en exceso, imponen una carga muy pesada. • NO toque las superficies calientes y EVITE los gases del escape a alta temperatura. • Permita que el equipo se enfríe antes de tocarlo. • Deje un espacio mínimo de 1.
Montaje Su generador requiere de ciertos procedimientos de montaje y solo estará listo para ser utilizado después de haberle suministrado servicio con el combustible y aceite recomendados. Si usted tiene problemas con el montaje de su generador, por favor llame a la línea de ayuda para generadores al (800) 743-4115. Si llamar para la ayuda, tiene por favor el modelo, la revisión y el número de serie de etiqueta de identificación disponible. Consulte la ubicación en la sección Controles y características.
Agregar aceite al motor 1. Coloque la generador en una superficie plana y nivelada. 2. Limpie la zona de alrededor del orificio de llenado de aceite y quite el tapón amarillo. 3. Con la ayuda de un embudo (opcional), vierta lentamente todo el contenido de la botella de aceite por el orificio de llenado de aceite. AVISO El tratamiento inadecuado del generador puede dañarlo y acortar su vida productiva. • NO procure acodar ni empezar el motor antes ha sido atendido a apropiadamente con el aceite recomendado.
Tierra del sistema Ubicación del generador El generador dispone de una conexión a tierra del sistema que conecta los componentes del bastidor a los terminales de tierra de los enchufes hembra de salida de CA. La tierra del sistema está conectada al cable de CA neutro que, a su vez, está conectado al bastidor del generador (el neutro está conectado al bastidor del generador).
Controles y características Lea este Manual del Operario y reglas de seguridad antes de poner en marcha su generador. Compare las ilustraciones con su generador, para familiarizarse con la ubicación de los diversos controles y ajustes. Guarde este manual para futuras consultas.
Juegos de cordones y enchufes conectores Utilice exclusivamente cables prolongadores de alta calidad, bien aislados y con conexión a tierra para la toma doble de 120 V del generador. Examine los cables prolongadores antes de cada uso. Revise las capacidades de todos las cordones de extensión antes de usarlos. Los juegos de cordones de extensión utilizados deberán tener una capacidad de 125 Voltios AC a 20 Amperios o mayor para la mayoría de los dispositivos eléctricos.
Operando Encienda el motor Desconecte todas las cargas eléctricas del generador. Use las siguientes instrucciones para encender: 1. Asegúrese de que la unidad está en una superficie plana. IMPORTANTE: Si la unidad no se arranca y utiliza en una superficie plana, se pueden producir problemas de arranque y de parada durante el funcionamiento. 2. Gire la válvula del combustible a la posición "On".
Conexión de cargas eléctricas Parada del motor 1. Deje que el motor se estabilice y se caliente por dos minutos después del arranque. 2. Enchúfelo y encienda la carga eléctrica deseada (120/240 V CA, monofásico, 60 Hz.) 1. Desconecte todas las cargas eléctricas de los tomacorrientes del panel del generador. NUNCA de arranque o detenga el motor con todos los dispositivos eléctricos conectados y encendidos. 2.
No sobrecargar el generador Capacidad Debe asegurarse de que su generador puede proveer los suficientes vatios de potencia continua (vatiaje nominal) y vatios de salida para los elementos que desee alimentar al mismo tiempo. Siga estos sencillos pasos: 1. Seleccione los elementos que quiere alimentar al mismo tiempo. 2. Sume la potencia nominal de esos elementos. Esa es la cantidad de energía que su generador debe producir para mantener sus elementos en funcionamiento. Vea Guía de Referencia de Potencia. 3.
Mantenimiento Plan de mantenimiento Siga los intervalos de horas o de calendario, los que sucedan antes. Si opera en condiciones adversas (señaladas más abajo) es necesario un mantenimiento más frecuente. Primeras Cinco (5) Horas • Cambie el aceite del motor Mantenimiento del Generador Cada 8 horas o diario El mantenimiento del generador consiste en conservar la unidad limpia y seca.
Mantenimiento del Motor ADVERTENCIA Chispear involuntario puede tener como resultado el fuego o el golpe eléctrico. CUANDO AJUSTE O HAGA REPARACIONES A SU MÁQUINA GENERADOR • Siempre desconecte el alambre de la bujía y colóquelo donde no pueda entrar en contacto con la bujía. CUANDO PRUEBE LA BUJÍA DEL MOTOR • Utilice un comprobador de bujías homologado. • NO comprueba la chispa sin la bujía instalada.
3. Limpie la zona de alrededor del tapón de vaciado de aceite (A), situado en la base del motor, al otro lado del carburador. C A B 4. Quite el tapón de llenado de aceite y vacíe todo el aceite en un recipiente adecuado. 5. Vuelva a colocar el tapón de vaciado y apriételo bien. Quite el tapón de llenado de aceite. 6. Vierta lentamente unos 0,6 litros (20 onzas) de aceite por el orificio de llenado (B) hasta el punto de desbordamiento (C). NO añada aceite en exceso. 7.
ADVERTENCIA El contacto con la zona del silenciador puede producir quemaduras graves. Los gases y el calor de escape pueden inflamar los materiales combustibles y las estructuras o dañar el depósito de combustible y provocar un incendio. • NO toque las superficies calientes y EVITE los gases del escape a alta temperatura. • Permita que el equipo se enfríe antes de tocarlo. • Deje un espacio mínimo de 1.5 m (5 pies) alrededor del generador, incluida la parte superior.
Almacenamiento Cambio de Aceite Con el motor todavía caliente, drene el aceite de la caja del cigüeñal. Vuelva a llenarlo con el grado de aceite recomendado. El generador deberá ser encendido al menos una vez cada siete días y deberá dejarlo funcionar al menos durante 30 minutos. Si no puede hacer esto y debe almacenar la unidad por más de 30 días, siga las siguientes instrucciones para preparar su unidad para almacenamiento. Generador 1. Limpie el generador como está descrito en Limpieza. 2.
Resolución de problemas Problemo El motor está funcionando pero no existe salida de AC disponsible. Causa 1. El interruptor automático de circuito está abierto. 2. Conexión mal o defectuosa del juego de cables. 3. El dispositivo conectado está dañado. 4. Avería en el generador. El motor funciona bien sin carga pero "funciona mal" cuando se le contectan cargas. 1. Corto circuito en una de las cargas conectadas. 2. El generador está sobrecarga. 3. Velocidad del motor es muy lenta. 4.
Garantías Garantía del sistema de control de emisiones Briggs & Stratton Corporation (B&S), el California Air Resources Board (CARB, Consejo de recursos de aire de California) y la United States Environmental Protection Agency (U.S.
2. 3. 4. 5. 6. 22 e. Elementos diversos utilizados en los sistemas anteriores • Válvulas y conmutadores de aspiración, temperatura, posición y temporizados • Conectores y unidades Duración de la cobertura B&S garantiza al propietario inicial y a cada comprador posterior que las piezas garantizadas no tendrán defectos de materiales ni de mano de obra que provoquen su fallo durante un período de dos años a partir de la fecha de entrega del motor a su comprador.
POLÍTICA DE GARANTÍA PARA EL PROPIETARIO DE GENERADOR PORTÁTIL BRIGGS & STRATTON POWER PRODUCTS GROUP, LLC Fecha de entrada en vigor:1 de Febrero de 2006. Sustituye a todas las garantías sin fecha y a las de fecha anterior al 1 Febrero de 2006 GARANTÍA LIMITADA Briggs & Stratton Power Products Group, LLC reparará o sustituirá sin cargo alguno cualquier componente del generador portátil que presente defectos de materiales y/o mano de obra.
Generador Portátil Especificaciones del producto Vataje que Empieza . . . . . . . . . . . . . . . . .8,500 Vatios (8,5 kW) Vataje . . . . . . . . . . . . . . . . . . . . . . . . . . . .5,500 Vatios (5,5 kW) Corriente Carga de C.A. a 120 Voltios . . . . . . . . . . . . . . . . . . . . . . . . . .45,8 Amperios a 240 Voltios . . . . . . . . . . . . . . . . . . . . . . . . . .22,9 Amperios Frecuencia Nominal . . . . . . . . . . . . . . . . . . . . .60Hz a 3600 rpm Fase . . . . . . . . . . . . . . . . . . . . .