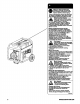
BRIGGS & CASTRATION Portable Generator Operator’s Manual This generator is certified in accordance with COA (Canadian Standards Association) standard 22.2 No. 100-04 {mayors and generators) and rated in accordance with PUMA (Portable Generator Manufacturers’ Association) standard PUMA G200 (Standard for Testing and Validating Performance of Portable Generators). BRIGGS & CASTRATION POWER PRODUCTS GROUP, LLC MILWAUKEE, WISCONSIN, U.S.A. i» Manual No.
Thank you for purchasing this quality-built Briggs & Stratton® generator. We are pleased that you've placed your confidence in the Briggs & Castration brand. When operated and maintained according to the instructions in this manual, your Briggs & Castration generator will provide many years of dependable service. This manual contains safety information to make you aware of the hazards and risks associated with generator products and how to avoid them.
Safe Operation Checklist Safe operation of the portable generator requires the completion of the following tasks: Carbon Monoxide (CO) Alarm O Carbon monoxide (CO) alarm(s) in working order. Smoke Alarm O Smoke alarm(s) in working order. Generator Location O Generator placed in a Carbon Monoxide (CO) safe zone. See Generator Location to reduce the Risk of Carbon Monoxide Poisoning. 0 Generator placed in a fire safe zone. See Generator Location io reduce the Risk of Fire.
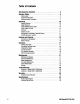
Table of Contents Safe Operation Checklist. .. 3 Operator Safety... can. 5 Safety Labels... . ..5 Equipment Description. . . Important Safety Information Assembly iia Unpack Generator . Install Wheel Kit. Attach Negative Battery Cable . System Ground Lo Connecting to a Building's Electrical System. Portable Generator Location Features and Controls... Cord Sets and Receptacles . i. Battery Charger Operation Starting the Engine. Connecting Electrical Loads. ce. Stopping the Engine...
Equipment Description Read this manual carefully and become familiar with your generator. Know its applications, its limitations and any hazards involved. The generator is an engine-driven, revolving field, alternating current (AC) generator equipped with a voltage regulator. The voltage regulator is designed to automatically maintain a constant output voltage level. It was designed to supply electrical power for operating compatible electrical lighting, appliances, tools and motor loads.
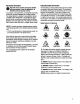
piyeZ.vlel=s Using a generator indoors CAN KILL YOU IN MINUTES. Generator exhaust contains carbon monoxide. This Is a poison you cannot see or smell. BES NEVER use Inside a home | Only use OUTSIDE and or garage, EVEN IF doors far away from windows, and windows are open. doors, and vents. /A\ WARNING Starter cord kickback {rapid retraction) will pull hand and arm forward engine faster than you can let go which could cause broken bones, fractures, bruises, or sprains resulting in serious injury.
£\ WARNING Generator voltage could cause electrical shock or burn resulting in death or serious injury. « Use listed transfer equipment, suitable for the intended use, to prevent back feed by isolating generator from electric utility workers. When using generator for backup power, notify utility company. Use a ground fault circuit interrupter (GUCCI) in any damp or highly conductive area, such as metal decking or steel work. DO NOT touch bare wires or receptacles.
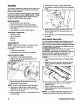
Assembly Your generator requires some assembly and is ready for use after it has been properly serviced with the recommended fuel and oil level is verified. If you have any problems with the assembly of your generator, please call the generator helpline at (800) 743-4115. If calling for assistance, please have the model, revision, and serial number from the identification label available. Unpack Generator 1. Set the carton on a rigid, flat surface. 2. Remove everything from carton except generator. 3.
Verify Engine Oil Level The generator engine is shipped from the factory filled with oil (API SJ or higher 10W-30). This allows for generator operation in the widest range of temperature and climate conditions. Before starting the engine, check oil level and ensure that engine is serviced as described in Maintenance. NOTICE Any attempt to crank or start the engine before it has been properly filled with the recommended oil could result in equipment failure. = Refer to Maintenance for oil fill information.
Portable Generator Location Before starting the portable generator there are two equally important safety concerns regarding carbon monoxide (CO) poisoning and fire that must be addressed. NOTICE Satisfying the RISK OF CARBON MONOXIDE POISONING location requirements may not satisfy the fire location requirements. Satisfying the RISK OF FIRE location requirements may not satisfy the CARBON MONOXIDE POISONING location requirements.
EXAMPLE OF LOCATION TO REDUCE THE RISK OF CARBON MONOXIDE POISONING EXHAUST ¢ KEEP ) FAR AWAY y Only use OUTSIDE and Direct exhaust AWAY FAR AWAY from windows, from windows, doors, and vents. doors and vents. DO NOT OPERATE IN ANY OF THE FOLLOWING LOCATIONS Garage Propagator too close lo home and Crawlspace townhouse directed Towards windows, by rob doors and vents.
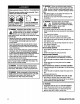
Operation Location of Portable Generator to REDUCE THE RISK OF FIRE /\ WARNING Exhaust heat/gases could ignite combustibles, structures or damage fuel tank causing a fire, resulting in death or serious injury. Portable generator must be at least 5 fest (1.5 m) from any structure, overhang, trees, windows, doors, any wall opening, shrubs, or vegetation over 12 inches (30.5 cm) in height. DO NOT place portable generator under a deck or other type of structure that may confine airflow.
Features and Controls (ih) Read this Operator's Manual and safely rules before operating your generator. Compare the illustrations with your generator, to familiarize yourself with the locations of various controls and adjustments. Save this manual for future reference. A Start Switch — Turn key to start @) position to start the engine. Turn key to OFF (0) position to switch off engine.
Cord Sets and Receptacles Use only high quality, well-insulated, grounded extension cords with the generator’s receptacles. Inspect extension cords before each use. Check the ratings of all extension cords before you use them. Check the operator's manuals of devices for the manufacturer's recommendations. A double pole rocker switch main circuit breaker is provided to protect the locking receptacle. If this circuit breaker is tripped, all receptacles are disconnected. \ WARNING Damaged or overloaded electri
Operation Starting the Engine Disconnect all electrical loads from the generator. Use the following start instructions: 1. Make sure unit is on a level surface. NOTICE Failure to start and operate the unit on a level surface will cause the unit not to start or shut down during operation. 2. Turn the fuel valve (A) to the ON (I) position. 3. Pull choke control out to close choke {x 4A. For electric starting, turn and hold key in start switch to start position until generator starts.
Connecting Electrical Loads 1. Let engine stabilize and warm up for a few minutes after starting. 2. Ensure circuit breaker on control panel position. 3. Plugin and turn on the desired 120 and/or 240 Volt AC, single phase, 60 Hz electrical loads. NOTICE When plugging into the 120 Volt receptacles, plug items to be powered in sequence as shown below. NOTICE * DO NOT connect 240 Volt loads to the 120 Volt duplex receptacles. * DO NOT connect 3-phase loads to the generator.
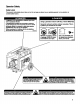
Creating a Temporary Cold Weather Shelter 1. For temporary shelter, the original shipping carton can be used. 2. Cut off top carton flaps and one long side of carton to expose muffler side of unit. If required, tape up other sides of carton to fit over generator as shown. NOTICE If required, remove wheel kit to fit carton over generator as shown. 3. Cut appropriate slots to access receptacles of unit. 4. Face exposed end away from wind and elements. 5.
Don’t Overload Generator Capacity NEVER add more loads than the generator capacity. Take special care to consider surge loads in generator capacity, as described above. pod on sure your Sennett) cn sullenly enough Rated” Additional rated (running) and surge (starting) watts for the items you . . will power at the same time. Follow these simple steps: Too or Appliance (Running) | Surge (Starting 1. Select the items you will power at the same time. on 2. Total the rated (running) watts of these items.
Maintenance Maintenance Schedule Follow the hourly or calendar intervals, whichever occurs first. More frequent service is required when operating in adverse conditions noted below. » Change engine oil * Clean debris » Check engine oil level » Clean engine air filter » Change engine oil" * Replace engine air filter « Service fuel valve » Service spark plug » Inspect muffler and spark arrested « Clean cooling system’ « Bandage mare after under dirty nr dusty conditions.
Fuel Valve Maintenance The fuel valve is equipped with a fuel sediment cup, screen, and o-ring that need to be cleaned. 1. Move fuel valve to OFF (0) position. 2. Remove sediment cup (A) from fuel valve. Remove o-ring (B) and screen (C) from fuel valve. bo 3. Wash sediment cup, o-ring, and screen in a nonflammable solvent. Dry them thoroughly. 4. Place screen and o-ring into fuel valve. Install sediment cup and tighten securely. 5. Move fuel valve to ON (I) position, and check for leaks.
Changing Engine Oil If you are using your generator under extremely dirty or dusty conditions, or in extremely hot weather, change the oil more often. /A CAUTION Avoid prolonged or repeated skin contact with used motor oil. « Used motor oil has been shown to cause skin cancer in certain laboratory animals. « Thoroughly wash exposed areas with soap and water. KEEP OUT OF REACH OF CHILDREN. DON'T POLLUTE. CONSERVE RESOURCES. RETURN USED OIL TO COLLECTION CENTERS.
Inspect Muffler and Spark Gamester The engine exhaust muffler has a spark arrested screen. Inspect the muffler for cracks, corrosion, or other damage. Inspect spark arrested screen for damage or carbon blockage. Clean if carbon blockage is found or replace if damaged. If replacement parts are required, make sure to use only original equipment replacement parts. A WARNING Exhaust heat/gases could ignite A combustibles, structures or damage fuel J56\ tank causing a fire, resulting in death or = serious injury
Storage The generator should be started at least once every seven days and allowed to run at least 30 minutes. If this cannot be done and you must store the unit for more than 30 days, use the following guidelines to prepare it for storage. Generator Storage Clean the generator as outlined in Cleaning. « Check that cooling air slots and openings on generator are open and unobstructed. Long Term Storage Instructions Fuel can become stale when stored over 30 days.
Troubleshooting Problem Cause Correction 1. One of the circuit breakers is open. 1. Reset circuit breaker. Engine is running, but no AC 2. Faulting generator. 2 Contact authorized service fancily. output is available. 3. Poor connection or defective cord set. 3. Check and repair. 4. Connected device is bad. 4. Connect another device that is In good condition. 1. Short circuit in a connected sad. 1. Disconnect shorted electrical load. Engine runs good at no-load but| 2. Engine speed is too slow. 2.
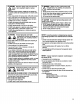
Schematic Model 030470 (7000 Watt) SUB-FIELD COL Cor R ec EH REL { SUB-FIELD) ca wr ALTERNATOR AVR | vor pet Er RED | 5 RED GRY ) GRY & ; on. SENSOR 120/240 308 BLK 3 [uN SENSOR PL ENGINE T ¢ Y MOTOR ARK U6 FLOAT STARTER IGNITION i BLK] [wB/w Ss OFF oto L ON S Star T oro KEY SWITCH KEY SWITCH CONTROL PANEL 1 1 BRIGGSandSTRATTON.
SUB-FIELD COIL BUB-FAIL Li. ALTERNATOR AVR HOUR METER Ht 304 2P CB. 208 C3. 120v 204 20V 208 1207240v 304 OFF KEY SWITCH KEY SWITCH GE CONTROL LDA JACK PANEL 5A FUSE BARRIER BATTERY 4 I wore | EE OL Spark SENSOR PLUG In = ENGINE an.
BRIGGS & CASTRATION POWER PRODUCTS GROUP, LLC PORTABLE GENERATOR OWNER WARRANTY POLICY LIMITED WARRANTY Briggs & Castration warrants that, during the warranty period specified below, & will repair of replace, free of charge, any part that is defective in material or workmanship or both. Transportation charges an product submitted for repair of replacement under this warranty must be borne by purchaser. This warranty is effective for and is subject to the time periods and conditions stated below.