
Specifications


A
MaintenanCg
6ee
tigs.
f,ts
g/
3at
hlaintenance
Schedule.
Follow
the
hourly
ot
:arra--car
intervals,
whichever
occur
first'
More
frequenl
ser',',;:
is required
when
operating
in adverse
conditions'
LNt$ml'Nrn*
it before
servicing,
ai,c ,isc0nnect
battery
at
negative
terminal,
if equipped.
Oil
service
(see
tig.
fl1
;::-:.:<
oil
level
regularly.
3; sure
correct
oil
level
is
maintained.
Check
every
8
-1:,-r
or daily,
before
starting
engine.
See
oil
fillilg-
rrr.-Turg
under
Oil
Reconmendations
Do not
over-fill'
Change
oil.
l-:roe
oil
after
first 5
hours of
operation.
Change
oil
.-
:"engine
is warm.
Refill
with
new
oil
of
recom-
-:-ced
SAE
viscosity
grade.
(see tiS.E)
Gear
reduction,
if equiPPed
==-ove
oil
fill
plug
g
and
oil
level
plug
@'
Drain-oil
=,:',
100 houri
of-operation
or
every
season.
To refill,
:,:-jSAE
30 oil
into
oil
fill
hole until
it runs
out
level
:r:':k
hole.
Replace
both
plugs.
Oil
fill
plug
has a
vent
.c
:
O and
must be
installed
on
top of
gear
case
cover.
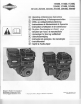
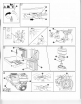
Air cleaner
seruice
(see f,S.
E/
Dual element
air cleanets
?epiace
pre-cleaner
O
and/or
cartridge
O
i{ very dirty
:r :amaged.
-:
service
pre-cleaner,
ii equipped,
wash
in
.liquid
:::e.qent
arid
water.
Squeeze
dry
in a
clean
cloth
and
. :,vio
dry
thoroughly.
D0 NOT
oil
pre-cleaner.
T: service
cartridge,
clean
by
tapping
gently
on
a
flat
-:--ace.
DO NOT
oil
cartridge.
ir:le:
D0 not
use
petroleum solvents,
e.g.,i<erosene,
*
^
:h
will
cause
the cartridge
to deteriorate.
Do
not use
:r'-"ssurized
air
to clean
cartridge'
Pressurized
air
can
ia.rage
the
cartridge.
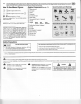
Feclangular
dual
element
ait
cleaner
',
Loosen
screw
and
tilt
cover
down.
Remove
pre-cleaner (i{
equipped)
and
cartridge
assembly
from cover.
2. After
servicing
pre-cleaner and
cartridge,
place
p,e-cleaner.
if equipped
(anows up)
over
cartridge
pleats (pre-cleaner
lip
will be at
bottom
of
pleats)'
:
insall
pre-cleaner and
cartridge
assembly
in cover'
1.
lnsert tabs
on
cover
into
slots
@
in bottom
o{ base'
5.
Tilt cover
up and
tighten
screw
securely.
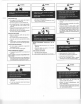
Oval
dual element
air
cleaner
'
. Remove
knob
and
cover
@.
Uft air
cleaner
off
stud'
2.
After cleaning,
reassemble
pre-cleaner on
-car-
tridge.
Push air
cleaner
firmly
down
on stud
0
to
seat
in base.
3.
Push cover
squarely
onto
base.
Tighten
knob
securely.
Maintenance
Cont'da
Oil loam@
ait
cleaner
To service
foam
element
@,
wash
in
liquid detergent
and
water.
Squeeze
drv
in a
clean
cloth.
Saturate
in
enoine
oil. Squeeze
in clean.
absorbent
cloth
t0
reriove
ALL
EXCESS
oil.
1.
Loosen
screw
and
tilt cover
down.
Remove
bracket
6 and
foam
element
from
cover'
2. Clean
bracket,
cover
and
base.
3.
lnstall bracket
and
foam
element
in cover.
4.
lnsert
tabs
on cover
into
slots
in bottom
of
base'
5.
Tilt cover
up and
fasten
securely
with screw'
Spark
plug
seruice
(see
ftgs'
E,
Clean/replace
spark
plug
every
100
hours
or every
season,
whichever
occurs
first.
Spark
plug-wrench ts
availabie
from
any
Authorized
Briggs
& Stratton
Service
Dealer.
Note:
ln some
areas,
local
law
requires
using
a
resislor
soark
oluq
to suppress
ignition
signals.
lf
this engine
uias oiigiiatty
equipped
with
resistor
spark
plug,
use
same
type
of
spark
plug
ior replacement.
Spark
plug
gap
@
should
be
.76
mm
or 0.030
in'
Keep engine
clean
(see ftgs.
g/
Periodically
remove
chaff
and
debris
build-up
from
enoine. Db
not
sorav
enqine
with
water
to
clean
bedause
water
could
bontaminate
fuel.
Clean
with
a
brush
or comPressed
air.
. /1 l Accumulation
of
debris
around
muf-
A
ru
H!
3d;13,;1'ff.1u1[i'"0'o
l{ muffler
is equipped
with spark
arrester
screen
@,
remove
spark
arrester
screen
for
cleaning
and
inspec-
tion
every
50
hours
or every
season.
Replace
i{
damaged,
To assure
smooth
operation,
keep
governor linkage,
springs
and
controls
O
free of
debris.
^
/! lt Reolace
in-line
fuel
filter 6.
Drain
L
^ru
Ht'.',iffi,'.:flt1ruel
shut-orr
valve
Clean
cooling
system.
Chaff
or debris
may
clog
engine's
air cooling
sy"sttim,
especially
after
prolonged
operation'
lnternal coolinq
fins and
surfaces
may
requlre
cleanlng
to
prevent
ove"rheating
and
engine
damage.
Remove
blower
housing
and
clean
as
shown
@,
Check
valve clearance:
Model
110000
and
120000
(intake .l0 -
.15
mm)'
Model
110000
and
120000
{exhaust.23
-
.28
mm)'
Model
200000
(intake .10
-
'15
mm).
Model
200000
(exhaust .10 -
.15 mm)'
trll ai
nte
n ance
Sch
e
d ule
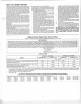
Partial
List
ol Genuine
Briggs
&
Stratton
Parts
Briqqs
& Stratton
(or
equivalent)
Pail
Part
No.
Oil(2002.)
...100005
Oil(a8oz.)
...100028
oil
pump
kit
(uses standard
electric
drill
.
'
.
'
.
.
5056
to
remove
oil
from
engine
quicklY)
Fuel
stabilizer
(1
oz.,
30
ml single
use
pouch)
992030
Fuel
stabilizer
(4.2
oz.,
1 25 ml
bottle)
999005E
(5041
)
Fuelfilter "
'694485
Flat
air
cleaner
cartridge
. . 491588
(5043)
Flataircleanerpre-cleaner
....'
493537
Oval
air
cleaner
cartridge
(Model
11,12)
. . . 690610
Oval
air
cleaner
pre-cleaner
(Model
11,12)
.
273356
Oval
air
cleaner
cartridge
(Model
20)
'
. . .
. .692484
Oval
air
cleaner
pre-cleaner
(Model 20)
'
. . .
273930
ResistorsParkPlug
..
'
802592E
Standard
spark
Plug
.
'
492167E
Longlileplatinumsparkplug
.'....5066
(used on
most
OHV
engines)
Sparktester
...19368
Sparkplugwrench
,
.'..19374