Manual Contents: General information... Operator Safety... Features and Controls. Operation... Maintenance and Adjustments... Storage... Troubleshooting... Specifications... General Information For additional information, refer to the Customer Contact Guide included with the unit. The illustrations in this document are representative, Your unit might took different from the images shown. LEFT and RIGHT are referenced from the operator's position.
Safety Messages A WARNING This product can expose you to chemicals including gasoline engine exhaust, which is known to the State of California to cause cancer and carbon monoxide, which is known to the State of California to cause birth defects or other reproductive harm. For more information go to www. PaSWarnings.ca.go. A northern dks ® This snow thrower is capable of amputating hands and feet, and throwing objects.
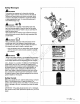
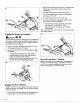
Free Hand™ Feature N [Primer Button Operation Traction Control Lever A WARNING Clean-Out Tool This flamethrower is only as safe as the operator. If iris misused, or not maintained correctly, it can be dangerous. Remember you are responsible for your safety and those i around you. + When leaving the operating position always disengage the auger, STOP the engine, and remove the key. DO NOT leave a running machine unattended.
A WARNING A Engines give off carbon monoxide, an odorless, colorless, poison gas. Breathing carbon monoxide can cause nausea, fainting, or death. + Start and operate the engine outdoors. « Do not operate the engine in an enclosed area, even if doors or windows are open. 4. Make sure that the operating area is clear of bystanders, especially children.
. When the oil level touches the top of the FULL indicator, install and tighten the dipstick, 4 Fuel Recommendations Fuel must meet these requirements: » Clean, unleaded gasoline. + A minimum of 87 octane :Ses High Attitude Requirements. » Gasoline with up to 10% ethanol: pe gasohol. NOTICE Do not use unapproved ‘Gasoline, such as 1 and E85. Do not mix oil in gasoline or changeless to operate on alternative fuels.
Start the Engine A ino We i“ Fuel and its vapors are extremely flammable apd explosive. Always handier fuel with extreme care. HE Failure fo obey these safety instructions can cause’a fire or explosion which could result in serve burns or, death. + Make sure that spark plug, muffler, fuel cap, and alr cleaner {if equipped) are install rec +» Do not crank the engine withe tha spark plug. + Do not use pressurized starting” “fluids because their vapors are flammable. » Do not over-prime the engine.
«+ Hf the extension cord is damaged, it must be replaced. Note: To extend the life of the starter, use short, start cycles at a maximum of five seconds. Wait one minute between start attempts. i” Stop the Engine 1. Turn the ignition key (A, Figure B)to the OFF + position. Remove the ignition key or the Push Teg equipped. Ey 3 2. Keep the key in a sags location out of the reach of children. The engine cannot start without the key.
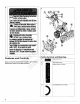
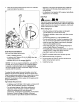
Engage the Auger and Impeller A locavore ay ® The snow thrower contains a rotating auger and impeller that throws snow. Fingers or fest can quickly become caught in the rotating auger or impeller, which can result in traumatic amputation or severe laceration, 1. Push and hold down the auger cantor} lever (A, Figure 10) to engage the auger and impeller. 2. Release the auger control lever to disengage the auger and impeller.
12 4. STOP the engine. Remove the ignition key or push/pull key. 2. Make sure that the impeller does not rotate. 3. Use a clean-out tool (G, Figure 14) to remove snow from the discharge chute. DO NOT use your hands to clean a clogged discharge chute! 1. Push down and hold the auger control lever @ Figure 13). Se jd Brie muddles are equipped with 2 headlight that illuminates. 2. Push down and hold the traction contra} lover {F) infrared in front of the snow thrower, When you START the 3.
+ Check the engine olf level, + Check the auger stop time. Remove accumulated snow and shush ta prevent freezing of the controls, whets, discharge chute, and auger. « Check the scraper bar for wear. + Change tie engine oil + Check the snow thrower for Diocese hardware, + Check the auger control cable adjustment. Check the muffler and muffler guard, Replace the spark plug {dealer service). Check the valve tlearance® (dealer service), * Not required unless problems are noted with engine performance.
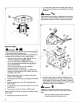
5. Put the unit on a level surface €. Clean the oil fill area. 7. Remove the dipstick (A, Figure 17). [17 8. Slowly add oil info the oli fill tube (B). See Specifications for the oil capacity. 9. Wait one minute. Check the oil level again. 10. Wuhan the oil revel touches the top of the full indicator (C}, install and tighten the dipstick. Adjust the Skid Shoe Height A DANGER Ry This snow thrower contains a rotating auger that collects snow.
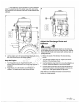
8. Make sure that each skid shoe firmly touches the surface. Then tighten the mounting nuts. NOTICE To prevent contact with the auger, aka sure that the mounting nuts are outside the auger housing. Lubricate the Control Lever Linkage Apply grease to the control lever linkage at the locations (A) as shown in Figure 20. 20 Lubricate the Auger Assembly 1. STOP the engine and remove the kay. 2. Lubricate the auger shaft assembly (A, Figure 22) with grease at the grease fittings, (if equipped).
3. Lift the snow thrower up on the auger housing end. Note: When you file the crankcase with off, do not let the snow thrower stand on the auger housing for an extended period of time. 4. Turnover the screws {A, Figure 23) and bottom panel (B). 5. Apply a very thin layer of 50 weight synthetic motor toot the hex shaft (C, Figure 24), Do this before storage and at | the start of each season. NOTICE Do notelet grass or oil touchpaper L bar friction 5 Tw wheel or the disc drive plate.
Replace the impeller Shear Brits A oer FY ® The snow thrower contains a rotating auger and impeller that throws snow. Fingers or feet can quickly become caught in the auger or impeller resulting in traumatic amputation or severe laceration. « STOP the engine, wait for all moving parts to stop, arid remove the engine key before maintenance or repairs, 1. STOP the engine. Ra move the engine key. © 2. Remove the shear bolts {A, Figure 26) and Stockists {C} from the impeller shaft (8). Align the bolt holes.
Off-Season Storage ~ Lubricate the control lever linkages, chute and deflector, auger assembly, and drive whee! axles. Bee Maintenance and Adjustments. « For rusted or chipped paint surfaces, sand lightly and At the end of the season, or when the unit is in storage for more than 30 days, complete the steps that follow. AH We 1% apply touch-up paint. WARNING For unpainted or bare metal surfaces, apply a rust Gasoline is highly flammable and its vapors are explosive, preventative product.
Specifications Specification Chart The spark ignition system on this snow thrower complies with Canadian standard ICES-002. Hem Model 130006 Armature Alr Gap 070 014 inch Intake Naive Clearance 004 006 inch (10-18 mmy Exhaust Naive Clearance 006 ODE Off Capacity 18 20 onion SOL Spark Plug Gap 030 inch {76 mn) Engine power will decrease 3.5% for every 1,000 feet (300 meters) above sea level and 1% for every 10 degrees F {5.