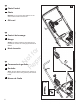
Setup Instructions es Instrucciones de montaje fr Instructions de montage N o R tf ep o r ro du ct io n en Copyright © Briggs & Stratton Corporation Milwaukee, WI, USA. All rights reserved. 80024468USCN REV.
en AVERTISSEMENT Safety The safety alert symbol is used to identify safety information about hazards that can result in personal injury. A signal word (DANGER, WARNING, or CAUTION) is used with the alert symbol to indicate the likelihood and the potential severity of injury. In addition, a hazard symbol may be used to represent the type of hazard. DANGER indicates a hazard which, if not avoided, will result in death or serious injury.
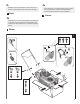
en fr Illustrations are representative. Your model may not include all the features. Some steps may not apply. 1 Parts Les illustrations sont représentatives. Votre modèle peut ne pas inclure toutes les caractéristiques. Certaines étapes peuvent ne pas s’appliquer. 1 es Pièces Las ilustraciones son representativas. Es posible que su modelo no incluya todas las características que se muestran. Es posible que no se apliquen algunos pasos.
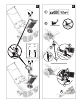
en 2 Electric Starter 3 Handle Note: Lift the handle upright, make sure cable doesn’t get pinched 4 . 2 10 mm es 2 Arranque eléctrico 3 Manija fr 2 N o R tf ep o r ro du ct io n Nota: Levante el mango en posición vertical, asegúrese de que el cable no se pellizque 4 . Démarreur électrique 3 Poignée Remarque : Lever la poignée en position debout, en s’assurant que le câble ne se coince pas 4 .
4 5 n N o R tf ep o r ro du ct io 1 3 3 2 6 7 5
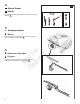
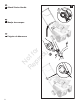
en 4 Chute Control 5 Chute 4 2 NOTICE: Do not use the chute deflector or the chute rotation handle to lift the unit. 6 Oil Level es 4 Control de la manga 5 Manga N o R tf ep o r ro du ct io 6 n AVISO: No utilice el deflector de la manga ni la manivela de rotación de la manga para levantar la unidad. Nivel de aceite fr 4 Commande de goulotte 5 Goulotte AVIS : Ne pas utiliser le déflecteur de goulotte ou la poignée de rotation de la goulotte pour soulever l’unité.
N o R tf ep o r ro du ct io 3/8 #3 n 5 6 1 2 3 4 5 4 3 5 7
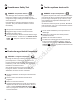
en 7 Attach Starter Handle 1 es 7 Manija de arranque fr N o R tf ep o r ro du ct io n 7 Poignée du démarreur 2 8 7
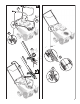
en 1 2 3 4 5 8 1 8 Attach Contol Cable Cut the wire tie. Lift the cable cover to expose the adjustment loops. Install the cable end fitting into one of the middle adjustment loops as shown. Lower cable cover. Check the cable tension. Cable should deflect slightly with moderate finger pressure. • If the auger rotates while the auger control is not engaged, lengthen the control cable by installing the end fitting in the next lowest loop.
en 9 Snowthrower Safety Test fr 9 DANGER Amputation hazard DANGER Risque d’amputation The discharge chute contains a rotating auger to throw snow. Fingers or feet can quickly become caught in the auger resulting in tramatic amputation or severe laceration. If the unit fails to operate as described, DO NOT operate it. See your authorized dealer for service immediately. See operator’s manual for starting procedure. Engage the auger control for several seconds. Release the auger control.
n N o R tf ep o r ro du ct io 9 1 2 3 4 STOP 5 sec.
n N o R tf ep o r ro du ct io