FACTORY RECONDITIONED PRESSURE WASHER Operating and Maintenance Manual Models may vary in function and appearance from units shown This pressure washer is rated in accordance to the Pressure Washer Manufacture Association (PWMA) standard PW101 (Testing and Rating Performance of Pressure Washers). BRIGGS & STRATTON POWER PRODUCTS GROUP, LLC JEFFERSON, WISCONSIN, U.S.A. Manual No.
Thank you for purchasing this factory reconditioned Briggs & Stratton pressure washer. We are pleased that you’ve placed your confidence in the Briggs & Stratton brand. When operated and maintained according to the instructions in this manual, your Briggs & Stratton pressure washer will provide years of dependable service. This manual contains safety information to make you aware of the hazards and risks associated with pressure washers and how to avoid them.
Table of Contents Safety Rules . . . . . . . . . . . . . . . . . . . . . . . . . . . . . . . . . . . . . . . . . . . . 2 Assembly . . . . . . . . . . . . . . . . . . . . . . . . . . . . . . . . . . . . . . . . . . . . . . 6 Unpack the Pressure Washer. . . . . . . . . . . . . . . . . . . . . . . . . . . . . . . . . . . . 6 Attach Handle to Unit. . . . . . . . . . . . . . . . . . . . . . . . . . . . . . . . . . . . . . . . . . 6 Attach Detergent Siphon Hose to Pump . . . . . . . . . . . . . . . . . . . . . .
Equipment Description Read this manual carefully and become familiar with your pressure washer. Know its applications, its limitations and any hazards involved. Every effort has been made to ensure that information in this manual is accurate and current. However, we reserve the right to change, alter or otherwise improve the product and this document at any time without prior notice.
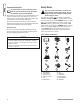
WARNING The engine exhaust from this product contains chemicals known to the State of California to cause cancer, birth defects, or other reproductive harm. WARNING Certain components in this product and related accessories contain chemicals known to the State of California to cause cancer, birth defects, or other reproductive harm. Wash hands after handling. WARNING Running engine gives off carbon monoxide, an odorless, colorless, poison gas.
WARNING Starter cord kickback (rapid retraction) can result in bodily injury. Kickback will pull hand and arm toward engine faster than you can let go. Broken bones, fractures, bruises, or sprains could result. • NEVER pull starter cord without first relieving spray gun pressure. • When starting engine, pull cord slowly until resistance is felt and then pull rapidly to avoid kickback.
WARNING Starter and other rotating parts can entangle hands, hair, clothing, or accessories. • NEVER operate pressure washer without protective housing or covers. • DO NOT wear loose clothing, jewelry or anything that may be caught in the starter or other rotating parts. • Tie up long hair and remove jewelry. WARNING Risk of eye injury. Spray can splash back or propel objects. • Always wear safety goggles when using this equipment or in vicinity of where equipment is in use.
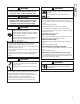
Assembly IMPORTANT: Read entire operator’s manual before you attempt to assemble or operate your pressure washer. IMPORTANT: Contact your local service center or look on the engine manufacturer’s website to obtain an engine operator’s manual. You will need the engine manual to find engine operation, maintenance and emissions warranty policy. NOTE: Your pressure washer may not include all accessories shown herein. Unpack the Pressure Washer 1. Remove everything from carton except pressure washer. 2.
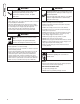
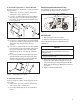
To attach handle supplied with “L” hooks or Wireform: Note: Your unit may be supplied with ”L” hooks or wireform spraygun holders. 1. Follow steps 1 and 2 in the section To attach handle with accessory tray or cleaning tank. 2. Insert one “L” hook through hole just above billboard or cleaning tank on left side of handle (viewing from front of unit) and attach plastic knob. Tighten knob by hand (see Figure 4).
Add Fuel Fuel must meet these requirements: • Clean, fresh, unleaded gasoline. • A minimum of 87 octane/87 AKI (91 RON). High altitude use, see High Altitude. • Gasoline with up to 10% ethanol (gasohol) or up to 15% MTBE (methyl tertiary butyl ether) is acceptable. 1. Clean area around fuel fill cap. 2. Remove cap. 3. Refer to the two illustrations in Figure 10. Slowly add regular unleaded fuel (A) to fuel tank (B). Be careful not to overfill. Allow about 1.5 inch of tank space (C) for fuel expansion.
Connect Hose and Water Supply to Pump NOTICE DO NOT run the pump without the water supply connected and turned on. • Damage to equipment resulting from failure to follow this instruction will void warranty. 1A. Uncoil high pressure hose and attach one end of hose to base of spray gun (see Figure 11). Tighten by hand. 1B. If unit is supplied with quick connects on high pressure hose and spray gun, attach quick connect end of hose to base of spray gun (see Figure 11).
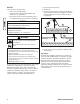
Features and Controls Read this Operator’s manual and safety rules before operating your pressure washer. Your pressure washer may resemble one of the units shown below and on the next page. Compare the illustrations with your pressure washer to familiarize yourself with the locations of various controls and adjustments. Save this manual for further reference. 16 9 4 14 16 6 15 18 7 8 15 3 3 12 13 18 10 19 17 2 9 5 19 10 12 4 14 1.
Features and Controls continued 4 14 7 6 15 18 15 3 3 13 17 1 7 16 11 5 19 10 12 10. High Pressure Outlet — Connection for high pressure hose. 11. Nozzle Extension with Quick Connect — Allows you to switch between different spray tips. 12. Oil Fill Cap/Dipstick — Check and add engine oil here. 13. Primer Bulb — Prepares a cold engine for starting. 14. Pump — Develops high water pressure. 15. Recoil Starter — Used for starting the engine manually. 10 19 4 14 16.
Operation How to Start Pressure Washer Pressure Washer Location WARNING Exhaust heat/gases can ignite combustibles, structures or damage fuel tank causing a fire. • Keep at least 5 ft. (152 cm) clearance on all sides of pressure washer including overhead. Place pressure washer outdoors in an area that will not accumulate deadly exhaust gas. DO NOT place pressure washer where exhaust gas (A) (Figure 14) could accumulate and enter inside or be drawn into a potentially occupied building.
9. Engage trigger lock (A) on spray gun trigger (see Figure 17). A Figure 17 — Spray Gun with Trigger Lock Engaged 10. If your engine has a fuel valve, turn it to the on position. WARNING Risk of eye injury. Spray can splash back or propel objects. • Always wear safety goggles when using this equipment or in vicinity of where equipment is in use. • Before starting the pressure washer, be sure you are wearing adequate safety goggles. • NEVER substitute safety glasses for safety goggles. 3.
Your unit may differ from that shown WARNING Starter cord kickback (rapid retraction) can result in bodily injury. Kickback will pull hand and arm toward engine faster than you can let go. Broken bones, fractures, bruises, or sprains could result. • NEVER pull starter cord without first relieving spray gun pressure. • When starting engine, pull cord slowly until resistance is felt and then pull rapidly to avoid kickback.
How to Stop Your Pressure Washer 1. Release spray gun trigger and let engine idle for two minutes. 2. If equipped, move throttle to slow position, then to stop position. 3. ALWAYS point gun in a safe direction and squeeze spray gun trigger to release retained high water pressure. IMPORTANT: Spray gun traps high water pressure, even when engine is stopped and water is disconnected.
If Unit is Equipped with Quick-Connect Spray Tips The quick–connect on the nozzle extension allows you to switch between several different spray tips. the spray tips vary the spray pattern as shown below (see Figure 26).
3. Pull back on collar, insert turbo nozzle and release collar (Figure 27). Tug on turbo nozzle to make sure it is securely in place. NOTICE Keep the detergent siphoning tube/filter from coming in contact with the hot muffler. • When inserting the filter into a detergent solution bottle, route the tube so as to keep it from inadvertently contacting the hot muffler. Figure 27- Attaching Turbo Nozzle to Quick Connect Nozzle Extension 4.Disengage trigger lock on spray gun trigger.
Pressure Washer Rinsing Cleaning Detergent Siphoning Tube After you have applied detergent, scour the cleaning surface with the high pressure water stream and then rinse it clean, as follows: 1. Engage trigger lock on spray gun. 2. If equipped, make sure detergent shut-off valve is in “Off” position. 3. Slide nozzle backwards or insert a high pressure quick connect spray tip to place pressure washer in high pressure mode. Detergent will not flow when in high pressure mode. 4.
Maintenance Typical Maintenance Schedule Follow the hourly or calendar intervals, whichever occurs first. More frequent service is required when operating in adverse conditions noted below.
Inspect In-Line Filter Refer to Figure 31 and service the in-line filter if it becomes clogged, as follows: 1. Detach spray gun and nozzle extension from high pressure hose. Detach nozzle extension from spray gun and remove o-ring (A) and screen (B) from nozzle extension (C). Flush screen, spray gun, and nozzle extension with clean water to clear debris. C B A Figure 31 — Clean In-Line Filter 2. If screen is damaged, obtain a replacement in-line filter screen and o-ring. If undamaged, reuse screen. 3.
Adjustable Nozzle: 1. Remove orifice (A) from end of nozzle extension. Separate nozzle extension from spray gun. Twist nozzle clockwise to stream position. Using a 2mm (5/64) allen wrench, Remove orifice from end of nozzle extension. (see Figure 32). 2. Remove nozzle extension (B) from spray gun. 3. Remove in-line filter from other end of nozzle extension following instructions Inspect In-Line Filter. 4. Use a small paper clip to free any foreign material clogging or restricting orifice (see Figure 32).
Engine Maintenance Adding Oil A typical engine maintenance schedule is shown in Maintenance Schedule. For instructions on properly maintaining the engine, refer to operating and maintenance manuals found on the engine manufacturer’s website or from equipment dealers. Models with oil fill cap (Figure 36) A Engine Oil CAUTION Avoid prolonged or repeated skin contact with used motor oil. • Used motor oil has been shown to cause skin cancer in certain laboratory animals.
Service Air Cleaner Your engine will not run properly and may be damaged if you run it with a dirty air cleaner. Service the air cleaner once every 25 hours of operation or once each year, whichever comes first. Service more often if operating under dirty or dusty conditions. 3. To clean cartridge, gently tap pleated paper side on a flat surface. 4. Reinstall clean or new cartridge assembly inside cover. 5. Insert cover’s tabs (D) into slots in bottom of base (E). 6.
Pump Maintenance Only the pumps shown in Figures 42, 43 & 44 need periodic service. All other pumps are maintenance-free. If your pump looks like the pump shown in Figure 43, follow these instructions: If your pump looks like the pump shown in Figure 42, follow these instructions: Figure 42— Annovi Pump Changing Pump Oil Change oil after first 50 hours of operation and then every 200 hours or 3 months, whichever occurs first. NOTE: When changing pump oil, use only high quality nondetergent 30 weight oil.
If your pump looks like the pump in Figure 44, follow these instructions; 2. Start and run pressure washer for at least 5 minutes. 3. Turn off pressure washer and disconnect spark plug wire from spark plug. 4. Place suitable container under oil drain hole. 5. Remove pump’s oil filler cap and o-ring (see Figure 45). Figure 44 — CAT Pump Changing Pump Oil For longest lasting service, follow the schedule given in the Pump Maintenance Checklist. IMPORTANT: Use 0.55 liter (18.
Storage Winter Storage After Each Use Water should not remain in the unit for long periods of time. Sediments or minerals can deposit on pump parts and freeze pump action. Follow these procedures after every use: 1. Flush detergent siphoning tube by placing the filter into a pail of clean water while running pressure washer in low pressure mode. Flush for one to two minutes. 2.
Long Term Storage If you do not plan to use the pressure washer for more than 30 days, you must prepare the engine and pump for long term storage. Protect Fuel System Fuel Additive: Fuel can become stale when stored over 30 days. Stale fuel causes acid and gum deposits to form in the fuel system or on essential carburetor parts. To keep fuel fresh, use Briggs & Stratton FRESH START™ fuel stabilizer, available as a liquid additive or a drip concentrate cartridge.
Troubleshooting Problem Cause 1. Low pressure nozzle installed. Water inlet is blocked. Inadequate water supply. 1. 4. 5. Inlet hose is kinked or leaking. Clogged inlet hose strainer. 6. Water supply is over 100°F. 6. 7. High pressure hose is blocked or leaks. Gun leaks. Nozzle is obstructed. Pump is faulty. 7. 2. 3. Pump has following problems: • Failure to produce pressure • Erratic pressure • Chattering • Loss of pressure • Low water volume 4. 8. 9. 10. 1. 2.
BRIGGS & STRATTON POWER PRODUCTS GROUP, LLC RECONDITIONED EQUIPMENT OWNER WARRANTY POLICY Effective December 1, 2005 replaces all undated Warranties and all Warranties dated before December 1, 2005 LIMITED WARRANTY Briggs & Stratton Power Products Group, LLC will repair or replace, free of charge, any part(s) of the equipment that is defective in material or workmanship or both. Transportation charges on product submitted for repair or replacement under this warranty must be borne by purchaser.
Briggs & Stratton Power Products Group, LLC Jefferson, WI 53549