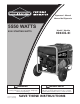
Operator’s Manual Manual del Operario 5550 WATTS 8550 STARTING WATTS Model / Modelo 030235-01 WARNING ADVERTENCIA Failure to read and follow the operator’s manual and all operating instructions can result in death, bodily injury, and/or property damage. Si no se leen y siguen las indicaciones del Manual del Operario y todas las instrucciones de uso, se pueden producir daños materiales, lesiones o incluso la muerte. Manual No.
Thank you for purchasing this quality-built Briggs & Stratton generator. We are pleased that you’ve placed your confidence in the Briggs & Stratton brand. When operated and maintained according to the instructions in this manual, your Briggs & Stratton generator will provide many years of dependable service. This manual contains safety information to make you aware of the hazards and risks associated with generator products and how to avoid them.
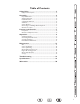
Table of Contents Safety Rules .................................................................2 Equipment Description..............................................................................4 Assembly .....................................................................4 Unpack Generator......................................................................................4 Shipment Contents.....................................................................................4 Install Wheel Kit ......
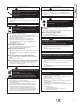
SAVE THESE INSTRUCTIONS Safety Rules This is the safety alert symbol. It is used to alert you to potential personal injury hazards. Obey all safety messages that follow this symbol to avoid possible injury or death. The safety alert symbol ( ) is used with a signal word (DANGER, WARNING, CAUTION), a pictorial and/or a safety message to alert you to hazards. DANGER indicates a hazard which, if not avoided, will result in death or serious injury.
WARNING WARNING Rapid retraction of starter cord (kickback) will pull hand and arm toward engine faster than you can let go. Broken bones, fractures, bruises or sprains could result. • • • • WARNING When starting engine, pull cord slowly until resistance is felt and then pull rapidly to avoid kickback. NEVER start or stop engine with electrical devices plugged in and turned on. Unintentional sparking can result in fire or electric shock.
Equipment Description Read this manual carefully and become familiar with your generator. Know its applications, its limitations and any hazards involved. The generator is an engine–driven, revolving field, alternating current (AC) generator. It was designed to supply electrical power for operating compatible electrical lighting, appliances, tools and motor loads. The generator’s revolving field is driven at about 3,600 rpm by a singlecylinder engine.
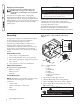
5. Install e-ring with pliers, squeezing from top of e-ring to bottom of axle. 6. Repeat steps 4 and 5 to secure second wheel. 7. Tip generator so that engine side is down. 8. Line up holes in support leg (E) with holes in generator frame. 9. Attach support leg using 2 capscrews (M8 x 16 mm) (F) and 2 hex nuts (G). Tighten with a 13 mm socket wrench and 13 mm wrench. 10. Return generator to normal operating position (resting on wheels and support leg).
System Ground Generator Location The generator has a system ground that connects the generator frame components to the ground terminals on the AC output receptacles. The system ground is connected to the AC neutral wire (the neutral is bonded to the generator frame). Clearances and Air Movement Special Requirements There may be Federal or State Occupational Safety and Health Administration (OSHA) regulations, local codes, or ordinances that apply to the intended use of the generator.
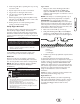
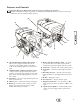
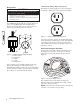
Features and Controls Read this Operator’s Manual and safety rules before operating your generator. Compare the illustrations with your generator, to familiarize yourself with the locations of various controls and adjustments. Save this manual for future reference. M L G K H D E A C I J F B A - 120 Volt AC, 20 Amp, Duplex Receptacles — May be used to supply electrical power for the operation of 120 Volt AC, 20 Amp, single phase, 60 Hz electrical, lighting, appliance, tool, and motor loads.
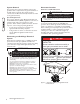
Receptacles 120 Volt AC, 20 Amp, Duplex Receptacles Both duplex receptacles (Figure 5) are protected against overload by a double pole rocker switch circuit breaker. CAUTION Receptacles may be marked with rating value greater than generator output capacity. • • NEVER attempt to power a device requiring more amperage than generator or receptacle can supply. DO NOT overload the generator. See Don’t Overload Generator in the Operation section.
Operation WARNING Rapid retraction of starter cord (kickback) will pull hand and arm toward engine faster than you can let go. Broken bones, fractures, bruises or sprains could result. Starting the Engine Disconnect all electrical loads from the generator. Use the following start instructions: 1. Make sure unit is on a level surface. IMPORTANT: Failure to start and operate the unit on a level surface will cause the unit not to start or shut down during operation. 2.
Connecting Electrical Loads Stopping the Engine 1. Let engine stabilize and warm up for a few minutes after starting. 1. 2. Plug in and turn on the desired 120 and/or 240 Volt AC, single phase, 60 Hz electrical loads. Turn OFF and unplug all electrical loads from generator panel receptacles. NEVER start or stop engine with electrical devices plugged in and turned ON. 2. Let engine run at no-load for several minutes to stabilize internal temperatures of engine and generator. 3.
Don’t Overload Generator 6. Repeat steps 4 and 5 for each additional load. Capacity You must make sure your generator can supply enough rated (running) and surge (starting) watts for the items you will power at the same time.
Maintenance Maintenance Schedule Follow the hourly or calendar intervals, whichever occurs first. More frequent service is required when operating in adverse conditions noted below.
Generator Maintenance Oil Generator maintenance consists of keeping the unit clean and dry. Operate and store the unit in a clean dry environment where it will not be exposed to excessive dust, dirt, moisture, or any corrosive vapors. Cooling air slots in the generator must not become clogged with snow, leaves, or any other foreign material. NOTE: DO NOT use water or other liquids to clean generator. Liquids can enter engine fuel system, causing poor performance and/or failure to occur.
SAE 30: 40 °F and higher (5 °C and higher) is good for all purpose use above 40°F, use below 40°F will cause hard starting. 10W-30: 0 to 100 °F (-18 to 38 °C) is better for varying temperature conditions. This grade of oil improves cold weather starting, but may increase oil consumption at 80°F (27°C) or higher. Synthetic 5W-30: -20 to 120 °F (-30 to 40 °C) provides the best protection at all temperatures as well as improved starting with less oil consumption.
Service Air Cleaner Service Spark Plug Your engine will not run properly and may be damaged if you run it with a dirty air cleaner. Change the spark plug every 100 hours of operation or once each year, whichever comes first. This will help your engine to start easier and run better. Replace the air cleaner every 25 hours of operation or once each year, whichever comes first. Replace more often if operating under dirty or dusty conditions. To service the air cleaner, follow these steps: 1. 1.
Engine Air Cooling System WARNING Running engines produce heat. Temperature of muffler and nearby areas can reach or exceed 150°F (65°C). Severe burns can occur on contact. Exhaust heat/gases can ignite combustibles, structures or damage fuel tank causing a fire. • • • • Over time debris may accumulate in cylinder cooling fins and cannot be observed without partial engine disassembly.
Storage Change Oil The generator should be started at least once every seven days and allowed to run at least 30 minutes. If this cannot be done and you must store the unit for more than 30 days, use the following guidelines to prepare it for storage. While engine is still warm, drain oil from crankcase. Refill with recommended grade. • Remove spark plug and pour about 1/2 ounce (15 ml) of clean engine oil into the cylinder.
Troubleshooting Problem Engine is running, but no AC output is available. Cause Correction 1. One of the circuit breakers is open. 1. Reset circuit breaker. 2. Fault in generator. 2. Contact authorized service facility. 3. Poor connection or defective cord set. 3. Check and repair. 4. Connected device is bad. 4. Connect another device that is in good condition. 1. Short circuit in a connected load. 1. Disconnect shorted electrical load. Engine speed is too slow. 2.
Specifications Specifications Engine Technical Information Generator Specifications This is a single cylinder, overhead valve(OHV), air cooled engine. It is a low emissions engine. In the State of California, Model Series 200000 engines are certified by the California Air Resources Board to meet emissions standards for 250 hours. Such certification does not grant the purchaser, owner or operator of this engine any additional warranties with respect to the performance or operational life of this engine.
Briggs & Stratton Corporation (B&S), the California Air Resources Board (CARB) and the United States Environmental Protection Agency (U.S. EPA) Emissions Control System Warranty Statement (Owner’s Defect Warranty Rights and Obligations) California, United States and Canada Emissions Control Defects Warranty Statement The California Air Resources Board (CARB), U.S. EPA and B&S are pleased to explain the Emissions Control System Warranty on your small off–road engine (SORE).
3. No Charge Repair or replacement of any Warranted Part will be performed at no charge to the owner, including diagnostic labor which leads to the determination that a Warranted Part is defective, if the diagnostic work is performed at an Authorized B&S Service Dealer. For emissions warranty service contact your nearest Authorized B&S Service Dealer as listed in the telephone directory under “Engines, Gasoline,” “Gasoline Engines,” “Lawn Mowers,” or similar category. 4.
BRIGGS & STRATTON POWER PRODUCTS GROUP, LLC PORTABLE GENERATOR OWNER WARRANTY POLICY Effective February 1, 2006 replaces all undated Warranties and all Warranties dated before February 1, 2006 LIMITED WARRANTY Briggs & Stratton Power Products Group, LLC will repair or replace, free of charge, any part(s) of the portable generator that is defective in material or workmanship or both. Transportation charges on product submitted for repair or replacement under this warranty must be borne by purchaser.
This page reserved.
Muchas gracias por comprar este generador Briggs & Stratton de gran calidad. Nos alegra que haya depositado su confianza en la marca Briggs & Stratton. Siempre que sea utilizado de acuerdo con las instrucciones de este manual, su generador Briggs & Stratton le proporcionará muchos años de buen funcionamiento. Este manual contiene información sobre seguridad para hacerle consciente de los riesgos asociados a los generadores y mostrarle cómo evitarlos.
Tabla de Contenido Reglas de seguridad ....................................................2 Descripción del equipo..............................................................................4 Montaje ........................................................................4 Desembalaje del generador ......................................................................4 Contenido de la caja ..................................................................................4 Instale el juego de ruedas.....
CONSERVE ESTAS INSTRUCCIONES Normas de seguridad Éste es el símbolo de alerta de seguridad. Sirve para advertir al usuario de un posible riesgo para su integridad física. Siga todos los mensajes de seguridad que figuren después de este símbolo para evitar lesiones o incluso la muerte. El símbolo de alerta de seguridad ( ) se utiliza con una palabra de señalización (PELIGRO, PRECAUCIÓN, ADVERTENCIA), una imagen y/o un mensaje de seguridad para advertir al usuario de un riesgo.
ADVERTENCIA ADVERTENCIA • • El rápido repliegue del cable del arrancador (retroceso) impedirá que el usuario suelte el cable a tiempo y tirará de su mano y brazo hacia el motor. Como resultado, podrían producirse fracturas, contusiones o esguinces. Este generador no cumple la norma 33CFR-183 del cuerpo de guardacostas de EE.UU. y no debe utilizarse en aplicaciones marinas. El uso de un generador no homologado por cuerpo de guardacostas de EE.UU. puede provocar lesiones y daños materiales.
Descripción del equipo PRECAUCIÓN Lea atentamente este manual y familiarícese con el generador. Conozca sus aplicaciones, limitaciones y riesgos. Este generador funciona en base a un motor de campo eléctrico giratorio y de corriente alterna (CA). Fue diseñado con la finalidad de proveer energía eléctrica para lámparas eléctricas, aparatos, herramientas y cargas de motor compatibles. El campo giratorio del generador se mueve a unas 3.600 rpm con un motor de un solo cilindro.
Tipo de gasolina 5. Para ello, apriete con unos alicates desde la parte superior de la anilla en “e” hacia la parte inferior del eje. 6. Repita los pasos 4 y 5 para asegurar la segunda rueda. 7. Dele la vuelta al generador de forma que el lado del motor quede abajo. 8. Haga coincidir los orificios de la pata de apoyo (E) con los del bastidor del generador. NOTA: El motor admite hasta un 10% de etanol (gasohol) o hasta un 15% de MTBE (éter metil terbutílico). 9.
Tierra del sistema Ubicación del generador El generador dispone de una conexión a tierra del sistema que conecta los componentes del bastidor a los terminales de tierra de los enchufes hembra de salida de CA. La tierra del sistema está conectada al cable de CA neutro que, a su vez, está conectado al bastidor del generador.
Controles y características del generador Lea este Manual del Operario y reglas de seguridad antes de poner en marcha su generador. Compare las ilustraciones con su generador, para familiarizarse con la ubicación de los diversos controles y ajustes. Guarde este manual para futuras consultas.
Tomas eléctricas Tomas eléctricas dobles de 120 V CA y 20 A PRECAUCIÓN Las tomas eléctricas pueden marcar un valor nominal mayor que la capacidad de salida del generador. • • El receptáculo (Figura 5) está protegido en contra de sobrecargas por un disyuntor basculante. NUNCA intente conectar un dispositivo que requiera más amperaje del que el generador o la toma eléctrica pueden suministrar. NO sobrecargar el generador. Véase No sobrecargar el generador.
Operando ADVERTENCIA El rápido repliegue del cable del arrancador (retroceso) impedirá que el usuario suelte el cable a tiempo y tirará de su mano y brazo hacia el motor. Como resultado, podrían producirse fracturas, contusiones o esguinces. Encienda el motor Desconecte todas las cargas eléctricas del generador. Use las siguientes instrucciones para encender: 1. Asegúrese de que la unidad está en una superficie plana.
Conexión de cargas eléctricas Parada del motor 1. Deje que el motor se estabilice y se caliente por dos minutos después del arranque. 1. 2. Enchúfelo y encienda la carga eléctrica deseada (120 y/o 240 V CA, monofásico, 60 Hz.) Desconecte todas las cargas eléctricas de los tomacorrientes del panel del generador. NUNCA de arranque o detenga el motor con todos los dispositivos eléctricos conectados y encendidos. 2.
No sobrecargar el generador Herramienta o aparato Capacidad Básicos Debe asegurarse de que su generador puede proveer los suficientes vatios de potencia continua (vatiaje nominal) y vatios de salida para los elementos que desee alimentar al mismo tiempo. Siga estos sencillos pasos: 1. Seleccione los elementos que quiere alimentar al mismo tiempo. 2. Sume la potencia nominal de esos elementos. Esa es la cantidad de energía que su generador debe producir para mantener sus elementos en funcionamiento.
Mantenimiento Plan de mantenimiento Siga los intervalos de horas o de calendario, los que sucedan antes. Si opera en condiciones adversas (señaladas más abajo) es necesario un mantenimiento más frecuente.
Mantenimiento del Generador El mantenimiento del generador consiste en conservar la unidad limpia y seca. Opere y almacene la unidad en un ambiente limpio y seco donde no será expuesta al polvo, suciedad, humedad o vapores corrosivos. Las ranuras del aire de enfriamiento del generador no deben estar tapadas con nieve, hojas, o cualquier otro material extraños.
SAE 30: 5 ºC (40 °F) y superior es adecuado para todo tipo de usos por encima de 5 ºC (40 °F). El uso por debajo de 5 ºC (40 °F) provocará dificultades de arranque. 10W-30: -18 a 38 °C (0 a 100 °F) es mejor en caso de temperatura variable. Este grado de aceite mejora el arranque en climas fríos, pero puede aumentar el consumo de aceite a 27 °C (80 °F) o temperaturas superiores. Cambio de Aceite del Motor Cambie el aceite después de las primeras 5 horas de operación.
Servicio del depurador de aire Servicio del bujía Si se utiliza con un filtro de aire sucio, el motor no funcionará correctamente y puede sufrir daños. Cambie la bujía cada 100 horas de funcionamiento o una vez al año, lo que suceda antes. Esto ayudará a su motor a arrancar más fácilmente y funcionar mejor. Cambie el filtro de aire cada 25 horas de funcionamiento o una vez al año, lo que suceda antes. Haga cambios más frecuentes si trabaja en zonas sucias o donde hay polvo.
ADVERTENCIA Los motores al funcionar producen calor. La temperatura del silenciador y de las áreas cercanas puede alcanzar o pasar los 150ºF (65ºC). Quemaduras severas pueden ocurrir al hacer contacto. Los gases y el calor de escape pueden inflamar los materiales combustibles y las estructuras o dañar el depósito de combustible y provocar un incendio.
Almacenamiento Cambio de Aceite El generador deberá ser encendido al menos una vez cada siete días y deberá dejarlo funcionar al menos durante 30 minutos. Si no puede hacer esto y debe almacenar la unidad por más de 30 días, siga las siguientes instrucciones para preparar su unidad para almacenamiento. Con el motor todavía caliente, drene el aceite de la caja del cigüeñal. Vuelva a llenarlo con el grado de aceite recomendado. Generador 1.
Resolución de problemas Problemo El motor está funcionando pero no existe salida de AC disponsible. El motor funciona bien sin carga pero "funciona mal" cuando se le contectan cargas. El motor no se enciende; o se enciende y funciona mal. Causa Accion 1. El interruptor automático de circuito está abierto. 1. Reposicione el interruptor. 2. Conexión mal o defectuosa del juego de cables. 2. Revise y repare. 3. El dispositivo conectado está dañado. 3.
Información técnica sobre el motor ESPECIFICACIONES El motor es de uno cilindros, de válvulas en cabeza (OHV), refrigerado por aire y de baja emisión. Especificaciones del Generador En el Estado de California, los motores de la serie 200000 han obtenido la certificación del California Air Resources Board (Consejo de recursos de aire de California) de cumplimiento de la normativa sobre emisiones durante 250 horas.
Briggs & Stratton Corporation (B&S), el California Air Resources Board (CARB, Consejo de recursos de aire de California) y la United States Environmental Protection Agency (U.S.
3. Servicio gratuito La reparación o sustitución de toda pieza garantizada se realizará sin cargo alguno para el propietario, incluido el trabajo de diagnóstico que permita determinar que la pieza garantizada es defectuosa, siempre que se realice en un distribuidor autorizado de servicio B&S.
POLÍTICA DE GARANTÍA PARA EL PROPIETARIO DE GENERADOR PORTÁTIL BRIGGS & STRATTON POWER PRODUCTS GROUP, LLC Fecha de entrada en vigor:1 de Febrero de 2006. Sustituye a todas las garantías sin fecha y a las de fecha anterior al 1 Febrero de 2006 GARANTÍA LIMITADA Briggs & Stratton Power Products Group, LLC reparará o sustituirá sin cargo alguno cualquier componente del generador portátil que presente defectos de materiales y/o mano de obra.