Operator’s Manual Model 120000 Quantum 600 Series 625 Series 650 Series 675 Series Quick Start Guide on page 4 BRIGGSandSTRATTON.com ECopyright Briggs & Stratton Corporation Milwaukee, Wisconsin 53201 U.S.A. Form No. 277039-9/06 Printed in U.S.A.
Safety References The safety alert symbol is used to identify safety information about hazards that can result in personal injury. A signal word (DANGER, WARNING, or CAUTION) is used with the alert symbol to indicate the likelihood and the potential severity of injury. In addition, a hazard symbol may be used to represent the type of hazard.
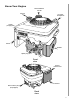
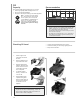
Know Your Engine Rewind/Starter handle Fuel fill Oil cap & Oil dipstick Choke (if equipped) Primer Muffler Spark plug Front view Speed control lever Air cleaner Side oil drain plug (if equipped) Back view 3
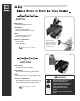
This manual contains safety information to make you aware of the hazards and risks associated with engines. Read the Operating Manual before starting your engine. 1 2 3 4 ADD OIL WHAT KIND? High quality SAE 30 motor oil. HOW MUCH? To FULL line on dipstick. Engine holds about 20 oz. (0.61l). HOW? Unscrew and remove oil cap. Pour in oil. Replace cap. FULL SPECIAL CONCERNS? Do not overfill. Do not tip engine. See page 10 for details. 1 2 3 WIPE DIPSTICK. REPLACE DIPSTICK AND TIGHTEN CAP.
If ReadyStart™ go to step 4. 1 2 3 4 PUSH PRIMER HOW MANY TIMES? Press 5 times the FIRST TIME you start engine. For all future starts, press 3 times. HOW? Locate primer bulb. Press with finger. Wait two seconds between each press. SPECIAL CONCERNS? Pressing primer too many times can flood engine with gas. A flooded engine will not start. See Troubleshooting section. 1 2 3 4 PULL STARTER HANDLE HOW? Stand behind equipment. Close bail, or operator control bar, on equipment with this feature.
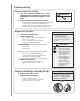
Troubleshooting Starter Handle will not pull. r The bail, operator control bar, is not engaged which releases the brake from the flywheel allowing the engine to turn over. r Place equipment on flat level surface. WARNING • Ensure all external equipment/engine loads are removed before starting engine. Direct coupled equipment components must be securely attached such as, but not limited to, blades, impellors, pulleys, sprockets, etc. Engine will not start. r Oil Level is OVER FULL mark on dipstick.
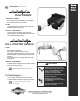
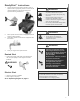
ReadyStartE Instructions 1. Check oil level. Ensure level is at FULL mark on dipstick. Use a high quality motor oil. Check the oil recommendations for the correct oil type for expected starting temperature. WARNING • • • • • Make sure spark plug, muffler, fuel cap and air cleaner are in place. Do not crank engine with spark plug removed. DO NOT start engine if there is a natural or LP gas leak in area. If there is natural or LP gas leakage in area, do not start engine.
Starting Instructions 1. Check oil level. Ensure level is at FULL mark on dipstick. Use a high quality motor oil. Check the oil recommendations for the correct oil type for expected starting temperature. WARNING • • • • • 2. Open fuel shut-off valve1/4 turn, if equipped. 3. Firmly push primer bulb 3 times, if equipped. WARNING • • 4. Move speed control to FAST, if equipped. Operate engine in FAST position. 5. Close bail, operator control bar on equipment with this feature. 6. Start your engine.
Operating Engine After engine has started, let it warm up several seconds to several minutes, depending on outside temperature. For maximum performance and life, operate engine with speed control in FAST, if equipped. • WARNING Running engines produce heat. Engine parts, especially muffler, become extremely hot. Do not tip engine or equipment at angle which causes gasoline to spill. Severe thermal burns can occur on contact. Periodically remove grass buildup under mower deck. See Maintenance section.
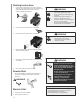
Oil Capacity Recommendation The engine holds approximately (18 oz.; 0.5 liter). • Use a high quality SAE 30 weight motor oil. • Do not use special additives. • Choose a viscosity according to the table opposite. Viscosity Grades ** * Note: Synthetic oil meeting ILSAC GF-2, API certification mark and API service symbol (shown at left) with “SJ/CF ENERGY CONSERVING” or higher, is an acceptable oil at all temperatures. Use of synthetic oil does not alter required oil change intervals.
Changing Oil Change oil after first 5 to 8 hours of use, then every 50 hours or every season. Change oil every 25 hours when operating the engine under heavy load or in high temperatures. 1. Run engine until it runs out of fuel. Otherwise, fuel can leak out, creating a fire/explosion hazard, when you tip engine in Step 4. 2. Disconnect spark plug wire and keep it away from spark plug. 3. With engine OFF but still warm remove dipstick. 4. Top oil drain, keep spark plug side up.
Adding Fuel 1. 2. Remove cap. Fill tank to approximately one inch below top of neck to allow for fuel expansion. Be careful not to overfill. Replace cap before starting. WARNING • Fuel Fill • • • • • Fresh StartE Fuel Cap Turn engine OFF and let engine cool at least 2 minutes before removing gas cap. Fill fuel tank outdoors or in well-ventilated area. Do not overfill fuel tank. Fill tank to approximately 1 inches below top of neck to allow for fuel expansion.
Engine Specifications This is a single cylinder, L-head, air-cooled engine. It is a low emissions engine. In the state of California, model 120000 engine covered in this manual is certified by the California Air Resources Board to meet emissions standards for 125 hours. Such certification does not grant the purchaser, owner or operator of this engine any additional warranties with respect to the performance or operational life of this engine.
WARNING Engine Maintenance Unintentional sparking can result in fire or electric shock. Regular maintenance will improve the performance and extend the life of the engine. See any Authorized Briggs & Stratton Dealer for service. Use only genuine Briggs & Stratton parts. Other parts may not perform as well, may damage the engine, and may result in injury. In addition, use of other parts may void your warranty.
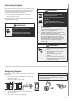
Air Cleaner All engines have an air cleaner cartridge. The cartridge is either flat or oval (see illustrations). In addition, some engines have a pre-cleaner. CAUTION Do not use pressurized air or solvents to clean cartridge. Pressurized air can damage cartridge; solvents will dissolve cartridge. Pre-cleaner To clean pre-cleaner (if equipped), separate it from cartridge and wash in liquid detergent and water. Air dry thoroughly. Do not oil. Re-assemble dry pre-cleaner on clean cartridge.
Combustion Deposits We recommend that after every 100-300 hours you have an authorized Briggs & Stratton Service Dealer remove combustion deposits from the cylinder, cylinder head, top of piston, and around valves. Muffler Replacement parts for the muffler must be the same and installed in the same position as the original parts, otherwise fire can occur. WARNING Fuel System Drain fuel tank or close fuel shut-off valve before replacing fuel filter.
Storage Engines stored over 30 days need special attention. 1. To prevent gum from forming in fuel system or on essential carburetor parts: a) if fuel tank contains oxygenated or reformulated gasoline (gasoline blended with an alcohol or an ether), run engine until it stops from lack of fuel, or b) if fuel tank contains gasoline, either run engine until it stops from lack of fuel, or add a gasoline additive to the gas in the tank. (See parts list.
Warranty Information Briggs & Stratton Corporation (B&S), the California Air Resources Board (CARB) and the United States Environmental Protection Agency (U.S. EPA) Emissions Control System Warranty Statement (Owner’s Defect Warranty Rights and Obligations) The California Air Resources Board (CARB), U.S. EPA and B&S are pleased to explain the Emissions Control System Warranty on your small off-road engine (SORE).
BRIGGS & STRATTON ENGINE OWNER WARRANTY POLICY Effective September 1, 2006 LIMITED WARRANTY Briggs & Stratton Corporation will repair or replace, free of charge, any part(s) of the engine that is defective in material or workmanship or both. Transportation charges on parts submitted for repair or replacement under this warranty must be borne by purchaser. This warranty is effective for and is subject to the time periods and conditions stated below.
ABOUT YOUR ENGINE WARRANTY Briggs & Stratton welcomes warranty repair and apologizes to you for being inconvenienced. Any Authorized Service Dealer may perform warranty repairs. Most warranty repairs are handled routinely, but sometimes requests for warranty service may not be appropriate. For example, warranty would not apply if engine damage occurred because of misuse, lack of routine maintenance, shipping, handling, warehousing or improper installation.