
Instruction Manual

Night Vision Monocular (BFT21B) - Instrucon Manual
Side interface Buon
Menu:
WIFI connecon
1. Aer power on camera, long press “M” buon to enter menu, select WIFI opon, press “IR”/”OK” buon to enter WIFI opon (turn ON
WIFI) and the screen would show “waing for WIFI connecon”
2. In your mobile phone, turn ON WIFI and search “Wifi-cam” and click connect to the camera WIFI network. If it is your first me to
connect, you will ask to input password: 12345678. If the phone is successfully connected to the camera, the LCD of camera will shows
“wifi connected”
3. Download and install the iSmart DV app from the Google Play Store or Apple App store. Launch the app to operate the camera via WIFI,
you are now ready to stream in real me and capture through the app.
FCC Warning
This device complies with Part 15 of the FCC Rules. Operaon is subject to the following two condions:
(1) This device may not cause harmful interference, and (2) this device must accept any interference received, including interference that
may cause undesired operaon
NOTE 1: This equipment has been tested and found to comply with the limits for a Class B digital device, pursuant to part 15 of the FCC
Rules. These limits are designed to provide reasonable protecon against harmful interference in a residenal installaon. This equipment
generates, uses and can radiate radio frequency energy and, if not installed and used in accordance with the instrucons, may cause
harmful interference to radio communicaons. However, there is no guarantee that interference will not occur in a parcular installaon. If
this equipment does cause harmful interference to radio or television recepon, which can be determined by turning the equipment off
and on, the user is encouraged to try to correct the interference by one or more of the following measures:
- Reorient or relocate the receiving antenna.
- Increase the separaon between the equipment and receiver.
- Connect the equipment into an outlet on a circuit different from that to which the receiver is connected.
- Consult the dealer or an experienced radio/TV technician for help.
NOTE 2: Any changes or modificaons to this unit not expressly approved by the party responsible for compliance could void the user's
authority to operate the equipment.
1. View/Play
2. photo/video
3. reduce brightness/Previous
4. Increase brightness/Next
5. Short press to switch between photo/video mode,
Long press to open the menu or cancel/back
6. Adjust IR Led brightness (OFF-1-2-3-4)/ OK
1. ON/OFF switch
2. USB port
3. Micro SD card slot
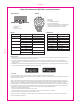
Main menu Sub menu Descripon
Data & Time :YYYY/MM/DD HH MM Set me
Buon backlight OFF Off Buon backlight
ON No Buon backlight
WiFi OFF Off WIFI
ON On WIFI
SD format No Format SD
YES
Default seng No Restore default sengs
YES
Firmware FW VERSION Check FW VERSION
FW UPDATE FW UPDATE
Default set:
1
2
3
1
2
3
4
5
6
Data & me 2018/01/01 00:00
Buon backlight ON
WiFi status OFF
SD format NO
Screen brightness 50%
Mode Picture
Photopixels 1600
Video 1280*720
WIFI NAME Wifi-cam
WIFI PASSWORD 12345678
148mm
210mm