ALL RIGHTS RESERVED © 2015. All rights are reserved. No part of this document can be reproduced without permission. All trademarks and brand names mentioned in this publication are property of their respective owners. While all the efforts have been made to ensure the accuracy of contents in this manual, we presume no responsibility for errors or omissions or statements of any kind, whether such errors are omissions or statements resulting from negligence, accidents, or any other cause.
will work in combination with any hardware or software applications provided by a third party, that the operations of the software will be uninterrupted or error free or that any defects in the software are correctable or will be corrected. User’s Manual is provided just to guide the user about the functionality of the device. This does not seem to be any certificate of technology. Some functions may vary due to modifications and up-gradations of software or due to printing mistake.
SAFETY PRECAUTIONS Please read the following safety guidelines before using the device: Do not use the phone while you are driving. Do not place magnetic storage media near your phone. Radiation from the phone may erase the information stored on them. Keep your phone and its accessories away from children. Mobile phones can interfere with the functioning of medical devices such as hearing aids or pacemakers.
Please back up your important data timely and keep them properly. The manufactor is not liable for any failure to call or loss of data due to mis-operation, poor signal or power cut, etc. All the screens in this manual are for reference only, and some contents actually displayed may depend upon the presetting of the service provider or the network operator, or the SIM card. If any functions referred to in this manual are different from those of your device, please follow your device.
TABLE OF CONTENTS ALL RIGHTS RESERVED ......................................................1 SAFETY PRECAUTIONS ......................................................3 TABLE OF CONTENTS ........................................................5 1. UNDERSTANDING YOUR DEVICE .......................................7 1.1 GENERAL INFO.................................................................. 7 1.2 DEVICE OVERVIEW ............................................................ 8 2. GETTING STARTED ..........
.3 BLUETOOTH ................................................................... 20 7. SETTINGS ................................................................. 21 7.1 SIM MANAGEMENT ......................................................... 21 7.2 WIRELESS & NETWORKS ................................................... 21 7.3 AUDIO PROFILES ............................................................. 21 7.4 DISPLAY ........................................................................ 21 7.5 STORAGE ...
1. UNDERSTANDING YOU R DEVICE 1.1 GEN ERAL INFO MINT 140 is a multi-function is phone, such as Android version 4.4, Wi-Fi, 1.0 GHz Dual Core Processor, 8 MP digital Camera, etc.
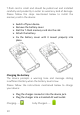
1.2 DEVICE OVERVIEW Position of Keys 1. Power Key 2. Earpiece 3. USB Port 4. Touch Screen 5. Menu Key 6. Home Key 7. Back Key 8. Front Camera Lens 9. Earphone Jack 10. Camera Lens 11. Battery Cover 12. Flash 13.
2. GETTING STARTED 2.1 INSTALLIN G S IM CA RD & BATT ERY Please switch off your device before inserting or removing the battery/ SIM card or memory card. Installing SIM Card and Battery In order to install battery and SIM card in the device, please follow the steps mentioned below: Remove the back cover of the device. Hold the device with the front facing downwards and pull the battery cover. Insert the SIM card in the device. Attach the battery. Push the battery cover until it clicks into place.
T-flash card is small and should be pulled out and installed carefully and prudently in order to avoid any kind of damage. Please follow the steps mentioned below to install the memory card in the device: Switch off your device. Remove the battery cover. Slot the T-Flash memory card into the slot. Attach the battery. Fix the battery cover until it mount properly into place.
You should fully charge the battery before using the device for the first time. It is recommended to charge the battery for three hours before using the device for the first time. 2.2 POWERIN G ON /OFF T HE DEV IC E Turning On the Device After installing the SIM card and charging the battery, you are now ready to turn on your device. Long press and hold the Power Key to turn on the device. The first screen that appears is known as the home/idle Screen.
3. BASIC OPERATIONS 3.1 CALLING To Make Calls If the icon appears on the screen, then you can make or receive calls. To make a call, please follow the steps mentioned below: Select Phone. Enter the phone number using the on-screen keyboard. Tap to delete a wrong number. Tap and hold it to erase the entire number. After entering phone number, tap To end the call, tap . Answer/Reject an Incoming Call When you receive an incoming call, a notification message appears on the screen.
To set up conference calls If you are already having a call conversation, select Hold to put the call on hold. Select Add Call to make another call. After connecting to the second call, select merge calls to set up the conference call. 3.2 MESSAGIN G Your device features, sending and receiving of SMS (Short Message Service) and MMS (Multimedia Message Service). Go to Main Menu and then select Messaging. Creating a Message Tap Compose new message. In To field; enter the recipient’s phone number.
To insert a picture or video file, etc, tap . To insert text, tap Type to Compose, and then enter your message. 3.3 CONTACTS Contacts refer to the phonebook that lets you store names, phone numbers, etc. To add a Contact Enter the Main Menu select People. Tap > select the storage You can enter contact information such as name, phone number, etc. Tap Done to save the contact. To import contacts Enter the Main Menu select People. Tap Menu > Import/Export.
3.4 EMA IL Your device allows you to compose, read and send emails. 3.5 BROWS ER Browser is a tool which enables you to access the Internet.
4. HOME SCREEN 4.1 STATUS BA R The status bar icons indicate different types of information. The table below lists various icons that might appear on the status bar of the device. Network signal strength Battery level of the device New short message Missed call notification USB connected Bluetooth is activated Wi-Fi is connected. GPRS network is in use. 4.2 CUSTO MIZIN G SC REEN The device features a touch screen with idle displays and access to utilities at just one-touch.
features without entering the main menu. Each screen can be customized by adding various widgets, shortcuts and folders. Shortcuts In order to add a shortcut on the screen: Long press on the desired application to add on the screen. Widgets Save time with live updates right on Home screen and get all of your personalized updates at one place. Setting the wallpaper You can customize the wallpaper of your Home screen with default wallpaper or with pictures taken from your device.
5. MULTIMEDIA 5.1 FILE MANA GER You can browse, open and manage the data saved in the Device and Memory card by accessing the File Manager sub-menu. The device provides a certain space for users to manage files and supports the T-Flash card. You can use the file browser to conveniently manage various directories and files on the T-Flash card. 5.2 MUSIC Use the Music to play music files. The songs saved in your SD Card can be played using the Music Player of the device.
downloaded images in the Gallery. The picture folder and video folder will be displayed. Select to view the camera pictures or camera videos. The images or videos will be displayed in thumbnails. 5.6 FM RADIO You can use your phone to listen to FM radio stations once the original Headset is plugged into the connector. Please press the side key to adjust music volume. Tap to exit FM radio function. Tap the ( search the channels.
6. NETWORK 6.1 WI-FI Connect to a wireless network to browse Internet. Enter Main Menu and tap Settings. Tap ‘ON’ to activate Wi-Fi. Tap Wi-Fi > Network notification to start detecting networks. The available networks will then be listed. Tap Add Wi-Fi network to add a connection. 6.2 3G The device supports WCDMA protocol. Please make sure that you device is turned off, then insert or remove the SIM card. 6.3 BLUETOOTH You can transfer data, such as music to other device using Bluetooth.
7. SETTINGS 7.1 SIM MANA GEMENT Your device supports one or multi SIM card. You can view/change the roaming settings of the cards using this menu. 7.2 WIRELESS & N ETWO RKS Access this sub-menu to change/view the Wi-Fi, Bluetooth, Mobile Networks, VPN settings, etc. Please refer to network section for detailed information on Wi-Fi and bluetooth. 7.3 AUDIO P ROFILES Your device provides four pre-defined user profiles that allow the operations of the device to best suit the environment you are in.
Un-mount SD Card: Un-mounts the microSD card from your device so that you can format the card or safely remove it when the device is on. Available Space: The amount of internal phone storage used by the operating system, its components, applications (including those you downloaded), and their permanent and temporary data. 7.6 BATT ERY You can check the battery status of the device by accessing this sub-menu. 7.
Select a SIM card. Tap Lock SIM card to use PIN. Check to enable, uncheck to disable. Enter the current PIN code. To change the PIN code, select Change PIN. Enter the old PIN code. Enter the new PIN code and confirm. Setup Screen Lock You can set up a lock for your screen in form of Pattern, PIN code or password. Go to Settings > Security. Set up screen lock. Select a desired form (Slide, Pattern, PIN code or password) 7.
applications can synchronize user data automatically. 7.13 DAT E & T IME You can select to set date, time and time zone using this sub-menu. Use Automatic unless you need to override the network values. Use 24-hour format: Select to set 24-hour formats on or off. Choose Date format: Select from a variety of formats. 7.14 SC HEDULED POWER ON&OFF You can set the time for auto power on /off. Do turn the status on before using that function, and then the time. 7.
8. APPLICATIONS AND UTI LITIES 8.1 CALCULATOR Calculator helps you perform basic arithmetic functions, such as addition, subtraction, multiplication and division. 8.2 CLOCK This function gives you an access to the alarm clock. Go to Clock Tap > tap to add alarm. 8.3 GMA IL Gmail is Google's web-based email service. Google Mail is configured when you first set up your device.
on the places you like and recommendations from your friends. 8.5 PLAY STORE Play store allows you to find and download applications and fun games for your device. Go to Main Menu > Play Store and setup your Google account. Select Create to create a new account or Existing to sign in your existing account. Once you are signed in you can begin searching and downloading programs from the market. Tap Apps to view the list of applications available and tap Games to view the list of games available.
9. SPECIFICATIONS Screen 4.0 inch (HVGA) Battery 1500mAh Dimensions 123x64x9.2 mm Weight 120 g Network GSM: 850/900/1800/1900 MHz WCDMA: 850/1900 MHz Up to 300 hours* Standby Time Maximum Talk Time Power Adapter Up to 4 hours* Input: 100-240V Output: 5V/750mA * The standby time and maximum talk time depend upon the network signals and settings.
ENVIRONMENTAL CONCERN Help us save Our Environment…GO GREEN..!! All our endeavors are directed towards providing environment friendly products to you. The materials used in our devices are recyclable and can be reused to make new products. We strive to make products that are safe for our consumers as well as the environment. Come join hands with us and make world a better place to live. Preserve natural resources for future generations by recycling your phone.
Don’t trash your phone, instead RECYCLE it This logo signifies that this product and/or its constituents should not be disposed off with other household waste.
recycling of our products. For details of our collection centers, please visit our website or call our customer care. Help us to GO GREEN. Constitution of Hazardous Elements in your Device: Your device does not contain the following hazardous elements in a proportion higher than the limits provided hereunder: maximum concentration value of 0.
To prevent possible hearing damage, do not listen at high volume levels for long periods. Adapter warning : Adapter shall be installed near the equipment and shall be easily accessible Battery warning Caution Risk of explosion if battery replaced by an incorrect type. Dispose of used batteries according to the instructions. Product operational temperature, Adaptor temperature Please make sure the temperature for device will not be higher than 45˚C The device could be used with a separation distance of 1.
FCC REGULATIONS: This mobile phone complies with part 15 of the FCC Rules. Operation is subject to the following two conditions: (1) This device may not cause harmful interference, and (2) this device must accept any interference received, including interference that may cause undesired operation. This mobile phone has been tested and found to comply with the limits for a Class B digital device, pursuant to Part 15 of the FCC Rules.
FCC NOTE: Caution: Changes or modifications not expressly approved by the party responsible for compliance could void the user‘s authority to operate the equipment. RF EXPOS URE INFO RMAT ION (SAR) This phone is designed and manufactured not to exceed the emission limits for exposure to radio frequency (RF) energy set by the Federal Communications Commission of the United States.
had been tested in accordance with the measurement methods and procedures specified in IEEE1528. The FCC has granted an Equipment Authorization for this model phone with all reported SAR levels evaluated as in compliance with the FCC RF exposure guidelines. SAR information on this model phone is on file with the FCC and can be found under the Display Grant section of www.fcc.gov/oet/ea/fccid after searching on FCC ID: WVB140M. For this device, the highest reported SAR value for usage against the head is 0.
User’s manual MINT 140 version 11 © Copyright 2015, Brightstar Corp., All rights reserved.