
Full Product Manual

WIRELESS REMOTE CONTROL
COLOR CHANGING LED PUCK LIGHT
OWNER’S MANUAL
Model # BRRC119
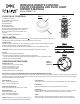
FIG. 1
1
LOCATION OF CONTROLS:
1. ON/OFF Tap Lens
2. Light Battery Compartment
3. Remote Control
4. Power Buttons
5. Preset Dimmer
6. Selectable Dimmer
7. Warm White, Red, Green, Blue Color Setting
8. Fade (cycle through all the color options)
9. Set (to select a color and recall that color)
10. Timer
11. Remote Battery Compartment
INSTALLATION:
When mounting the puck lights make sure the icon is facing out, towards the remote (Fig. 3).
This will ensure that the puck lights receive the signal from the remote.
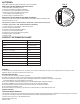
Adhesive Tape:
1. Make sure the area where you want to attach the light is clean and clear of debris and dust.
2. Attach adhesive tape to mounting bracket (Fig. 4).
3. Place mounting bracket in desired location. Press firmly to ensure adhesive sticks.
CAUTION: Adhesive tape may remove paint or damage surface when removed.
Screws:
1. Remove mounting bracket from light.
2. Use the mounting bracket as a guide to drill two (2) pilot holes.
Secure mounting bracket to surface with screws (included). Do not over tighten screws.
3. Attach light to mounting bracket.
OPERATING INSTRUCTIONS:
ON/OFF Tap Lens:
1. Press the lens once for warm white.
2. Press a second time for red.
3. Press a third time for green.
4. Press a fourth time for blue.
5. Press a fifth time to turn the light off.
Remote Control Operation: REMOVE PLASTIC TAB FROM REMOTE PRIOR TO USE
The remote control will operate the puck lights within 15 feet. The remote uses Infra Red technology. It is best to point the remote control
at the puck lights. Physical objects between the remote and the puck lights may interfere with the Infra Red signal. Up to 12 puck lights
can be controlled by one remote control.
Power Buttons:
Red – Turns puck lights OFF.
Green – Turns puck lights ON.
Preset Dimmer Buttons:
When puck lights are ON press 50% or 100%.
Dimmer Buttons:
When puck lights are ON:
Hold - to decrease brightness.
Hold + to increase brightness.
NOTE: Brightness level can only be controlled by the
remote. Lights will default to last brightness setting.
Attach
adhesive
tape here
FIG. 4
2
11
8
FIG. 2
4
5
6
7
3
FIG. 3
9
10
Color Buttons:
There are 4 preset color options: warm white (3000K), red, green and blue.
Fade Button:
Press the FADE button to cycle through all the color options.
Set Button:
After the FADE button has been pressed you can select a color by pressing
the SET button. The SET button will also recall the color selected.
Timer:
When puck lights are ON press desired timer option (30 or 60 minutes).
Lights will flash to confirm setting. Reset timer by turning puck lights OFF.