Modelo / Model 810-3013-M Asador a Carbón de Barril Charcoal Barrel Grill MANUAL DEL PROPIETARIO / OWNER’S MANUAL INSTRUCCIONES DE ARMADO Y OPERACIÓN ASSEMBLY AND OPERATING INSTRUCTIONS GUARDE ESTE MANUAL PARA REFERENCIA FUTURA SAVE THIS MANUAL FOR FUTURE REFERENCE Modelo / Model 810-3013-M AVISO PARA EL INSTALADOR: ENTREGUE ESTAS INSTRUCCIONES AL PROPIETARIO DE LA ASADOR PARA REFERENCIA FUTURA. NOTICE TO INSTALLER: LEAVE THESE INSTRUCTIONS WITH THE GRILL OWNER FOR FUTURE REFERENCE.
TABLA DE CONTENIDOS: Importantes Advertencias de Seguridad . . . . . . . . . . . . . . . . . . . . . . . . . . . . . . . . . . 2-3 Instrucciones de Armado . . . . . . . . . . . . . . . . . . . . . . . . . . . . . . . . . . . . . . . . . . . . . 4-12 Preparación para el Uso Y Instrucciones de Encendido . . . . . . . . . . . . . . . . . . . . 13-14 Instrucciones de Operación . . . . . . . . . . . . . . . . . . . . . . . . . . . . . . . . . . . . . . . . . . 15-19 Seguridad Posterior al Uso . . . . . . . . . .
IMPORTANTES ADVERTENCIAS DE SEGURIDAD ES NUESTRO DESEO QUE ARME Y UTILICE SU ASADOR EN LA FORMA MÁS SEGURA POSIBLE. EL PROPÓSITO DE ESTE SÍMBOLO DE ALERTA DE SEGURIDAD ES QUE USTED PRESTE ATENCIÓN A LOS POSIBLES PELIGROS CUANDO ARME Y UTILICE SU ASADOR. ¡CUANDO VEA ESTE SÍMBOLO DE ALERTA DE SEGURIDAD, PRESTE ESPECIAL ATENCIÓN A LA INFORMACIÓN A CONTINUACIÓN! LEA DETENIDAMENTE TODAS LAS ADVERTENCIAS DE SEGURIDAD E INSTRUCCIONES ANTES DE ARMAR Y USAR EL ASADOR.
ADVERTENCIA • Verifique el nivel de grasa en la lata con frecuencia y vacíela o cámbiela cuando esté 3/4 llena. Tenga mucho cuidado ya que el asador, la lata y su contenido estarán calientes. • Cuando cocine en el asador, la grasa de la carne puede gotear sobre el carbón y producir una llamarada. Si esto sucede, cierre la tapa para sofocar la llama. No use agua para apagar incendios causados por grasa.
INSTRUCCIONES DE ARMADO LEA DETENIDAMENTE TODAS LAS ADVERTENCIAS DE SEGURIDAD E INSTRUCCIONES ANTES DE ARMAR Y USAR EL ASADOR. SI FALTAN PARTES, LLAME A SERVICIO AL CLIENTE AL 800-527-0717. Inspeccione el contenido de la caja para verificar que todas las partes estén incluidas e intactas. Servicio no válido para México. Recomendamos que esta unidad sea armada por dos personas.
Contenido de la bolsa de partes 2 8 25 8 6 Pernos de Hombro M6 X 25 mm Pernos M6 X 12 mm Pernos M5 X 12 mm Tuercas M6 Tuercas M5 Pernos de Hombro M6 X 25 mm 4 4 2 1 Chavetas Pernos M5 X 40 mm Arandelas M10 mm Tuerca de Bloqueo M5 Pernos M6 X 12 mm Chavetas Tuercas M5 Tuercas M6 Pernos M5 X 12 mm Pernos M5 X 40 mm Arandelas M10 Tuerca de Bloqueo M5 5 INS_810-3013-M_Span_Eng.
Elija un lugar adecuado y despejado para armar el asador y pídale a un amigo que le ayude. Tienda cartón sobre el suelo para proteger el acabado del asador y el área de armado. Coloque el asador de costado para comenzar el armado. Agujeros para apoyos de repisa delantera Paso 1 Conecte y una las patas derechas e izquierdas (2 pares). El par de patas delanteras tiene 2 agujeros extra para los soportes de la repisa delantera, tal como se ilustra.
NOTA: Con la ayuda de un amigo, voltee el carrito. Paso 3 Coloque la repisa inferior a las patas usando cuatro pernos M5 x 40 mm . Paso 4 Inserte el eje de las ruedas a travéz de la rueda, la arandela y el ensamblado de la pata. Asegure el eje de la rueda con una chaveta. Repita para la otra rueda. 7 INS_810-3013-M_Span_Eng.
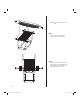
NOTA: Con la ayuda de un amigo, voltee el carrito a la posición vertical. Paso 5 Instale la base de la parrilla a la base del carrito usando seis pernos M5 X 12 mm y dos tuerca M5. Paso 6 Instale dos soportes para la repisa frontal a la base del carrito usando dos pernos M5 X 12 mm . Una la repisa frontal a la parrilla usando dos pernos M5 X 12 mm y tuercas M5. Una los dos soportes para la repisa frontal a la repisa frontal usando dos pernos M5 X 12 mm .
Paso 8 Fije el conjunto de placa de la cubierta izquierda al cuerpo del asador con seis pernos M6 X 12 mm y tuercas M6, a continuación, coloque la manija del cuerpo del asador utilizando dos pernos M6 X 12 mm y tuercas M6, como se ilustra. Paso 9 Conecte la chimenea a la tapa del asador usando dos pernos M5 X 12 mm y dos tuercas M5. Paso 10 Instale la manija de la tapa del asador usando dos pernos M5 X 12 mm . 9 INS_810-3013-M_Span_Eng.
Paso 11 Inserte el medidor de temperatura, y gírelo a la derecha para trabar en su lugar. Paso 12 Instale la tapa del asador a la base del asador usando dos pernos M6 X 25 mm de hombro y chavetas. Paso 13 Remueva una tuercas de trabe ensambladas previamente en la parrilla para calentar. Inserte la parrilla para calentar en los agujeros en la tapa del asador y luego inserte las patas de la parrilla para calentar en los agujeros den la base del asador.
Paso 15 Coloque la parrilla para carbón del asador en la bandeja de carbón. Cuelgue el ensamblado de parrilla para carbón dentro de la base del asador usando los ajustadores de la rejilla para carbón. ADVERTENCIA: Nunca cuelgue la parrilla para carbón de las manijas de los ajustadores de la parrilla para carbón. Manija Ajustadores de la Parrilla para Carbón Paso 16 Cuelgue el ensamblado de la parrilla para carbón dentro de la base del asador usando los ajustadores de la parrilla para carbón.
Asador a Carbón de Barril (Armado) 12 INS_810-3013-M_Span_Eng.
PREPARACIÓN PARA EL USO Y INSTRUCCIONES DE ENCENDIDO COLOQUE EL ASADOR AL AIRE LIBRE SOBRE UNA SUPERFICIE DURA, NIVELADA Y NO COMBUSTIBLE, LEJOS DE UN ALERO O DE CUALQUIER MATERIAL COMBUSTIBLE. NUNCA LA USE SOBRE UNA SUPERFICIE DE MADERA U OTRAS SUPERFICIES QUE PUEDEN ARDER. SITÚE EL ASADOR LEJOS DE LAS VENTANAS O PUERTAS ABIERTAS PARA EVITAR QUE ENTRE HUMO A LA CASA. SI HAY VIENTO, SITÚE EL ASADOR EN UN ÁREA EXTERIOR PROTEGIDA DEL VIENTO.
NOTA: Para prolongar la vida útil de la parrilla, asegúrese de que las brasas calientes y la leña no toquen las paredes de la parrilla. SI ESTÁ USANDO UN ENCENDEDOR PARA CHIMENEA A CARBÓN, CONTINÚE CON EL PASO 9 Si usa un Encendedor para Chimenea a Carbón, siga todas las advertencias e instrucciones del fabricante para el uso de su producto. Comience con 5.5 libras (2.5 kg) de carbón en el compartimiento para cocinar.
INSTRUCCIONES DE OPERACIÓN COLOQUE EL ASADOR AL AIRE LIBRE SOBRE UNA SUPERFICIE DURA, NIVELADA Y NO COMBUSTIBLE, LEJOS DE UN ALERO O DE CUALQUIER MATERIAL COMBUSTIBLE. NUNCA LA USE SOBRE UNA SUPERFICIE DE MADERA U OTRAS SUPERFICIES QUE PUEDEN ARDER. SITÚE EL ASADOR LEJOS DE LAS VENTANAS O PUERTAS ABIERTAS PARA EVITAR QUE ENTRE HUMO A LA CASA. SI HAY VIENTO, SITÚE EL ASADOR EN UN ÁREA EXTERIOR PROTEGIDA DEL VIENTO.
Paso 5 Abra el obturador de aire aproximadamente 1 ó 2 pulg. (2.54 cm - 5 cm) y el regulador de tiro de la chimenea hasta la mitad. Con la tapa abierta, apártese y encienda cuidadosamente el carbón; déjelo arder hasta que esté cubierto con una ceniza ligera (aproximadamente 20 minutos). ADVERTENCIA: Se debe permitir que el fluido de encendido se consuma por completo antes de cerrar la tapa.
Cómo Cocinar a la Parrilla en la Cámara de Cocción Paso 1 Quite la parrilla para cocinar de la cámara de cocción y póngalas a un lado. Coloque el conjunto de la parrilla para carbón en el nivel más bajo de la cámara de cocción. Paso 2 Coloque una lata sobre el sujetador de la gaveta para grasa. Debe haber una lata colocada bajo el agujero para grasa todo el tiempo. Paso 3 Siga cuidadosamente las instrucciones a continuación para encender la parrilla.
SI ESTÁ USANDO LIQUIDO ENCENDEDOR CONTINÚE CON EL PASO 8 Si usa un Encendedor para Chimenea a Carbón, siga todas las advertencias e instrucciones del fabricante para el uso de su producto. Comience con 5.5 libras (2.5 kg) de carbón en el compartimiento para cocinar Abra el obturador de aire aproximadamente 1 ó 2 pulg. (2.54 cm - 5 cm) y el regulador de tiro de la chimenea a la mitad.
Cómo Agregar Carbón/ Leña Mientras Cocina Puede ser necesario añadir carbón y/o leña para mantener o aumentar la temperatura de cocción. Cómo agregar carbón/leña en la cámara de cocción Paso 1 Apártese y abra cuidadosamente la tapa de la cámara de cocción. Sea precavido ya que pueden producirse llamaradas cuando el aire fresco hace contacto repentino con las llamas. Paso 2 Use guantes para el horno para retirar la comida y la parrilla para cocinar.
SEGURIDAD POSTERIOR AL USO ADVERTENCIA • Siempre deje que el asador y todos los componentes se enfríen bien antes de tocarlos. • Nunca deje las brasas y cenizas en el asador desatendidas. Verifique que las brasas y cenizas están totalmente apagadas antes de retirarlas. • Se deben remover las brasas y cenizas restantes del asador antes de dejarlo desatendido. Sea precavido para protegerse usted y su propiedad.
TABLE OF CONTENTS: General Warnings. . . . . . . . . . . . . . . . . . . . . . . . . . . . . . . . . . . . . . . . . . . . . . . . . . 22-23 Assembly Instructions . . . . . . . . . . . . . . . . . . . . . . . . . . . . . . . . . . . . . . . . . . . . . . 24-32 Preparation for Use & Lighting Instructions. . . . . . . . . . . . . . . . . . . . . . . . . . . . . . 33-34 Operating the Grill . . . . . . . . . . . . . . . . . . . . . . . . . . . . . . . . . . . . . . . . . . . . . . . . . 35-39 After-use Safety .
IMPORTANT SAFETY WARNINGS WE WANT YOU TO ASSEMBLE AND USE YOUR GRILL AS SAFELY AS POSSIBLE. THE PURPOSE OF THIS SAFETY ALERT SYMBOL IS TO ATTRACT YOUR ATTENTION TO POSSIBLE HAZARDS AS YOU ASSEMBLE AND USE YOUR GRILL. WHEN YOU SEE THE SAFETY ALERT SYMBOL, PAY CLOSE ATTENTION TO THE INFORMATION WHICH FOLLOWS! READ ALL SAFETY WARNINGS AND INSTRUCTIONS CAREFULLY BEFORE ASSEMBLING AND OPERATING YOUR GRILL. WARNING • Only use this grill on a hard, level, non-combustible, stable surface (concrete, ground, etc.
WARNING • Check grease level in tin can often and empty or change when 3/4 full. Use extreme caution as the grill, tin can and its contents will be hot. • When grilling, grease from meat may drip into the charcoal and cause a grease fire. If this should happen close lid to suffocate the flame. Do not use water to extinguish grease fires. • Use caution since flames can flare-up when fresh air suddenly comes in contact with fire.
ASSEMBLY INSTRUCTIONS READ ALL SAFETY WARNINGS & ASSEMBLY INSTRUCTIONS CAREFULLY BEFORE ASSEMBLING OR OPERATING YOUR GRILL. FOR MISSING PARTS, PLEASE CALL CUSTOMER SERVICE AT 800-527-0717. Inspect contents of the box to ensure all parts are included and undamaged. Not valid for Mexico. We recommend two people work together when assembling this unit.
Parts Bag Contents 2 8 25 8 6 M6 X 25 mm Shoulder Bolts M6 X 12 mm Bolts M5 X 12 mm Bolts M6 Nuts M5 Nuts 4 4 2 1 M6 X 25 mm Shoulder Bolts Cotter Pins M5 X 40 mm Bolts M10 mm Flat Washers M5 Lock Nut M6 X 12 mm Bolts Cotter Pins M5 Nuts M6 Nuts M5 X 12 mm Bolts M5 X 40 mm Bolts M10 Flat Washers M5 Lock Nut 25 INS_810-3013-M_Span_Eng.
Choose a good, cleared assembly area and get a friend to help you put your grill together. Lay cardboard down to protect grill finish and assembly area. Turn the grill on its side to begin assembly. Front Shelf Bracket Holes Step 1 Connect right and left legs together (2 pairs). Front pair legs will have two extra holes for front shelf supports as illustrated. Step 2 Attach right cart beam to right legs using four M5 X 12 mm bolts. Attach left cart beam to left legs using four M5 X 12 mm bolts.
NOTE: With the help of a friend, turn cart assembly over. Step 3 Attach bottom panel to the legs using four M5 X 40 mm bolts as illustrated. Step 4 Insert wheel axle through wheel, washer, and leg assembly. Secure wheel axle using a cotter pin. Repeat for other wheel. 27 INS_810-3013-M_Span_Eng.
NOTE: With the help of a friend, turn cart assembly to the upright position. Step 5 Attach grill body to cart base using six M5 X 12 mm bolts and two M5 nut. Step 6 Attach two front shelf brackets to cart base using two M5 X 12 mm bolts. Attach front shelf to grill using two M5 X 12 mm bolts and M5 nuts. Attach two front shelf brackets to front shelf using two M5 X 12 mm bolts. Step 7 Attach air shutter to left cover plate using one M5 X 12 mm bolt and one M5 lock nut as illustrated.
Step 8 Attach left cover plate assembly to grill body using six M6 X 12 mm bolts and M6 nuts, then attach grill body side handle using two M6 X 12 mm bolts and M6 nuts as illustrated. Step 9 Attach chimney to the grill lid using two M5 X 12 mm bolts and two M5 nuts. Step 10 Attach grill lid handle to grill lid using two M5 X 12 mm bolts. 29 INS_810-3013-M_Span_Eng.
Step 11 Insert the temperature gauge and then turn it clockwise to lock into place. Step 12 Attach grill lid to grill body using two M6 X 25 mm shoulder bolts and cotter pins. Step 13 Remove one pre-attached lock nut on the warming rack. Insert warming rack through holes in the grill lid and then insert the warning rack legs through the holes in the grill body. Secure using the lock nut on threaded warming rack end. Step 14 Insert grease cup bracket on the cart right beam. 30 INS_810-3013-M_Span_Eng.
Step 15 Insert smoker charcoal grate to ash tray. Hang the charcoal grate assembly inside grill body using charcoal grate brackets. WARNING: Never hang charcoal grate from charcoal grate adjuster handles. Handle Charcoal Grate Adjuster Step 16 Hang the charcoal grate assembly inside grill body using charcoal grate brackets. Step 17 Place cooking grates on support ribs directly above charcoal grate. 31 INS_810-3013-M_Span_Eng.
Charcoal Barrel Grill (Assembled) 32 INS_810-3013-M_Span_Eng.
PREPARATION FOR USE & LIGHTING INSTRUCTIONS PLACE THE GRILL OUTDOORS ON A HARD, LEVEL, NON-COMBUSTIBLE SURFACE AWAY FROM ROOF OVERHANG OR ANY COMBUSTIBLE MATERIAL. NEVER USE ON WOODEN OR OTHER SURFACES THAT COULD BURN. PLACE THE GRILL AWAY FROM OPEN WINDOWS OR DOORS TO PREVENT SMOKE FROM ENTERING YOUR HOUSE. IN WINDY WEATHER, PLACE THE GRILL IN AN OUTDOOR AREA THAT IS PROTECTED FROM THE WIND. READ ALL SAFETY WARNINGS AND INSTRUCTIONS CAREFULLY BEFORE OPERATING YOUR GRILL.
IF USING CHARCOAL CHIMNEY STARTER, PROCEED TO STEP 9 If using lighter fluid, follow all manufacturer’s warnings and instructions regarding the use of their product. Start with 5.5 pounds of charcoal in cooking chamber. This should be enough charcoal to cook with once the curing process has been completed. Open the firebox air shutter approximately 1” to 2” and smokestack damper halfway. Step 6 Saturate charcoal with lighting fluid.
OPERATING INSTRUCTIONS PLACE THE GRILL OUTDOORS ON A HARD, LEVEL, NON-COMBUSTIBLE SURFACE AWAY FROM ROOF OVERHANG OR ANY COMBUSTIBLE MATERIAL. NEVER USE ON WOODEN OR OTHER SURFACES THAT COULD BURN. PLACE THE GRILL AWAY FROM OPEN WINDOWS OR DOORS TO PREVENT SMOKE FROM ENTERING YOUR HOUSE. IN WINDY WEATHER, PLACE THE GRILL IN AN OUTDOOR AREA THAT IS PROTECTED FROM THE WIND. READ ALL SAFETY WARNINGS AND INSTRUCTIONS CAREFULLY BEFORE OPERATING YOUR GRILL.
Step 5 Open the air shutter approximately 1” to 2” and smokestack damper half way. With lid open, stand back and carefully light charcoal and allow to burn until covered with a light ash (approximately 20 minutes). WARNING: Charcoal lighting fluid must be allowed to completely burn off prior to closing lid (approximately 20 minutes).Failure to do this could trap fumes from charcoal lighting fluid in grill and may result in a flash-fire or explosion when lid is opened.
Grilling In Cooking Chamber Step 1 Remove cooking grill from cooking chamber and set aside. Place charcoal grate assembly to lowest level of cooking chamber. Step 2 Place a tin can on the grease cup holder. A tin can must be placed under the grease hole at all times. Step 3 Follow the instructions below carefully to build a fire. You may use charcoal and/or wood as fuel in the Charcoal Barrel Grill (see “Adding Charcoal/ Wood During Cooking” section of this manual).
IF USING LIGHTER FLUID, PROCEED TO STEP 8 If using pre-treated charcoal, follow all manufacturer’s warnings and instructions regarding the use of their product. Start with 5.5 pounds of charcoal in cooking chamber. Open the air shutter approximately 1” to 2” and smokestack damper halfway. Step 7 With grill lid open, stand back and carefully light charcoal and allow to burn until covered with a light ash (approximately 20 minutes).
Adding Charcoal/Wood During Cooking Additional charcoal and/or wood may be required to maintain or increase cooking temperature. Adding Charcoal/Wood in Cooking Chamber Step 1 Stand back and carefully open cooking chamber lid. Use caution since flames can flare-up when fresh air suddenly comes in contact with fire. Step 2 Wearing oven mitts/gloves, remove food and cooking grills. Step 3 Stand back a safe distance and use long cooking tongs to lightly brush aside ashes on hot coals.
AFTER-USE SAFETY WARNING • Always allow grill and all components to cool completely before handling. • Never leave coals and ashes in grill unattended. Make sure coals and ashes are completely extinguished before removing. • Before grill can be left unattended, remaining coals and ashes must be removed from grill. Use caution to protect yourself and property. Place remaining coals and ashes in a noncombustible metal container and completely saturate with water.
PARA CUBIERTAS, ACCESORIOS Y OTROS PRODUCTOS, FAVOR DE VISITARNOS POR LA RED MUNDIAL EN: FOR COVERS, ACCESSORIES AND OTHER PRODUCTS, PLEASE VISIT US ONLINE AT: 1 AÑO DE GARANTÍA LIMITADA (VÁLIDA SÓLO EN E.U.A.) Durante un año a partir de la fecha de compra, The Brinkmann Corporation garantiza al comprador original que el Asador de Barril Grande está libre de defectos de materiales o mano de obra.