
Instructions / Assembly


WHENTOPERFORMALEAKTEST:
• Afterassemblingyourgrillandbeforelightingforthefirsttime,evenifpurchasedfullyassembled.
• EverytimetheLPgascylinderisrefilled,exchangedorifanyofthegascomponentsaredisconnectedor
replaced.
• Anytimeyourgrillhasbeenmoved.
• Atleastonceperyearorifyourgrillhasnotbeenusedformorethan60days.
CHECKINGFORLEAKS:
CAUTION: Strong odors, colds, sinus congestion, etc. may prevent the detection of propane by
smell. Use caution and common sense when testing for leaks.
Note: The leak test must be performed in an area that has adequate lighting in order to see if
bubbles are developing and not in a windy or noisy area so larger leaks can be detected by
smell or sound.
1. Create a mixture of 50% water and 50% liquid dishwashing soap.
2. Open the lid.
3. Ensure all control knobs are set to the “OFF” position.
4. Turn on the gas at the cylinder valve. Turn the cylinder valve knob counter-
clockwise to full open. If you hear a rushing sound or smell gas, turn the
gas off. Tighten any leaking connections. If leak is detected at connection
nut and tightening does not stop leak, reinspect propane tank rubber seal.
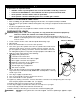
5. Apply the soapy water mixture to the following:
Supply tank (cylinder) weld.
Connection nut to tank valve.
Back side of connection nut to brass nipple.
Brass nipple connection into regulator.
Regulator connections to gas supply hoses.
Hose connection to gas manifold.
The full length of gas supply hose.
Tank valve to cylinder.
6. Check each place listed (A–H) for growing bubbles, which indicates a leak.
Large leaks may not be detected by bubbles but should produce a rushing
sound or gas smell.
7. Turn off gas supply at cylinder valve.
8. Turn on control knobs to release gas pressure in hose.
9. Turn control knobs to “OFF” position.
10. Tighten any leaking connections. If leak is detected at connection nut and tightening does not stop
leak, reinspect propane tank rubber seal. (see page 6)
11. Repeat soapy water test until no leaks are detected.
12. Turn off gas supply at cylinder valve until you are ready to use your grill.
13. Wash off soapy residue with cold water and towel dry.
14. Wait 5 minutes to allow all gas to evacuate the area before lighting grill.
WARNING: DO NOT use the grill if leaks cannot be stopped. Contact a qualified gas appliance repair
service.
8
To prevent fire or explosion hazard:
• DONOTsmokeorpermitignitionsourcesintheareawhileconductingaleaktest.
• PerformtestOUTDOORSinawellventilatedareathatisprotectedfromthewind.
• Neverperformaleaktestwithamatchoropenflame.
• Neverperformaleaktestwhilethegrillisinuseorwhilegrillisstillhot.
A
B
C
D
E
F
G
H
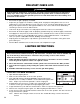
DANGER
Watch For Bub bles
F
B
C
D
E
G
H
A