
Instructions / Assembly
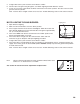


5. To light other burner, push and turn control knob to “HIGH”.
6. If burner does not ignite using the igniter, see “Match Lighting the Main Burners” section.
7. To turn off, turn each control knob clockwise until it locks in the “OFF” position. This does not turn off the
gas ow from the cylinder.
Note: If burner does not light or ame is too low, See “Trouble Shooting” section of the owners manual.
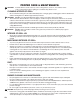
MATCH LIGHTING THE MAIN BURNERS:
1. Open lid before lighting.
2. Make sure all control knobs are in the “OFF” position.
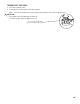
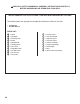
3. Place a paper match in the end of the matchlighter. Strike the match and
place through lighting hole in the left hand side of the grill to approximately
1/2” (1 to 2 cm) from the burner.
4. Turn on the LEFT main burner control knob to the “HIGH” position. The
burner should light within 5 seconds.
5. If the burner does not light, turn the control knob to “OFF” and wait
5 minutes for gas to dissipate and repeat lighting procedure.
6. To light other burner, push and turn control knob to “HIGH”.
7. If the burner does not light within the rst few attempts of match lighting, there is a problem with the gas
supply. Turn off the gas at the burner and cylinder. DO NOT attempt to operate the grill until the problem
is found and corrected.
Note: If burner does not light or ame is too low, See “Trouble Shooting” section of the owners manual.
Note: Observe ame height when lit: Flame should be a Blue/Yellow color
between 1”–2” when burner is on “HIGH”.
See section in manual on burner adjustment to adjust ame.
10
Lighting Hole
Matchlighter