
Warranty


17
BURNER ASSEMBLY/MAINTENANCE:
• Although your burners are constructed of stainless steel, they may corrode as a result of the extreme
heat and acids from cooking foods. Regularly inspect the burners for cracks, abnormal holes, and other
signs of corrosion damage. If found, replace the burner.
• DO NOT block ventilation areas in sides, back or cart compartment of
grill. Burner tubes can become blocked by spiders and other insects
building their nests. Blocked burner tubes can prevent gas flow to the
burners and could result in a burner tube fire or fire beneath the grill.
To clean the Burner Assembly follow these instructions to clean and/or
replace parts of burner assembly or if you have trouble igniting the grill.
1. Turn gas off at control knobs and LP cylinder tank valve.
2. Remove cooking grills and heat distribution plates.
3. Remove cotter pin and stud from each burner.
4. Carefully lift each burner up and away from valve openings.
5. Use a narrow bottle brush or a stiff wire bent into a small hook
to run through each burner tube or use compressed air to blow into
burner tube and out the flame ports. Check each port to make sure air
comes out each hole.
CAUTION: Wear eye protection when using compressed air.
6. Use a wire brush to clean the entire outer surface of burner to remove
food residue and dirt.
7. Check burner for damage, if any cracks or holes are
found replace burner.
8. Install burner in grill and carefully orient burners CORRECTLY.
IMPORTANT: Burner opening must slide over valve nozzle.
9. Replace cotter pins to each burner.
Note: Follow the “Gas Leak Testing” section of this manual.
Relight burners to verify proper operation.
10. Replace heat distribution plates and cooking grills.
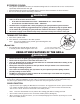
Debris
Cotter
Pin
PROPER VALVE TO BURNER ALIGNMENT
Valve Nozzle
Burner Opening
Stud