NOTICE TO PROFESSIONAL INSTALLER: LEAVE THESE INSTRUCTIONS WITH THE GRILL OWNER FOR FUTURE REFERENCE. AVISO PARA EL INSTALADOR: ENTREGUE ESTAS INSTRUCCIONES AL PROPIETARIO DE LA PARRILLA PARA REFERENCIA FUTURA.
IMPORTANT SAFETY WARNINGS WE WANT YOU TO USE YOUR CONVERSION KIT FOR YOUR GRILL AS SAFELY AS POSSIBLE. THE PURPOSE OF THIS SAFETY ALERT SYMBOL IS TO ATTRACT THE ATTENTION TO POSSIBLE HAZARDS AS THE GRILL IS CONVERTED AND USED AS A NATURAL GAS GRILL. WHEN YOU SEE THE SAFETY ALERT SYMBOL PAY CLOSE ATTENTION TO THE INFORMATION WHICH FOLLOWS! READ ALL SAFETY WARNINGS AND INSTRUCTIONS CAREFULLY BEFORE CONVERTING AND OPERATING YOUR GRILL. DANGER IF YOU SMELL GAS: 1. Shut off gas to the appliance. 2.
TABLE OF CONTENTS General Warnings. . . . . . . . . . . . . . . . . . . . . . . . . . . . . . . . . . . . . . . . . . . . . . . . . . . . . . . . . 3 Assembly Instructions . . . . . . . . . . . . . . . . . . . . . . . . . . . . . . . . . . . . . . . . . . . . . . . . . . . . 4-8 Connecting to Natural Gas Source. . . . . . . . . . . . . . . . . . . . . . . . . . . . . . . . . . . . . . . . . . . . 9 Leak Testing. . . . . . . . . . . . . . . . . . . . . . . . . . . . . . . . . . . . . . . . . . . . . . . . .
DANGER Connection should be made by a professional service technician. Supply the technician with a copy of these instructions. Incorrect connection can result in a gas leak with possibility of fire. GENERAL WARNINGS WARNING • Never use liquid propane gas in a unit designed for natural gas. • Never use charcoal or wood briquette in a gas grill. Flavoring chips must be contained in a metal smoking box to contain ash and prevent fires.
ASSEMBLY INSTRUCTIONS YOU MUST BE A PROFESSIONAL SERVICE TECHNICIAN TO CONVERT THIS GRILL. READ ALL SAFETY WARNINGS & ASSEMBLY INSTRUCTIONS CAREFULLY BEFORE ASSEMBLING OR OPERATING THE CONVERTED GRILL. The following tools are required to assemble the Conversion Kit: • Phillips Head Screwdriver • Adjustable Wrench • 3/4” Wrench PARTS CONTENTS Gas Orifice Tool 1.51mm Large Wrench L 1.51 mm Valve Orifice x 1 Pc. (BLUE) 1.35mm Small Wrench This grill has been converted to natural gas. 1.
CONVERSION INSTRUCTIONS Gas Manifold Nut 810-6805-S CAUTION: Some parts may contain sharp edges. Wear protective gloves if necessary. Note: Make sure all control knobs are in the off position, LP tank valve is closed and tank is disconnected from regulator and removed from grill. Step 1 Using an adjustable wrench to hold the gas manifold connection secure, use a 3/4” wrench to loosen the hose connection nut. Replace existing LP hose/regulator assembly with natural gas 10’ hose assembly.
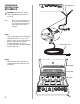
Step 3 Remove screw from each burner "foot" using a screwdriver. Carefully lift each burner up and away from valve openings. Set aside for later use. Step 4 Use the gas orifice tool to remove the LP brass orifice from main burner valves through the hole on the firebox front panel. Repeat this step for all main burners in your grill. Side View Firebox Front Panel Note: All orifices of the grill are double orifices type (LP gas and natural gas). You only remove the LP gas orifice tip.
Step 6 Figure 1 shows valve stem and bezel with the control knob removed. Take five large stop plates from the component card and place them over the valve stems as illustrated (Figure 2). Verify the tab and the stamped letter on the stop plates face out. Replace control knobs when finished. WARNING: We recommend and request that you do not remove the control panel in order to access the valve tips.
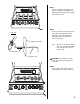
810-6805-S ROTISSERIE BURNER CAUTION: Only use specified natural gas orifice for your grill. Note: It is helpful to keep the screws with the components as they are removed for ease of reassembly. Cover Bolts Step 9 Remove the two screws of panel to gain access to the rotisserie LP brass orifice on back side of grill. Set aside for later use. Step 10 Use the wrench included to remove the LP brass orifice from the gas supply line.
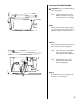
CONNECTING YOUR GRILL TO THE NATURAL GAS SOURCE 1. Coat pipe nipple with gas resistant teflon tape or pipe dope. Tighten quick-disconnect coupling onto pipe nipple that leads to natural gas supply (Figure A). 2. After grill is completely assembled, make sure natural gas supply valve is "OFF" and then connect natural gas hose to socket. Push sleeve back on socket (Figure B) and insert plug until sleeve snaps forward, locking plug into socket. Be sure to leak test these connections prior to use.
WARNING • Never use your grill without leak testing all gas connections and hoses. See the section on “Leak Testing” in this manual for proper procedures. • Visually inspect the hose assembly prior to each use for evidence of damage, excess wear or deterioration. If found, replace the assembly before using your grill. Only the manufacturer's supplied replacement should be used. • During assembly or conversion to natural gas, keep the supply hoses free of kinks and/or damage.
CHECKING FOR LEAKS: 1. 2. 3. 4. 5. 6. Create a mixture of 50% water and 50% liquid dishwashing soap. Open the lid. Ensure all control knobs are set to the "OFF" position. Ensure gas hose is tightly connected to gas source. Turn on the fuel supply at the source. Apply the soap water mixture to the following: A Hose connection to gas manifold. B Brass connections and quick disconnect assembly. C Brass connections to “Y” splitter. D The full length of gas supply hose. E Quick disconnect coupler.
WARNING E Property damage, bodily harm, severe burns, and death could result from failure to follow these safety steps. These steps should be performed after the grill has been assembled and prior to each use. DO NOT operate this grill until you have read and understand ALL of the warnings and instructions in this manual. PRE-START CHECK LIST: • Ensure that the grill is properly assembled. • Inspect the gas supply hose for burns, chaffing, kinks, and proper routing before each use.
ADVERTENCIAS IMPORTANTES DE SEGURIDAD QUEREMOS QUE USTED UTILICE EL EQUIPO DE CONVERSIÓN PARA SU PARRILLA DE LA MANERA MÁS SEGURA POSIBLE. LA FINALIDAD DE ESTE SÍMBOLO DE ALERTA DE SEGURIDAD ES ATRAER SU ATENCIÓN A LOS POSIBLES RIESGOS QUE IMPLICA LA CONVERSIÓN DE ESTA PARRILLA PARA UTILIZARLA CON GAS NATURAL. CUANDO VEA ESTE SÍMBOLO DE ALERTA DE SEGURIDAD , ¡LEA DETENIDAMENTE LA INFORMACIÓN QUE SIGUE! LEA MUY BIEN TODAS LAS ADVERTENCIAS E INSTRUCCIONES DE SEGURIDAD ANTES DE CONVERTIR Y OPERAR SU PARRILLA.
ÍNDICE DE MATERIAS Advertencias Generales . . . . . . . . . . . . . . . . . . . . . . . . . . . . . . . . . . . . . . . . . . . . . . . . . . . 14 Instrucciones de Ensamblado . . . . . . . . . . . . . . . . . . . . . . . . . . . . . . . . . . . . . . . . . . . . 15-18 Cómo Conectar a una Fuente de Gas Natural . . . . . . . . . . . . . . . . . . . . . . . . . . . . . . . . . 19 Prueba de Detección de Fugas. . . . . . . . . . . . . . . . . . . . . . . . . . . . . . . . . . . . . . . . . . .
PELIGRO Sólo un técnico profesional de servicio debe realizar la conexión. Déle al técnico una copia de estas instrucciones. Una conexión incorrecta puede ocasionar una fuga de gas y un posible incendio. ADVERTENCIAS GENERALES ADVERTENCIA • Nunca utilize gas propano líquido en una unidad hecha para gas natural. • Nunca utilice briquetas de carbón vegetal o de leña en una parrilla de gas.
INSTRUCCIONES DE ENSAMBLADO USTED DEBE SER UN TÉCNICO PROFESIONAL DE SERVICIO PARA CONVERTIR ESTA PARRILLA. LEA DETENIDAMENTE TODAS LAS ADVERTENCIAS DE SEGURIDAD E INSTRUCCIONES DE ENSAMBLADO ANTES DE ARMAR U OPERAR LA PARRILLA CONVERTIDA . Las siguientes herramientas son indispensables para ensamblar el equipo de conversión: • Destornillador con cabeza Phillips • Llave de tuercas ajustable • Llave de 3/4” PIEZAS INCLUIDAS: Herramienta del Orificio de Gas 1.
INSTRUCCIONES DE CONVERSIÓN Tuerca del Múltiple del Gas 810-6805-S PRECAUCIÓN: Algunas piezas pueden tener bordes filosos. Póngase guantes protectores en caso necesario. Nota: Cerciórese de que todas las perillas de control estén en posición cerrada ("OFF"), que la válvula del tanque de gas LP esté cerrada y que el tanque haya sido desconectado del regulador y sacado de la parrilla.
Paso 3 Con un destornillador, saque el tornillo de cada "pata" del quemador. Con cuidado, levante cada quemador y aléjelo de las aberturas para las válvulas. Ponga a un lado para usarse más tarde. Paso 4 Use la herramienta del orificio del gas para quitar el orificio de latón para el gas LP de las válvulas del quemador principal, introduciéndo la a través del agujero en el panel frontal del cámara de fuego. Repita este paso para todas las válvulas del quemador principal en su parrilla.
Paso 6 La Figura 1 muestra el vástago y bisel de la válvula sin la perilla de control. Tome cinco placas grandes de tope de la tarjeta de componentes y colóquelas sobre los vástagos del quemador principal y lateral como se ilustra (Figura 2). Verifique la lengüeta y la letra marcada de las placas de tope esten hacia fuera. Al terminar, vuelva a colocar las perillas de control en su lugar.
814-6805-S ROSTIZADOR PRECAUCIÓN: Solamente use el orificio del gas natural especificó para su parrilla. Nota: Pernos de la Cubierta Es útil conservar los tornillos con los componentes al irlos sacando porque así será más fácil volverlos a ensamblar. Paso 9 Quite los dos tornillos del panel para alcanzar el de latón orificio del gas LP del rostizador, ubicada en el lado trasero de la parrilla. Póngalos a un lado para usarlos más tarde.
CÓMO CONECTAR SU PARRILLA AL SUMINISTRO DE GAS NATURAL 1. Aplíquele lubricante o una cinta de Teflon resistente al gas al tubo corto enroscado. Apriete el acoplamiento de desconexión rápida al tubo corto enroscado que va al suministro de gas natural (Figura A). 2. Una vez que la parrilla haya sido ensamblada totalmente, asegúrese de que la válvula de suministro del gas natural esté cerrada ("APAGADO") y luego conecte la manguera del gas natural al receptáculo.
ADVERTENCIA • Nunca utilice su parrilla sin antes haber revisado todas las conexiones y tuberías de gas para detectar fugas. Consulte la sección sobre “La Prueba de Detección de Fugas” en este manual para saber cómo proceder debidamente. • Realice una inspección visual del ensamblado de la manguera antes de cada uso para descubrir daños, desgaste excesivo o deterioro. Si es así, reemplace el ensamblado antes de utilizar su parrilla. Sólo debe utilizar el repuesto suministrado por el fabricante.
CÓMO REVISAR PARA ENCONTRAR FUGAS: 1. Elabore una mezcla de 50% agua y 50% de jabón líquido lavaplatos. 2. Abra la cubierta. Fíjese si salen Burbujas 3. Fíjese que todas las perillas de control estén en posición "APAGADO". 4. Cerciórese de que la manguera del gas esté bien conectada a la fuente de gas. 5. Abra el suministro de gas en la fuente. 6. Aplique la mezcla de jabón y agua a las siguientes piezas: A Conexión de la manguera al múltiple de gas.
LISTA DE REVISIÓN ANTES DEL PRIMER USO: • Asegúrese de que la parrilla haya sido ensamblada debidamente. • Inspeccione la manguera suministradora de gas para detector quemaduras, rozaduras, torceduras y el recorrido correcto antes de cada uso. Si es obvio que hay demasiada abrasión o desgaste o si la manguera ha sido cortada, debe reemplazarla antes de utilizar su parrilla. • Revise todas las conexiones de gas y la manguera para detectar fugas. Consulte la sección "Prueba de detección de fugas".
FOR COVERS, ACCESSORIES AND OTHER PRODUCTS, PLEASE VISIT US ONLINE AT: PARA CUBIERTAS, ACCESORIOS Y OTROS PRODUCTOS, FAVOR DE VISITARNOS POR LA RED MUNDIAL EN: WARRANTY The Brinkmann Corporation warrants to the original purchaser that the Natural Gas Conversion Kit is free from defects due to workmanship or materials for 1 Year when installed by a professional service technician.