™ ENDURA EXTRA-LONG RUNNING SOLAR POWERED ACCENT LIGHTS CLASSIC TIER OWNER’S MANUAL TM ASSEMBLY AND OPERATING INSTRUCTIONS
HOW YOUR CLASSIC TIER SOLAR-POWERED LIGHTS WORK TM READ AND FOLLOW ALL INSTRUCTIONS CAREFULLY BEFORE OPERATING YOUR SOLAR LIGHT. SAVE THIS MANUAL FOR FUTURE REFERENCE. IMPORTANT: The EPA Certified RBRC® Battery Recycling Seal on the nickel-cadmium (Ni-Cd) battery contained in our product indicates The Brinkmann Corporation is voluntarily participating in an industry program to collect and recycle these battery at the end of their useful life, when taken out of service in the United States or Canada.
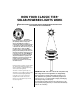
ASSEMBLY INSTRUCTIONS Inspect contents of the box to ensure all parts are included and undamaged. A flathead screwdriver is required for mounting the wall bracket. PARTS LIST: 1 Classic Tier Light Head Fixture 2 Connector 1 3 Ground Stake 4 Ground Connector w/Point 5 Deck/Wall/Fence Mounting Bracket 6 Mounting Screws (2) 2 Select a location with full, direct sunlight. Shady locations will not allow the battery to charge fully and will reduce the hours of nighttime light.
OPERATING INSTRUCTIONS READ AND FOLLOW ALL INSTRUCTIONS CAREFULLY BEFORE OPERATING YOUR SOLAR LIGHT. SAVE THIS MANUAL FOR FUTURE REFERENCE. Step 1 Attach the ground stake to a pointed connector. Push approximately 3" of the ground stake into the ground. If the ground is too hard, soak area with water to soften. Step 2 Align the connector to the grooves on bottom of light head. Turn counter-clockwise to set in place. Step 3 Insert light head into ground stake.
Deck/Wall/Fence Mounting: Select a location with full, direct sunlight. Shady locations will not allow the battery to charge fully and will reduce the hours of nighttime light. Step 1 Mount the bracket to a deck, wall or fence using the two screws provided. Step 2 Align the connector to the grooves on bottom of light head. Turn counter-clockwise to set in place. Step 3 Insert light head into bracket. The photocell light sensor should point away from other nighttime light sources.
Changing Battery Step 1 Remove lens from top housing by turning lens counter-clockwise. Step 2 With top housing upside down (solar panel facing down), unlock housing plate by turning counter-clockwise. Step 3 Remove battery. Replace with new Ni-Cd rechargeable battery.
Solar lights can be left outside year round, even in cold weather. However, if you wish to store your light indoors for more than two or three days, follow these steps to prevent damage to rechargeable batteries: • Store at room temperature in a dry location. • Store solar light where it can receive some sunlight or room light each day. The batteries needs light to maintain a charge during storage.
1-YEAR LIMITED WARRANTY For 1-year from date of purchase, The Brinkmann Corporation warrants the Classic Tier solar light against defects due to workmanship or materials to the original purchaser. The Brinkmann Corporation’s obligations under this warranty are limited to the following guidelines: • This warranty does not extend to the L.E.D. or battery.