™ Deluxe Outdoor Charcoal/Wood Smoker & Grill OWNER’S MANUAL ASSEMBLY & OPERATING INSTRUCTIONS WARNING READ AND FOLLOW ALL WARNINGS AND INSTRUCTIONS IN THIS MANUAL TO AVOID PERSONAL INJURY OR PROPERTY DAMAGE.
IMPORTANT SAFEGUARDS WE WANT YOU TO ASSEMBLE AND USE YOUR SMOKER AS SAFELY AS POSSIBLE. THE PURPOSE OF THIS SAFETY ALERT SYMBOL IS TO ATTRACT YOUR ATTENTION TO POSSIBLE HAZARDS AS YOU ASSEMBLE AND USE YOUR SMOKER. WHEN YOU SEE THE SAFETY ALERT SYMBOL, PAY CLOSE ATTENTION TO THE INFORMATION WHICH FOLLOWS! READ ALL SAFETY WARNINGS AND INSTRUCTIONS CAREFULLY BEFORE ASSEMBLING AND OPERATING YOUR SMOKER. WARNING 1 • Only use this smoker on a hard, level, noncombustible, stable surface (concrete, ground, etc.
WARNING • Check grease and/or ash level in metal bucket or tin can often and empty or change when w full. Use extreme caution as the smoker, metal bucket or tin can and its contents will be hot. • When grilling, grease from meat may drip into the charcoal and cause a grease fire. If this should happen close lid, air vent and damper to suffocate the flame. Do not use water to extinguish grease fires. • Use caution since flames can flare-up when fresh air suddenly comes in contact with fire.
ASSEMBLY INSTRUCTIONS READ ALL SAFETY WARNINGS & ASSEMBLY INSTRUCTIONS CAREFULLY BEFORE ASSEMBLING OR OPERATING YOUR SMOKER. FOR MISSING PARTS, PLEASE CALL CUSTOMER SERVICE AT 1-800-527-0717. (Proof of purchase will be required.) Inspect contents of the box to ensure all parts are included and undamaged. We recommend two people work together when assembling this unit.
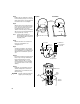
Clear an assembly area and get a friend to help you put your smoker together. Lay cardboard down to protect smoker finish and assembly area. Firebox Opening Step 1 Place the large cooking chamber on its closed end with the door open. Make sure that another person is holding the cooking chamber steady. The opening to the firebox should be facing up as illustrated. Step 2 To install the ash-guard shield, start from the inside of smoker and insert a 4" x w" bolt into the small hole next to the grease hole.
Step 6 Top View Bottom View Install the leg brace (without the L-bracket) to the mounted legs using four 4 x 24" hex head bolts and hex nuts. Securely tighten the bolts and hex nuts. Do not overtighten. Smoker Chamber 4" Hex Nut 4" Flat Washer Step 7 Attach the other two legs (with wheel axles) to the smoker. First, insert the wire rack into the leg, then move bolted end of leg until bolts align with holes in the cooking chamber.
Step 12 Attach leg brace with L-bracket to the legs with wheel axles using four 4 x 24" hex head bolts and hex nuts. When attaching leg brace, it may be necessary to slightly loosen leg nuts to align the holes. Make sure the L-bracket faces the grease hole under cooking chamber. The bracket will hold a metal bucket or tin can for catching grease and/or ashes when smoker is in use. WARNING: Leg Brace with L-Bracket A metal bucket or 44" tall, 20 oz. tin can must be kept under grease hole at all times.
Step 18 Fasten the four shelf brackets to the outside front of the cooking chamber and four grill support brackets to the inside using 4" x w" bolts, washers and nuts as illustrated. Cooking Chamber 3 16 ⁄ " x 12" Wooden Shelf Slat Carriage Bolt Grill Support Bracket Grill Support Bolt Step 19 Attach the two grill support brackets to inside front of firebox using 4" x w" bolts, washers and nuts.
PREPARATION FOR USE & LIGHTING INSTRUCTIONS PLACE THE SMOKER OUTDOORS ON A HARD, LEVEL, NON-COMBUSTIBLE SURFACE AWAY FROM ROOF OVERHANG OR ANY COMBUSTIBLE MATERIAL. NEVER USE ON WOODEN OR OTHER SURFACES THAT COULD BURN. PLACE THE SMOKER AWAY FROM OPEN WINDOWS OR DOORS TO PREVENT SMOKE FROM ENTERING YOUR HOUSE. IN WINDY WEATHER, PLACE THE SMOKER IN AN OUTDOOR AREA THAT IS PROTECTED FROM THE WIND. READ ALL SAFETY WARNINGS AND INSTRUCTIONS CAREFULLY BEFORE OPERATING YOUR SMOKER.
NOTE: To extend the life of your smoker, make sure that hot coals and wood do not touch the walls of the firebox. IF USING CHARCOAL CHIMNEY STARTER, PROCEED TO STEP 7. If you choose to use charcoal lighting fluid, ONLY use charcoal lighting fluid approved for lighting charcoal. Do not use gasoline, kerosene, alcohol or other flammable material for lighting charcoal. Follow all manufacturer’s warnings and instructions regarding the use of their product. Start with 8 to 10 pounds of charcoal.
OPERATING INSTRUCTIONS PLACE THE SMOKER OUTDOORS ON A HARD, LEVEL, NON-COMBUSTIBLE SURFACE AWAY FROM ROOF OVERHANG OR ANY COMBUSTIBLE MATERIAL. NEVER USE ON WOODEN OR OTHER SURFACES THAT COULD BURN. PLACE THE SMOKER AWAY FROM OPEN WINDOWS OR DOORS TO PREVENT SMOKE FROM ENTERING YOUR HOUSE. IN WINDY WEATHER, PLACE THE SMOKER IN AN OUTDOOR AREA THAT IS PROTECTED FROM THE WIND. READ ALL SAFETY WARNINGS AND INSTRUCTIONS CAREFULLY BEFORE OPERATING YOUR SMOKER.
Step 4 Open the firebox air vent approximately 1" to 2" and smokestack damper half way. With firebox lid open, stand back and carefully light charcoal and allow to burn until covered with a light ash (approximately 20 minutes). Charcoal lighting fluid must be allowed to completely burn off prior to closing firebox lid. WARNING: Failure to do this could trap fumes from charcoal lighting fluid in smoker and may result in a flash-fire or explosion when lid is opened.
When grilling in cooking chamber, close the ash-guard shield to contain ashes and embers. WARNING: A metal bucket or tin can must be placed under the grease hole at all times to catch grease and/or ashes. Check grease level in bucket or tin can often and empty or change when w full. Use extreme caution as bottom of cooking chamber, container and contents will be hot. Grilling In Cooking Chamber TIN CAN Step 1 Remove cooking grills from cooking chamber and set aside.
Step 5 When charcoal is burning well, use long cooking tongs to carefully spread briquets evenly on the charcoal grates, one to two layers thick. If desired, add wood chunks using long cooking tongs (see “Flavoring Wood” and “Adding Charcoal/Wood During Cooking” sections of this manual.) Top Cooking Level Step 6 Wearing oven mitts/gloves, place the two cooking grills on the top level in cooking chamber. Place food on cooking grills. Step 7 Close firebox and cooking chamber lids.
• During the smoking process, avoid the temptation to open lid to check food. Opening the lid allows heat and smoke to escape, making additional cooking time necessary. • Food closest to the firebox will cook and brown faster. Rotate food midway through the cooking cycle. If food is excessively browned or flavored with smoke, wrap food in aluminum foil after the first few hours of smoking. This will allow food to continue cooking without further browning or smoke flavoring.
Adding Charcoal/Wood During Cooking Additional charcoal and/or wood may be required to maintain or increase cooking temperature. Adding Charcoal/Wood in Firebox Step 1 Stand back and carefully open firebox lid. Use caution since flames can flare-up when fresh air suddenly comes in contact with fire. Step 2 Wearing oven mitts/gloves, stand back a safe distance and use long cooking tongs to lightly brush aside ashes on hot coals.
AFTER-USE SAFETY WARNING • Always allow smoker and all components to cool completely before handling. • Never leave coals and ashes in smoker unattended. Make sure coals and ashes are completely extinguished before removing. • Before smoker can be left unattended, remaining coals and ashes must be removed from smoker. Use caution to protect yourself and property. Place remaining coals and ashes in a noncombustible metal container and completely saturate with water.
ACCESSORIES The Art of Smoke Cooking Cookbook Contains 40 exciting yet simple recipes using the delicious technique of smoke cooking. Beautifully photographed full-color, sixty-six page hardback cookbook presents old favorites as well as new recipes such as smoked meatballs & spaghetti, smoked pizza, smoked tomato soup and smoked peach cobbler. Model 812-3327-0 Deluxe Charcoal Starter Smoke’N Spice Seasoning These custom blended spices are a delicious marinade seasoning for smoke cooking and grilling.
ACCESSORIES Pitmaster Deluxe Horizontal Smoker Cover R Metal Grease Bucket Our heavy-duty, durable vinyl cover with felt backing provides years of protection for Pitmaster Deluxe models. This top-of-the-line cover comes with closure strips at both ends to prevent cover from slipping or blowing off. Black. Model 812-2100-0 This metal bucket conveniently hangs from the L-bracket on your Pitmaster Deluxe horizontal smoker to catch falling grease and ash. Made of aluminum.
© 2001 The Brinkmann Corporation Dallas, Texas 75244 U.S.A. www.brinkmanncorp.com ONE YEAR LIMITED WARRANTY For one year from date of purchase, The Brinkmann Corporation warrants the Pitmaster Deluxe against defects due to workmanship or materials to the original purchaser.