Owner's Manual LAWN AERATOR MODELS: PA-40 BH PA-48 BH • • • • Assembly Installation Operation Repair Parts For use with Riders and Lawn/Garden Tractors IMPORTANT This manual contains information for the safety of persons and property. Read it carefully before assembly and operation of the equipment! For the latest product updates and setup tips: Visit us on the web! www.brinly.com L-1762 Rev.
INTRODUCTION CONGRATULATIONS on the purchase of your new Brinly-Hardy Lawn Aerator! Your lawn aerator is designed, engineered and manufactured to give you the best possible dependability and performance. CUSTOMER RESPONSIBILITIES Please read and retain this manual. The instructions enables you to assemble and maintain your lawn aerator properly. And please, always observe the “Safety” instructions. TABLE OF CONTENTS SAFETY....................................................................................
SAFETY TOWING SAFELY TO HELP PREVENT BODILY INJURY DUE TO LOSS OF STABILITY OR CONTROL: • Do not exceed maximum towing capacity of towing vehicle listed in the vehicle operator's manual. • Stopping distance increases with speed and weight of towed load. Travel slowly and allow extra time and distance to stop. • Do not tow this machine behind a motor vehicle such as a car, truck or ATV. • Total towed weight must not exceed limits specified in towing vehicle operator's manual.
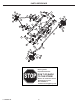
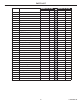
PARTS REFERENCE 17 29 2 32 24 7 24 8 20 24 21 18 5 32 22 31 7 32 32 32 4 20 31 8 20 26 24 15 9 10 26 13 15 32 26 32 12 27 15 11 19 14 28 16 25 22 STOP L-1762 Rev. E 30 30 23 Installation Questions? Missing Parts? Replacement Parts? DON’T GO BACK TO THE STORE! Please call Customer Service Department Toll Free 877.728.8224 or customerservice@brinly.
PARTS LIST ITEM NO. DESCRIPTION MODEL PA-40 BH MODEL PA-48 BH PART NO. QTY. PART NO. QTY.
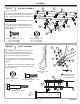
ASSEMBLY Figure 1 SIDE PLATE ASSEMBLY TOOLS REQUIRED: 6 1/2" Wrench (2) Slip Joint Pliers Tape Measure 15/16" Wrench (2) 24 20 32 1a. Assemble Side Plates (5) to Tray (6) as shown. 5 Pre-assemble the Flat Washers (24) to the Hex Bolts (20). Insert the Bolt and Washer Assembly from the inside of the tray. Secure with Nylon Lock Nuts (32). 32 IMPORTANT When tightening the bolts, for the PA-48 BH maintain a distance of 48" to 48-1/8" inside to inside of Side Plates (5).
ASSEMBLY Figure 3 6 20 TOW BAR ASSEMBLY 20 3a. Assemble Mount Brackets (31) to Tray (6) as shown. Insert the Bolts from the topside of the Tray. Loosely tighten with Nylon Lock Nuts (32). 31 IMPORTANT Tray with label faces forward. For PA-48 BH model install Center Plate (33) to Tray (6) as shown. Insert the Bolts from the topside of the Tray. Loosely tighten with Nylon Lock Nuts (32). 32 31 33 32 32 32 7 (20) Hex Head Bolt, 5/16" x 3/4" Qty. 4 for PA-40 BH Qty.
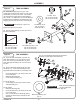
ASSEMBLY Figure 5 TUBE ASSEMBLY 24 5a. Assemble Plugging Spoons (9) to each welded plate (side opposite welds) of all the Tube Assemblies (12 and 13) as shown. For PA-48H, pre-assemble Hex Bolts (20) and Flat Washers (24). NOTE: PA-40BH does not use Flat Washers. Install the Bolt (and Washer Assemblies) through Plugging Spoons and secure with Lock Nuts (28). IMPORTANT Rounded part of spoon fits against the tube to lock in place. 20 (28) Lock Nut, 5/16" Qty. 24 for PA-40 BH Qty.
ASSEMBLY Figure 7 HANDLE ASSEMBLY 7a. Push the Axle Assembly (10) through the left side plate as far as possible and rotate so the hole in the flat plate faces to the rear as shown. Install the Lift Handle Assembly (11) with the welded tube facing out, to the Axle Assembly (10). Secure with Hex Bolt (19) and Nylon Lock Nut (32). 14 10 19 7b. Slip Handle Grip (14) over end of Lift Handle Assembly (11). NOTE: Soapy water will ease the assembly. (14) Handle Grip Qty.
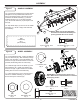
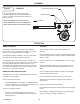
ASSEMBLY Figure 9 LEVELING Adjust This Surface To Level 9a. The final step is to level Tray (6) using adjustment bolts as shown here and installed in Step 2. To adjust, loosen Bolts and position Tow Bars until level. Adjustment Bolts To Tractor NOTE: The adjustment is made with the aerator attached to the rider or lawn/garden tractor with the wheels in transport position. OPERATION WHEN TO AERATE CAUTION Your Aerator should not be used when lawn conditions are too wet or too dry.
MAINTENANCE USE OF ADDITIONAL WEIGHT Should rust develop, sand lightly and then paint area with enamel. The weight required to give a recommended penetration of approximately two to three inches will vary according to soil type and conditions. Concrete blocks, patio blocks, sand bags, or any other type of weight can be added to Aerator Tray as required. Weight can be secured by using tie downs through holes in Tray Flanges. Tie downs are not furnished with your unit.
MANUFACTURER'S LIMITED WARRANTY FOR Pull Behind Accessories The limited warranty set forth below is given by Brinly-Hardy Company with respect to new merchandise purchased and used in the United States, its possessions and territories. Brinly-Hardy Company warrants the products listed below against defects in material and workmanship, and will at its option, repair or replace, free of charge, any part found to be defective in materials or workmanship.