OWNER'S MANUAL L AW N A E R ATO R MODEL: PA - 4 0 B H PA - 4 8 B H • Assembly • Installation • Operation • Repair Parts For use with Riders and Lawn/Garden Tractors Call Customer Service, Toll-Free: 877-728-8224 Visit us on the web! www.brinly.com Important: This manual contains information for the safety of persons and property.
INDRODUCTION ================================================================================================ CONGRATULATIONS on the purchase of your new Brinly-Hardy Plug Aerator! This accessory has been designed, engineered and manufactured to give you the best possible dependability and performance. Should you experience any problem you cannot easily remedy, please do not hesitate to contact our knowledgeable customer service department toll-free at 1-877-728-8224.
SAFETY ================================================================================================ • • • • • • • • • • • • • • • • • • • • • • • • • • • • Do not exceed the maximum drawbar pull rating of the towing vehicle. Drawbar pull is the horizontal force required to pull the attachment (including weight of load). Only tow this product in the vehicle’s tow mode/speed setting or less than 5 mph. Do not exceed 5 mph. Towing speed should always be slow enough to maintain control.
SPECIFICATIONS ================================================================================================ MODEL: PA - 4 0 B H MODEL: PA - 4 8 B H Maximum Towing Speed . . . . . . . . . . . . . . . . 5 MPH Maximum Towing Speed . . . . . . . . . . . . . . . . . 5 MPH Aerator Capacity . . . . . . . . . . . . . . . . . . . . . 150 lbs. Aerator Capacity . . . . . . . . . . . . . . . . . . . . . 200 lbs. Empty Weight . . . . . . . . . . . . . . . . . . . . . . . . 66 lbs. Empty Weight .
PART IDENTIFIER ================================================================================================ TEAR OUT THIS PAGE Illustrations on this page are to-scale for faster identification of hardware during assembly. Tear out this page for quick reference. Simply lay the hardware directly on top of the illustrations below to verify you’re using the correct parts.
PART IDENTIFIER ================================================================================================ PA-40BH REF DESCRIPTION PA-48BH PART NO. QTY PART NO.
REQUIRED TOOLS FOR ASSEMBLY --------------------• • • • • • • ASSEMBLY: 7/16” Wrench 7/16” Socket & Ratchet 9/16” Wrench 9/16” Socket & Ratchet 1/2” Socket & Ratchet Pliers Gloves 40” Plug Aerator ( PA-40 BH ) ================================================================================================ If you are assembling the 48” model (PA-48 BH), please skip to page 15 of this manual. Not sure which model you have? Page 4 will clear up any confusion.
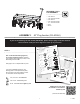
40” Plug Aerator ( PA-40 BH ) ASSEMBLY: ================================================================================================ STEP 2-A -------------------------Align the Side Plates (5) with Tray (6) as illustrated here. 32 5 Find this hardware: - x8 Hex Bolts (20) - 5/16” x 3/4” - x8 Flat Washers (24) - 5/16” - x8 Nylon Lock Nuts (32) - 5/16” Add a flat washer (24) to each of the hex bolts (20). From the inside of the tray, insert the bolt and washer assembly.
40” Plug Aerator ( PA-40 BH ) ASSEMBLY: ================================================================================================ STEP 3 -----------------------------20 Assemble Mount Brackets (31) to Tray (6) as shown. 20 6 Find this hardware: - x4 Hex Bolts (20) - 5/16” x 0.75” - x4 Nylon Lock Nuts (32) - 5/16” Insert the Bolts (20) from the topside of the Tray. Add Nylon Lock Nuts (32) to the bolts, DO NOT tighten fully (yet).
ASSEMBLY: 40” Plug Aerator ( PA-40 BH ) ================================================================================================ 17 STEP 4 ---------------------------------- C C. Insert Hitch Pin (17) in Clevis (2) and secure with Hairpin Cotter (18). Grasp Hitch Pin and pull forward. 18 D. Securely tighten all of the fasteners installed in Steps 4-A and 4-B. After that, securely tighten hardware installed from Step 2-B through Step 3.
40” Plug Aerator ( PA-40 BH ) ASSEMBLY: ================================================================================================ STEP 6 ------------------------------------------------------------------------------ SHORT END FACES OUT 12 13 26 15 15 26 12 SHORT END FACES OUT 15 15 15 15 26 10 26 5 START HERE 5 TIP: SPOTTING THE DIFFERENCES BETWEEN TUBES START WITH: 10 + 26 5 VS Add a Machinery Bushing to the Axle.
ASSEMBLY: 40” Plug Aerator ( PA-40 BH ) ================================================================================================ STEP 7 ------------------------------------------------------------------------------ 11 14 19 32 10 11 NOTE: Make sure the Axle Assembly Flat Plate (10) and Lift Handle Assembly (11) are pointing towards the rear as shown. 10 FLIP THE AERATOR OVER: A.
ASSEMBLY: 40” Plug Aerator ( PA-40 BH ) ================================================================================================ STEP 8 ---------------------------Combine: 10 - x1 Hex Bolt (22) - 5/16” x 4” - x1 Flat Washer (25) - 5/8” Slide the bolt assembly through one wheel (16) (wheel hub pointing toward the threads of the bolt) and add: 22 - x1 Flat Washer (25) - 5/8” - x1 Hex Nut (30) - 5/8” Thread the hex nut as far as possible, still allowing wheel to rotate freely.
ASSEMBLY: 40” Plug Aerator ( PA-40 BH ) ================================================================================================ STEP 10 ---------------------------LEVELING Adjustment Bolts Adjustment Bolts The final step is to level Tray (6) using adjustment bolts as shown here and installed in Step 2-B. 7 7 To adjust, loosen Bolts and position Tow Bars (7) until level.
REQUIRED TOOLS FOR ASSEMBLY --------------------• • • • • • • ASSEMBLY: 7/16” Wrench 7/16” Socket & Ratchet 9/16” Wrench 9/16” Socket & Ratchet 1/2” Socket & Ratchet Pliers Gloves 48” Plug Aerator ( PA-48 BH ) ================================================================================================ If you are assembling the 40” model (PA-40 BH), please go back to page 7 of this manual. Not sure which model you have? Page 4 will clear up any confusion.
48” Plug Aerator ( PA-48 BH ) ASSEMBLY: ================================================================================================ STEP 2-A -----------------------------Align the Side Plates (5) with Tray (6) as illustrated here. 32 5 Find this hardware: - x8 Hex Bolts (20) - 5/16” x 3/4” - x8 Flat Washers (24) - 5/16” - x8 Nylon Lock Nuts (32) - 5/16” Add a flat washer (24) to each of the hex bolts (20). From the inside of the tray, insert the bolt and washer assembly.
48” Plug Aerator ( PA-48 BH ) ASSEMBLY: ================================================================================================ STEP 3 -----------------------------20 20 Assemble Mount Brackets (31) to Tray (6) as shown. 20 6 Find this hardware: - x7 Hex Bolts (20) - 5/16” x 0.75” - x7 Nylon Lock Nuts (32) - 5/16” Align the Center Plate (33) with Tray (6) as shown. Insert three Hex Bolts (20) through the top of the Tray. Loosely hold in place with three Lock Nuts (32).
ASSEMBLY: 48” Plug Aerator ( PA-48 BH ) ================================================================================================ 17 STEP 4 ---------------------------------- C C. Insert Hitch Pin (17) in Clevis (2) and secure with Hairpin Cotter (18). Grasp Hitch Pin and pull forward. 18 D. Securely tighten all fasteners installed in Steps 4-A and 4-B. After that, securely tighten all the hardware installed from Step 2-B through Step 3.
48” Plug Aerator ( PA-48 BH ) ASSEMBLY: ================================================================================================ STEP 6 - - - - - - - - - - - - - - - - - - - - - - -12 ------------------------------------------------------13 26 SHORT END FACES OUT 15 15 15 15 12 26 13 15 SHORT END FACES OUT 13 15 15 12 26 15 15 15 15 13 26 15 26 12 15 15 5 26 15 START HERE 10 15 5 TIP: SPOTTING THE DIFFERENCES BETWEEN TUBES START WITH: 10 + 26 5 Add a Machinery Bushin
ASSEMBLY: 48” Plug Aerator ( PA-48 BH ) ================================================================================================ STEP 7 ------------------------------------------------------------------------------ 11 14 19 32 10 11 NOTE: Make sure the Axle Assembly Flat Plate (10) and Lift Handle Assembly (11) are pointing towards the rear as shown. 10 FLIP THE AERATOR OVER: A.
ASSEMBLY: 48” Plug Aerator ( PA-48 BH ) ================================================================================================ STEP 8 ---------------------------Combine: 10 - x1 Hex Bolt (22) - 5/16” x 4” - x1 Flat Washer (25) - 5/8” Slide the bolt assembly through one wheel (16) (wheel hub pointing toward the threads of the bolt) and add: 22 - x1 Flat Washer (25) - 5/8” - x1 Hex Nut (30) - 5/8” Thread the hex nut as far as possible, still allowing wheel to rotate freely.
ASSEMBLY: 48” Plug Aerator ( PA-48 BH ) ================================================================================================ STEP 10 ------------------------LEVELING Adjustment Bolts 7 The final step is to level Tray (6) using adjustment bolts as shown here and installed in Step 2. 7 Adjustment Bolts To adjust, loosen Bolts and position Tow Bars (7) until level.
OPERATION, MAINTENANCE AND SERVICE SECTION OPERATION ================================================================================================ WHEN TO AERATE -----------------------------------------------------Your Aerator should NOT be used when lawn conditions are too wet or too dry. INFO & VIDEOS -----------------Additional info and videos are available on our website: www.brinly.com TO DETERMINE LAWN CONDITION: Dig a small amount of your soil (about three inches deep).
OPERATION, MAINTENANCE AND SERVICE SECTION OPERATION ================================================================================================ MOUNTING AND TRANSPORTING -------------------------Attach aerator to your rider or lawn/garden tractor using pin and hairpin cotter (supplied). TO PLACE IN TRANSPORT POSITION: • Push REARWARD on Lift Handle (11) towards Transport Lock Pin in Side Plate. CAUTION: Pull Handle OUT and move over the Lock Pin. Aerator now rests on wheels.
OPERATION, MAINTENANCE AND SERVICE SECTION MAINTENANCE ================================================================================================ • The key to years of trouble-free service is to keep your Aerator clean and dry. • Never allow wet material to remain in tray for extended periods of time. • Occasionally check all moving parts for free movement and, if necessary, lubricate with oil. • Should rust develop, sand lightly & then paint area with enamel.
PARTS REFERENCE ================================================================================================ 32 4 24 3 5 20 20 20 6 20 5 20 24 32 32 33 27 32 17 2 21 29 32 2 7 32 24 18 8 32 32 8 32 32 31 32 24 22 16 23 25 25 7 31 32 30 10 19 25 16 12 28 11 22 30 26 14 13 15 26 30 13 23 15 26 15 12 28 15 24 20 9 15 26 L-1762-F
PARTS LIST ================================================================================================ PA-40BH REF DESCRIPTION PA-48BH PART NO. QTY PART NO.
MANUFACTURER’S LIMITED WARRANTY FOR BRINLY PULL-BEHIND ACCESSORIES The provisions as set forth in this warranty provide the sole and exclusive remedy arising from the sale. Brinly-Hardy Co. shall not be liable for incidental or consequential loss or damage including, without limitation, expenses incurred for substitute or replacement lawn care services or for rental expenses to temporarily replace a warranted product.