TimeLapse HD Video Camera TLC 100 User Manual www.brinno.
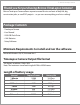
1 - Brinno TimeLapse Camera Thank you for purchasing Brinno TimeLapse Camera! Brinno TimeLapse Camera allows anyone to record the ins and outs of daily life, big construction jobs, or small DIY projects…so you can see everything, and miss nothing! Package Contents • TimeLapse Camera • User Manual • 2GB USB Flash Drive • 4 AA Batteries • Setup Software Minimum Requirements to install and run the software Microsoft Windows 98, XP, Vista and Win 7 TimeLapse Camera Output file format AVI format, resolution
Brinno TimeLapse Camera - 2 How to setup your TimeLapse Camera 1. Remove the TimeLapse Camera from the package. 2. Check to make sure that all the contents are included. 3. Open up the TimeLapse Camera by placing it Lens side down on a flat surface, or Lens side down in the palm of your hand, and remove the battery door by pulling open the latch. 4. Insert four AA batteries according to the polarity direction (+ -). 5.
3 - Brinno TimeLapse Camera NOTE • The maximum size USB flash drive that TimeLapse Camera can support is a 8GB USB Flash Drive. If you use a USB flash drive with a larger memory density the camera will not function properly. • Replace the battery door on the TimeLapse Camera. Make sure to push down the latch until you hear it “click” to ensure the door is closed properly. • With the wheel in the middle of the camera you can choose between one of seven time interval settings.
Brinno TimeLapse Camera - 4 Choose your Lens setting TimeLapse Camera has two lens positions that determine the focal distance and the depth of field of the camera: Standard Setting : Turn the lens to the “mountain” icon position. This will give a depth of field that extends from approximately 1 meter (2.6 feet) and beyond, and is best for getting shots of an entire garden or a large area. Macro Setting : Turn the lens bezel to the “flower” icon position.
5 - Brinno TimeLapse Camera TimeLapse Camera Operation On the front of the TimeLapse Camera, above the lens, there are three LED lights. These LEDs allow you to monitor the status of the camera without having to move the camera from its mounted position.
Brinno TimeLapse Camera - 6 Installing software 1. There are 2 programs on the USB Flash Drives supplied with the TimeLapse Camera. The first program “TimeLapse Camera Setup” allows you to set the time and date of the TimeLapse Camera to your local time. This program also allows you to set the time interval for the Custom setting on the TimeLapse Camera. 2. The second program called “TimeLapse Camera Player” allows you to play the videos taken by the TimeLapse Camera.
7 - Brinno TimeLapse Camera If you choose this option, the next step is to read the user agreement. If you agree, then click “Yes, I do” to continue. The software will then be loaded onto your computer and you can click the “Thanks” button to complete the installation. The setup program will then create and open a program group called “Brinno TimeLapse Camera” containing three icons. The “TimeLapse Camera Setup” icon is used to start the time, date and custom time interval setting program.
Brinno TimeLapse Camera - 8 How to use “TimeLapse Camera Setup” “TimeLapse Camera Setup” allows you to set the time and date of the TimeLapse Camera to your local time. This program also allows you to set the time interval for the Custom setting on the TimeLapse Camera. A E B C A Fluorescent Lighting Frequency Select the correct lighting frequency to match your indoor lighting frequency. USA: 50Hz, Europe: 60Hz Note: Turns the flicker filter off.
9 - Brinno TimeLapse Camera Loading your Time and Date Stamp and Custom Time Interval Setting onto your USB Flash Drive 1. Insert your USB Flash Drive into any available USB port on your computer. Windows will automatically assign a drive letter to the USB flash drive. Make a note of the drive letter assigned to the USB flash drive. 4. Remove the USB flash drive from your computer’s USB port.
Brinno TimeLapse Camera - 10 How to use “TimeLapse Camera Player” Start the “TimeLapse Camera Player” program by double clicking the “TimeLapse Camera Player” icon in the “ Brinno TimeLapse Camera” program group. If the program group does not open, you can open it by using the “Start.. Programs.. Brinno..” menus to find and open the program group. TimeLapse Camera Player TimeLapse Camera player is designed for use with the Brinno’s TimeLapse Camera.
11- Brinno TimeLapse Camera 1.3. Speed Control The Speed Control is a vertical tracking control on the right side of the display window. This is used to set the playback rate. Because this is a time-lapse camera, the playback rate has to be different from the recording rate. Note that in some installations, if the requested playback rate exceeds the host PC’s ability to decompress and display frames, some frames may be skipped in order to keep up with the requested TimeLapse Camera rate.
Brinno TimeLapse Camera - 12 1.6. Playlist TimeLapse Camera Player allows you to play multiple files, either from the same directory or from multiple directories. To add files to an existing playlist, simply drag and drop one or more files into the TimeLapse Camera Player window. Alternatively, using the “File – Open” dialog box will allow you to select multiple files. Files will be sorted in the playlist by their date and time stamp.
13 - Brinno TimeLapse Camera Specifications Model Video Resolution Field of View Focal Length Macro Effect Time Interval Settings Portable Memory Storage Power Source Size (DxWxH) Weight Housing Material TLC 100 1280x 1024 (HD Resolution, AVI format) 49.5º 20" to infinity 20" with background unfocused • Six default settings: 1 minute , 5 minutes, 30 minutes, 1 hour , 4 hours, 24 hours • One Customized setting : from 5 seconds to 12 hours.
www.brinno.com 7F, No. 75, Zhou Zi St., Taipei City 11493, Taiwan Phone: +886-2-8751-0306 Fax: +886-2-8751-0549 301-0010-00 EN-A1 Email: customerservice@brinno.