
Operation Manual


11
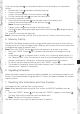
If the connecting cable
11
has to be dismantled to install the display unit, proceed as
follows:
Remove the screw •
12
and open the display housing.
Loosen union nut •
16
.
Loosen connecting cables from the terminal strip •
18
.
Pull the connecting cable •
11
out from the cable screw.
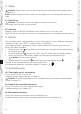
For assembly, proceed as follows:
Insert the connecting cable •
11
into the cable screw of the display unit.
Connect the connecting cables to the terminal strip •
18
.
Note: Ensure correct polarity.
Tighten union nut •
16
on the thread of the cable screw.
Close the display housing by replacing the back of the housing •
13
and tightening the
screw
12
.
The system is now ready for operation.
Note: For commissioning, read the fi lter system manual. Check system for any leaks.
5 Memory Call-Up
The BRITA FlowMeter enables the data (usage period and the amount of water that has
fl owed) of the last 5 fi lter cartridges to be called up, with the data of the most recent fi lter
cartridge being stored at memory level 1.
Note: Press the “PROG” button
7
to leave the memory call-up level at any time.
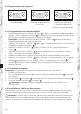
Press the “PROG” button •
7
for 5 seconds and the display will change to call-up
mode.
In the display •
8
the 1st memory level is shown; this is shown by displaying the 1 in
the “Memory level” fi eld. The amount of water that had fl owed before the last fi lter
change is displayed in running text, alternating with the use period in months.
To access the next memory level up, press the “RESET” button •
9
.
The number in the display shows the current memory level. The data as described for •
memory level 1 appears in the display.
6 Signalling Exhaustion
When the residual capacity entered has been exceeded, this is displayed in negative and
fl ashes. If the recommended usage period of 12 months has been exceeded, the residual
capacity fl ashes.
7 Resetting Litre Information and Time Function
To change the fi lter, read the fi lter system manual.
Note: Before bleeding and fl ushing the fi lter system, the BRITA FlowMeter must be
reset.
Press the “RESET” button •
9
for 3 seconds until “RESET” appears in the display
8
.
The data time and litre measures have now been reset.•
Note: The pre-set litre capacity remains.
The fi lter system is now ready for operation again (Chapter 5)