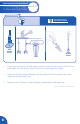
Drop-In Filtration System USS - 120 Installation Instructions As Easy As... Step 1 Step 2 Step 3 CONNECT TO AUXILIARY FAUCET OR KITCHEN FAUCET System Tested and Certified by NSF International against NSF/ANSI Standard 42 for Aesthetic Chlorine, Taste & Odor, and Particulate Class IV. System Tested and Certified by NSF International against NSF/ANSI Standard 372 for low lead content and compliance. Please refer to Performance Data Sheet for complete reduction data.
Tools & Materials Required main components secondary components filter system head package contents main: filter system head with mounting bracket mounting screws filter o-ring filter o-ring filter cartridge filter cartridge auxiliary faucet adapter mounting bracket filter housing secondary: mounting screws auxiliary faucet adapter 1/4” plastic tubing 1/4" plastic tubing filter housing wrench filter housing filter housing wrench tools needed for installation optional items drill with 1/8"
Before You Begin Please read all instructions, specifications, and precautions before installing and using your water filter system. NOTICE Precautions: for cold water use only. Consult your local plumbing codes and install accordingly. This filter must be protected from freezing, which can cause cracking of the filter and water leakage.
Helpful Hints Before You Start • Locate space in your cabinet to secure water filter system. • Check under the sink to locate a solid wall surface to mount the filter system. **FILTER SYSTEM MUST BE MOUNTED IN A VERTICAL POSITION** • Position on cabinet wall to provide easy access for future cartridge change-outs. • If you have anything other than flexible hose under your sink, check to see if you need to purchase special fittings. • Turn off cold water shut-off valve to kitchen sink.
direct connect to kitchen faucet Step 1 Attach Head to Inside of Cabinet Wall materials and tools needed Remove filter housing from system head. • Mount bracket to system head. • Measure and mark location of mounting holes. • Mount system head to wall of cabinet. ’ 30 • 3 Locate an easy access area to mount the filter. 2 • 1 Note: Mount the filter system to a solid cabinet wall or wall.
direct connect to kitchen faucet Attach tubing/fittings to the water line/head Step 2 materials and tools needed WARNING COLD WATER VALVE COLD WATER VALVE • Disconnect the top of the cold water plumbing line from the faucet shank. Ensure cold water shut-off valve is closed, and turn on cold water on faucet. • Screw the Kitchen Faucet Adapter onto the lower end of the faucet shank and upper end of cold water line. • Note position of Kitchen Faucet Adapter as attached to cold water line.
direct connect to kitchen faucet Step 2 Attach tubing/fittings to the water line/head << Step continued from previous page materials and tools needed utility knife wet ends of tubing before inserting COLD WATER FAUCET LINE 1/4" PLASTIC TUBING cut squarely on both ends A do not bend or crimp do not cut at an angle 1/4" PLASTIC TUBING B COLD WATER FAUCET LINE COLD WATER VALVE • Determine lengths of 1/4" plastic tubing needed to connect to both inlet port and outlet port of Kitchen Faucet Adapt
direct connect to kitchen faucet direct connect to kitchen faucet Install Filter and Test Step 3 for Leaks Troubleshooting Guide Leaks between system head and filter housing * * * * * Remove the filter housing and inspect the o-ring. Make sure it is in place and free from dirt and particles. Install the filter/filter housing. Turn on the cold water supply valve and turn on the filter faucet. Make sure filter housing is seated tightly.
direct connect to kitchen faucet EV ACE ERY PL SIX Use and Care HS Filter Replacement (every 6 months) RE direct connect to kitchen faucet MO NT Brita® Filtration System USS-120 Usage and quality of water in your incoming water line affect the life of filter cartridges. Cartridges should be replaced sooner if water pressure at the faucet begins to drop noticeably or if the filter fails to perform satisfactorily. For FREE Filter Replacement Reminder, go to www.protectplus.
The Benefits of Using an Auxiliary Faucet with your BRITA® USS-120 Filtration System Only filters the water you want to filter. Optimizes filter life by only filtering water for drinking and cooking. Improves filter performance depending upon the filter you use. See enclosed Performance Data Sheet for claims. The USS-120 Filtration System is one of the MODEL # FCT-102 Chrome Instructions and hardware included.
Debajo del fregadero Sistema de filtración de inserción USS - 120 Instrucciones de instalación Tan fácil como... Paso 1 Paso 2 Paso 3 Conecte al grifo auxiliar o al grifo de cocina Normas NSF/ANSI Sistema probado y certificado por NSF internacíonal según la norma NSF/ANSI 42 para cloro estético, sabor y olor, y partículas clase IV. Sistema probado y certificado por NSF internacíonal según la norma NSF/ANSI 372 para la conformidad y bajo contenido de plomo.
Implementos y materiales necesarios componentes principales componentes secundarios cabezal del sistema de filtración Contenido del paquete principal: tornillos de montaje junta tórica del filtro cartucho de filtro cabezal de sistema de filtración con soporte de montaje junta tórica del filtro adaptador de grifo auxiliar cartucho de filtro soporte de montaje carcasa del filtro secundarios: tornillos de montaje adaptador de grifo auxiliar tubería plástica de 1/4” (6.
Antes de comenzar Lea todas las instrucciones, especificaciones y precauciones antes de instalar o utilizar su sistema de filtración de agua. Aviso Precauciones: para uso con agua fría únicamente. Lea todas las instrucciones, especificaciones y precauciones antes de instalar o utilizar su sistema de filtración de agua. Este filtro deberá estar protegido del congelamiento, lo cual puede ocasionar la rotura del filtro y goteo de agua.
Consejos útiles Antes de comenzar • Ubique el espacio en su gabinete para fijar el sistema de filtración de agua. • Revise bajo el fregadero para ubicar una superficie de pared sólida para montar el sistema de filtración. **EL SISTEMA DE FILTRACIÓN DEBERÁ MONTARSE EN POSICIÓN VERTICAL** • Coloque en una pared del gabinete que brinde acceso fácil para futuros cambios del cartucho.
Conexión directa al grifo de la cocina Step 1 Fije el cabezal a la parte interior de la pared del gabinete Materiales e implementos necesarios Retire la carcasa del filtro del cabezal del sistema. • Monte el soporte al cabezal del sistema. • Mida y marque la ubicación de los agujeros de montaje. • ’ 30 • 3 Ubique un área de fácil acceso para montar el filtro. 2 • 1 Nota: Monte el sistema del filtro en la pared sólida de un gabinete o en la pared.
Conexión directa al grifo de la cocina Fije la tubería/acoples a la tubería de agua/cabezal Paso 2 Materiales e implementos necesarios Advertencia Válvula de agua fría Válvula de agua fría • Desconecte la parte superior de la tubería de agua fría del vástago del grifo. Revise que la válvula de cierre de agua fría esté cerrada y abra el suministro de agua fría del grifo.
Conexión directa al grifo de la cocina Paso 2 Fije la tubería/acoples a la tubería de agua/cabezal << Paso 2 - Continúa en la página siguiente Materiales e implementos necesarios utility knife Moje los extremos de la tubería antes de insertarla Tubería del grifo de agua fría A Corte en ángulo recto en ambos extremos Tubería plástica de 1/4” (6.4 mm) Entrada Salida No doble ni engarce No corte en ángulo Tubería plástica de 1/4” (6.
Conexión directa al grifo de la cocina Instale el filtro y pruebe si hay fugas Conexión directa al grifo de la cocina Paso 3 Guía para solución de problemas Fugas entre el cabezal del sistema y el alojamiento del filtro. * * * * * Retire la carcasa del filtro e inspeccione la junta tórica. Compruebe que esté en su lugar y que no tenga suciedad ni partículas. Instale el filtro/la carcasa del filtro. Abra la válvula de suministro de agua fría y abra el grifo del filtro.
Conexión directa al grifo de la cocina ZO CADA LA S Uso y mantenimiento S EIS SE Reemplazo del filtro (cada 6 meses) REEM P Conexión directa al grifo de la cocina ME Sistema de filtración Brita® USS-120 El uso y la calidad del agua de su tubería de alimentación de agua afectan la vida de los cartuchos del filtro. Los cartuchos deben cambiarse con mayor frecuencia si la presión del agua del filtro comienza a disminuir notablemente o si el filtro no funciona satisfactoriamente.
Los beneficios de utilizar un grifo auxiliar con su sistema de filtración BRITA® USS-120 Solo filtra el agua que usted desea filtrar. Optimiza la vida del filtro ya que filtra solo el agua para beber y cocinar. Mejora el rendimiento del filtro dependiendo del filtro que utilice. Consulte la Hoja de datos de rendimiento que se incluye para ver los enunciados. El sistema de filtración USS-120 es uno MODELO n.° FCT-102 cromado. Incluye instrucciones y accesorios.
Great-tasting water that's better for you, better for the environment1 Agua de estupendo sabor que es mejor para usted, mejor para el ambiente1 Great-tasting water > Agua de estupendo sabor When water tastes better, you'll drink more of it Si el agua tiene mejor sabor, beberá más Reduce chlorine (taste and odor) 2 > Disminuye el cloro (sabor y olor)2 Brita® filters reduce chlorine (taste and odor) 2 found in tap water, leaving you with great-tasting water Los filtros Brita® disminuyen el cloro (sabor y o