P2315_R01e.
P2315_R01e.qxd 11/7/2003 12:59 PM Page 2 Table of Contents Safety Information . . . . . . . . . . . . . . . . . . . . . . . . . . . . . . . . . . . . 2–5 Features . . . . . . . . . . . . . . . . . . . . . . . . . . . . . . . . . . . . . . . . . . . 6–7 Vehicle Safety Belts . . . . . . . . . . . . . . . . . . . . . . . . . . . . . . . . . . . . . 8 Vehicle Seating Positions . . . . . . . . . . . . . . . . . . . . . . . . . . . . . . . . . 9 Installation . . . . . . . . . . . . . . . . . . . . . . . . . .
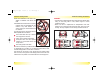
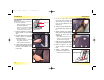
P2315_R01e.qxd 11/7/2003 12:59 PM Page 4 • Use only with children who weigh between 22 and 105 pounds (10 and 48 kg) and whose height is 56 inches (142 cm) or less. • Snugly adjust the belts provided with this child restraint around your child. A snug strap should not allow any slack. It lies in a relatively straight line without sagging. It does not press on the child’s flesh or push the child’s body into an unnatural position. • Always secure the top anchorage strap provided with this child restraint.
P2315_R01e.qxd 11/7/2003 12:59 PM Page 6 Safety Information • This child restraint system conforms to all applicable Federal motor vehicle safety standards. This restraint is certified for use in motor vehicles and aircraft. • Fill out the registration card and mail it in today! Child restraints could be recalled for safety reasons. You must register this restraint to be reached in a recall. Send your name, address, and the restraint's model number and manufacturing date to Britax Child Safety, Inc.
P2315_R01e.
P2315_R01e.qxd 11/7/2003 1:02 PM Page 10 Vehicle Safety Belts NOTE: The information in this section only applies to installation with vehicle seat belts. IMPORTANT: Some vehicles have no seating positions which are compatible with this restraint, or any other restraint. If in doubt, contact your vehicle manufacturer for assistance. The following types of vehicle seat belts are not compatible with this restraint: Front vehicle belts with top or bottom anchorage points in the door.
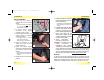
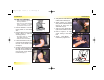
P2315_R01e.qxd 11/7/2003 1:02 PM Page 12 Installation Installation LATCH Installation LATCH Anchors 1 Verify that your vehicle is equipped with LATCH anchors (Fig A). • A positive click confirms attachment. • Verify that LATCH harness is not twisted. • If LATCH anchors are not installed, you must use standard vehicle belt installation methods. 2 If stored, remove LATCH connectors from storage A pouches on rear of cover. 3 Remove tether from pouch and loosely attach to approved anchorage point(s).
P2315_R01e.qxd 11/7/2003 1:03 PM Page 14 Installation Installation Lap-Shoulder Belt Installation Long Route Shoulder Lap A (Recommended vehicle belt route) • Figure A illustrates a typical lapshoulder belt installation. • When not in use, always store the LATCH connectors in storage pouches sewn in back of cover. 1 Place the restraint in a forward facing position on the vehicle seat. 2 Remove tether from pouch and loosely attach to approved anchorage point(s).
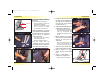
P2315_R01e.qxd 11/7/2003 1:03 PM Page 16 Installation Installation Lap-Shoulder Belt Installation Short Route (Recommended ONLY if vehicle belt is too short for Long Route) • Figure A illustrates a typical lapshoulder belt installation. • When not in use, always store the LATCH connectors in storage pouches sewn in back of cover. 1 Place the restraint in a forward facing position on the vehicle seat. 2 Remove tether from pouch and loosely attach to approved anchorage point(s).
P2315_R01e.qxd 11/7/2003 1:04 PM Page 18 Installation Installation Lap Belt Only Installation • Figure A illustrates a typical lap belt only installation. • When not in use, always store the LATCH connectors in storage pouches sewn in back of cover. 1 Place the restraint in a forward facing position on the vehicle A seat. 2 Remove tether from pouch and loosely attach to approved anchorage point(s). • See pages 18–19 for complete Versa-Tether instructions.
P2315_R01e.qxd 11/7/2003 1:04 PM Page 20 Versa-Tether® Versa-Tether® WARNING: • ATTACH THE VERSA-TETHER ONLY TO TETHER ANCHORS IDENTIFIED BY YOUR VEHICLE MANUFACTURER AS TETHER ANCHORAGE POINTS. USE OF OTHER LOCATIONS IS NOT APPROVED OR PERMITTED. • THE VERSA-TETHER MUST BE USED AT ALL TIMES. USING THE TETHER IMPROVES THE STABILITY OF THE RESTRAINT AND REDUCES THE RISK OF INJURY. • Use BOTH tether hooks for children heavier than 80 pounds (36 kg). Attach each hook to a separate tether anchor.
P2315_R01e.qxd 11/7/2003 1:04 PM Page 22 Using Restraint Features Using Restraint Features Recline Bar Pad Inserts The recline bar allows the restraint recline to be adjusted for comfort. Use of the recline bar is optional. Attaching the Recline Bar Insert recline bar into the holes in lower rear of restraint prior to installation in A vehicle (Fig. A). IMPORTANT: The bottom of the restraint should be flat on the vehicle seat when installed.
P2315_R01e.qxd 11/7/2003 1:04 PM Page 24 Using Restraint Features Using Restraint Features Pommel Buckle The pommel (Fig. A) is intended for extra Pommel comfort with older children. While the pommel is optional, the belly pad should always be used. Removing the Pommel To remove, slide belly pad and pommel off A the buckle. Replace belly pad. Installing the Pommel To install, slide belly pad off buckle to remove. Slide pommel then belly pad on buckle.
P2315_R01e.qxd 11/7/2003 1:05 PM Page 26 Securing Your Child Securing Your Child Once the restraint has been installed in the vehicle, follow these instructions to secure your child in the restraint. IMPORTANT: Before securing your child in the restraint, always check the adjuster area for debris (e.g. food, coins, toys, etc.). If debris is present, it must be removed to prevent interference with the adjuster mechanism.
P2315_R01e.qxd 11/7/2003 1:05 PM Page 28 Harness Height Harness Height Checking Harness Height: 1 Place child in restraint, then secure harness (see pages 22–23). 2 Observe where the shoulder harness is positioned on your child. • Harness straps should be located in the nearest slot at or above the child’s shoulders. Forward Facing Strap Height 3 If harness height is okay, continue using restraint without adjustment. If harness height requires adjustment, refer to Harness Height Adjustment below.
P2315_R01e.qxd 11/7/2003 1:05 PM Page 30 Care and Maintenance Care and Maintenance Cover Removal 1 Loosen the harness, by lifting the harness adjuster while pulling the shoulder straps forward as far as possible. 2 Unhook the shoulder straps from the yoke, on the rear of restraint. 3 Pull upper harness straps through the shell and cover, to the front of the restraint. 4 Remove the belly pad and pommel from the buckle. 5 Gently remove the upper portion of the cover.
P2315_R01e.qxd 11/7/2003 1:05 PM Page 32 Care and Maintenance Care and Maintenance Buckle Removal Cleaning the Buckle 1 Locate the metal buckle strap retainer on bottom of the restraint. 2 Pull retainer away from restraint to loosen. A 3 Turn the retainer so that the short side will go through the slot in the restraint shell (Fig. A). 4 Push the retainer through slots in the shell and cover, to the front of the restraint.
P2315_R01e.qxd 11/7/2003 1:05 PM Page 34 Warranty This restraint was distributed by SnugSeat®. SnugSeat warrants this product to the original purchaser as follows: LIMITED ONE-YEAR WARRANTY This product is warranted against defective materials or workmanship for one year from the date of original purchase. Proof of purchase is required.