
User guide

13
Installation
4
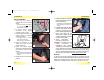
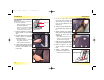
Route the vehicle belt around
the back of the restraint then
through the second belt slot,
from the rear of the restraint
to the front
(Fig. C)
.
5
Verify that the vehicle belt is not
twisted, then buckle (
Fig. D)
.
•
If unable to buckle the vehicle belt
around the restraint using the long
route, use Lap-Shoulder Belt
Installation (Short Route) on pages
14
–
15.
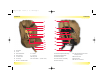
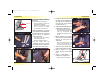
6 While pushing the restraint
firmly into the vehicle backrest,
remove all slack from the
vehicle belt.
•
First remove slack from the lap
portion of the vehicle belt, then
the shoulder portion (Fig. E & F).
7 Verify that the vehicle belt is
tight and the restraint is secure.
8 Refer to Figure G to verify
correct routing of the vehicle
belt.
9 Attach Versa-Tether
®
as
instructed on pages 18–19.
•
ALWAYS use the Versa-Tether!
E
F
G
12
Installation
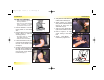
Lap-Shoulder Belt Installation
Long Route
(Recommended vehicle belt route)
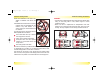
• Figure A illustrates a typical lap-
shoulder belt installation.
•
When not in use, always store the
LATCH connectors in storage
pouches sewn in back of cover.
1 Place the restraint in a forward
facing position on the vehicle seat.
2 Remove tether from pouch and
loosely attach to approved
anchorage point(s).
•
See pages 18–19 for complete
Versa-Tether instructions.
•
ALWAYS use the Versa-Tether!
3
Pull the vehicle belt out
completely and pass it through
the first belt slot, from the front of
the restraint to the rear (Fig B).
Shoulde
r
Lap
B
A
C
D
P2315_R01e.qxd 11/7/2003 1:03 PM Page 14