B-READY™ Accessories User Guide IMPORTANT: To ensure your child is as safe as possible, read all instructions thoroughly before using these accessories. Store this manual for future reference.
Table of Contents Warnings. . . . . . . . . . . . . . . . . . . . . . . . . . . . . . . . . . . . . . . . . . . . . . . . . . . 2 B-READY Second Seat . . . . . . . . . . . . . . . . . . . . . . . . . . . . . . . . 4 Features . . . . . . . . . . . . . . . . . . . . . . . . . . . . . . . . . . . . . . . . . . . . . . . . . . . 5 Operating Instructions Attaching the Second Seat . . .
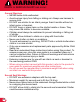
WARNING! Section Title DEATH or SERIOUS INJURY can occur: General Warnings • NEVER leave child unattended. • Avoid serious injury from falling or sliding out. Always use harness to secure child. • DO NOT use stroller for an infant younger than 6 months without an infant carrier or bassinet. • DO NOT hang or place items on the stroller handle or frame. They may cause the stroller to become unstable. • Children must always be restrained to prevent standing or falling out of stroller.
Section Title Bassinet Warnings SUFFOCATION HAZARD: • Infants can suffocate between added padding or soft bedding and the side of the bassinet. • NEVER add a mattress, pillow comforter or padding. Use ONLY the pad provided by BRITAX. • Bassinet can roll over on soft surfaces and suffocate child. ONLY place bassinet on firm, stable surface. To reduce the risk of SIDS, Pediatricians recommend healthy infants be placed on their backs to sleep, unless otherwise advised by your Physician.
B-READY™ 2nd Seat
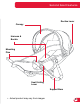
Second Seat Features Recline Lever Canopy Harness & Buckle Mounting Pins Seat Folding Lever Support Bars • Actual product may vary from images.
Operating Instructions Attaching the Second Seat NOTE: Storage pouch must be removed before attaching second seat • Line up the support bars on the second seat with the mounting brackets on the inside of the frame • Slide the mounting pins into mounting bracket on the stroller • Press down to until it is locked into place 6
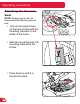
Operating Instructions Removing the Second Seat • Press the left button on the rear frame and then press and hold the right release button while lifting upward on the seat • Slide the mounting pins out of the mounting brackets and lift the second seat away from stroller Second Seat Recline • Lift the recline lever at the top of the seat and raise or lower the seat into one of the four recline positions 7
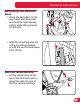
Operating Instructions Folding Stroller with Second Seat • Recline the second seat to its lowest position and fold back the canopy • Slide the seat folding lever and press the second seat down until it lies flat • Stroller can now be folded as described in the stroller user guide NOTE: You may need to compress the frame to engage the chassis lock 8
B-READY with Second Seat Second Seat with Infant Car Seat • Attach the extension adapters to the frame by lining up the locking latches with the chassis sockets and pressing down until they lock into place • Attach the fabric guard by connecting the zippers around each side of the frame and securing the elastic bands around the frame hinge bolt IMPORTANT: The fabric guard should always be used with an infant carrier on top to protect the child in the lower seat from possible finger entrapment • Attach top
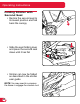
Securing Your Child In Second Seat • Unlatch the harness by depressing the button in the center of the buckle while pulling the two tongues away from the buckle assembly • To raise or lower the harness height, unthread the harness clips from the back of the seat NOTE: You may need to loosen the harness to adjust the harness height (See next page) • Rethread the clips at the desired height NOTE: Harness height should be at or above the shoulders of the child 10
Securing Your Child In Second Seat • Buckle the harness by inserting the tongues on the harness straps into the buckle assembly NOTE: Ensure the straps are not twisted as they may become uncomfortable for the child • Tighten or loosen the harness straps by sliding the harness adjusters up or down Buckle tongues separate for added safety.
B-READY™ Bassinet
Bassinet Features Canopy Carry Handle Canopy Adjusters Storage Pouch Seat Locking Latch & Release Lever • Actual product may vary from images.
Bassinet Assembly • Pull the frame supports outward by the tabs until they lock under all four clips • Place the bassinet bedding into the bassinet and pull the elastic over the ends • Connect the hook and loop fasteners around the carry handle hinge 14
Bassinet Assembly Boot Cover • Lay the cover over the bassinet with the hook and loop fasteners face down • Attach the five hook and loop fasteners 15
Operating Instructions Attaching the Bassinet • Line up the bassinet locking latches with the chassis sockets • Push down until the bassinet locks into place NOTE: Can be used forward facing with the use of the extension adapters (page 9) • Lift gently on the bassinet to ensure that it is secure NOTE: DO NOT pick up stroller with bassinet handle 16
Operating Instructions Removing the Bassinet • Press the locking latch release buttons on both sides of the bassinet and lift upward Folding with Bassinet • The bassinet must be removed before folding stroller Carry Handle/Canopy • Press the hinge buttons on both sides of the carry handle and rotate the handle up or down to the desired position 17
Operating Instructions Bassinet with Second Seat • Attach the bassinet using the extension adapters by lining up the bassinet locking latches with the extension adapter sockets and pressing down until the bassinet locks into place • Attach second seat (Page 6) IMPORTANT: Extension adapters MUST be used when using the bassinet with the second seat TIP: For extra room for the child in the lower seat, the seat can be placed in a reclined position (Page 7) 18
19
B-READY™ Lower Infant Car Seat (LICS) Adapter
Lower Infant Car Seat (LICS) Adapter LICS Adapter Sockets Mounting Pins Support Bars • Actual product may vary from images.
Operating Instructions Attaching the LICS Adapter NOTE: Storage pouch must be removed before attaching LICS Adapter • Line up the support bars on the LICS Adapter with the mounting brackets on the inside of the frame • Slide the mounting pins into mounting bracket on the stroller • Press down to engage the accessory frame lock 22
Operating Instructions Attaching Infant Car Seat to LICS Adapter • Line up the locking latches with the LICS sockets and press down until they lock into place Removing the LICS Adapter • Press the left button on the rear frame and then press and hold the right release button while lifting upward on the LICS Adapter • Slide the mounting pins out of the mounting brackets and lift the LICS Adapter away from stroller 23
Operating Instructions Dual Infant Car Seats • Attach the extension adapters to the frame by lining up the locking latches with the chassis locks and pressing down until they lock into place • Attach the fabric guard by connecting the zippers around each side of the frame and securing the elastic bands around the frame hinge bolt IMPORTANT: The fabric guard should always be used with an infant car seat on top to protect the child in the lower position from possible finger entrapment 24
Operating Instructions • Attach top infant car seat by lining up the locking latches with the adapter sockets and pressing down until they lock into place • Attach the lower infant car seat by lining up the locking latches with the LICS sockets and press down until they lock into place IMPORTANT: Top and lower infant car seats can be either forward or rear facing Important Reminders • DO NOT use extension adapters with the top seat. They are only for use with the bassinet or infant car seat.
B-READY™ Stroller Configurations • Shown with optional accessories (sold separately) 26
B-READY™ Stroller Configurations * * Extension adapters MUST be used in this configuration 27
B-READY™ Stroller Configurations • Shown with optional accessories (sold separately) * * Extension adapters MUST be used in this configuration 28 *
Care and Maintenance Frame • Wipe the frame with a damp cloth and mild soap. Use clean, dry cloth or towel to wipe away excess water and soap. Fabric • Do not machine wash or dry. Do not iron. • Hand wash with cold water and mild soap. Air dry to prevent the cover from shrinking. Cleaning Plastic Parts: • Wipe with a damp cloth and mild soap. Use clean, dry cloth or towel to wipe away excess water and soap. Plastic Parts • Do not use abrasives, solvents, strong detergents, or household cleaners.
Warranty This product is distributed by Britax Child Safety, Inc. Britax Child Safety, Inc. (“Britax”) warrants this product to the original retail purchaser as follows: Limited Two-Year Warranty This product is warranted against defective materials or workmanship for two years from the date of original purchase. Proof of purchase is required.
Notes 31
Notes 32
Visit our website at www.Britax.com for more information. Britax Child Safety, Inc. 13501 South Ridge Drive Charlotte, NC 28273 USA A Britax Childcare Group Limited company Tel. : 1-888-427-4829 www.Britax.