
Installation Sheet


SHOWERHEAD AND SHOWER ARM INSTALLATION:
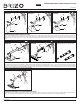
Install a 1/2" threaded pipe nipple to extend beyond the nished wall 3/8" to 1/2". Apply plumber's tape to thread on pipe nipple and screw brass adapter (1) securely onto
nipple. Screw showerhead (2) onto the shower arm, using provided wrench (4) to tighten securely. Check position of set screw on top of shower arm (3) making sure it is not
sticking through to the inside opening where it could interfere with the assembly. Slide shower arm and head assembly over the adapter and tighten set screw against the
adapter.
1
3
2
4
3
1
4
2
1
3
2
4
Sotria
RP75722
p
RSVP
RP48040
p
Virage
RP62603
p
3
1
5
6
Vettis
RP90243
p
Levoir
RP92044
p
SHOWERHEAD AND SHOWER ARM INSTALLATION:
Apply plumber tape to threads on brass adapter (1). Install adapter so that it extends beyond the nished wall 1-1/4" to 1-1/2". Ensure that O-Rings (2) are installed properly
into grooves on adapter. Slide shower ange (3) over shower arm (4). Install shower arm (4) onto brass adapter (1), and secure with set screw (5) on side of shower arm. Slide
ange (3) until it is at against the nished wall. Vettis
®
only: Apply plumber tape to threads on shower arm (4). Thread showerhead (6) onto shower arm. Do not overtighten
showerhead. For an additional 1-3/4" extension order RP101285.
2
4
3
1
5
6
2
4
2
3
4
STANDARD SHOWERHEAD AND SHOWER ARM INSTALLATION:
Connect top outlet (1) to shower arm (2) with proper ttings. To prevent damage to nish on shower arm, insert wall end of shower arm into shower ange (3) before screwing
arm into riser connection. Thread showerhead (4) onto shower arm. Apply plumber tape to pipe threads on both ends. Do not overtighten showerhead.
1
SHOWERHEAD AND SHOWER ARM INSTALLATION
RP101285p
Available Extension for Shower Arm
NOTE: It is suggested that you securely anchor water lines.
11/07/2019 Rev. B1
www.brizo.com
pSpecify Finish
103575