
Specifications


NTI VEEMUX DVI VIDEO MATRIX SWITCH
51
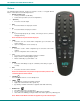
• AUDIO (Applies to models with audio support only)
Pressed prior to entering a port switch command
Applies the command to the audio signals only
(by default, port switch commands are applied to both Audio and Video)
• VOL + / - (Applies to models with audio support only)
Increases / Decreases the volume for the selected output
Can be used with * (All) to adjust the volume for all outputs
“Volume +” and ”Volume -“ will operate as multi-press buttons – if continually held down, the volume will continue to
increase / decrease.
• MUTE Audio (Applies to models with audio support only)
Mutes audio for the selected output
Can be used with *(All) to mute all outputs
Audio will be un-muted by pressing the MUTE Audio button again, Increasing or Decreasing the volume, or by
switching ports
Mute and Un-Mute commands are applied only to the selected output
• SCAN
Pressed to toggle the scan enable/disable feature for the selected port
Must be preceded by an output port number (1 or 2 digits), or the * (Asterisk) button to toggle all ports
Note: If the dwell time for a port is set for 0 seconds, it will not be scanned (page 38)
• PREV -THIS BUTTON IS NOT USED FOR THIS PRODUCT
Operation
Operation of the IRT-UNV is intuitive. The number of button presses required to complete any operation is kept to a
minimum. This is accomplished using intelligent software within the NTI Matrix Switch. Additionally, the Matrix Switch allows for
multiple ways for the user to complete the same operation – ensuring that the Remote will work as expected, regardless of who
uses it.
Note: For models with audio support, these commands will switch the video and audio signals simultaneously. For
independent video and audio switching using the IRT-UNV, see “Independent Video and Audio Control” on page 53.
Changing Ports
The first, and most important operational use of the IR Remote is changing ports of the switch. This requires the
selection of both input and output ports. There are several methods of control.
Channel Surfing
The “IN +/-“ and “SCAN” buttons can be used to surf through input port connections. However, since there are multiple
outputs/users, the question becomes “which output connection is being changed?” As a result, it is required that an output be
selected prior to using the “IN +/-“ buttons.
The output port can be selected in two ways:
• by pressing the “OUT” button before selecting the output port number
• by pressing the “OUT” button after selecting the output port number
In both cases, the user must enter the output port number using the Numeric Keys (0-9). However, when the “OUT”
button is pressed prior to selecting the port number, there will be a two (2) second delay after the last digit of the output port is
entered that must expire before the output port is accepted. To avoid this delay, press the “ENTER” button to immediately accept
the port number.
Once the output port has been accepted, there will be a five (5) second timeout, during which the user must press
another button (“IN +,” IN -,” or “SCAN”). Each subsequent press of “IN+” or “IN-“ will renew the timeout, waiting for you to press it
again (to advance or go back by one more Input channel). If no new command is sent to the switch before the timeout expires,
the switch will forget the selected output, and pressing the “IN +/-“ buttons will have no effect.
All output channels can surf inputs at once by pressing the “ * “ button prior to pressing the “IN +/-“ buttons.