
User's Manual


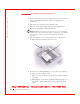

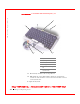


Table Of Contents
- Dell™ Latitude™ D400
- Finding Information
- About Your Computer
- Using Microsoft® Windows® XP
- Dell™ QuickSet Features
- Using the Keyboard and Touch Pad
- Using the Display
- Using the Dell™ D/Bay
- Using a Battery
- Power Management
- Using PC Cards
- Using Smart Cards
- Traveling With Your Computer
- Passwords
- Solving Problems
- Power Problems
- Error Messages
- Video and Display Problems
- Sound and Speaker Problems
- Printer Problems
- Modem and Internet Connection Problems
- Touch Pad or Mouse Problems
- External Keyboard Problems
- Unexpected Characters
- Drive Problems
- PC Card Problems
- Smart Card Problems
- Network Problems
- General Program Problems
- If Your Dell™ Computer Gets Wet
- If You Drop or Damage Your Computer
- Resolving Other Technical Problems
- Using the Dell Diagnostics
- Cleaning Your Computer
- Reinstalling Software
- Adding and Replacing Parts
- Using the System Setup Program
- Alert Standard Format (ASF)
- Getting Help
- Specifications
- Appendix
- Glossary

Adding and Replacing Parts 161
FILE LOCATI ON: S:\SYSTEMS\Pebble\UG\A00\English\r_r.fm
DELL CONFI DENTI AL – PRELI MI NARY 1/29/03 – FOR PROOF ONLY
a Align the notch in the module edge connector with the tab in the
connector slot.
b Slide the module firmly into the slot at a 45-degree angle, and
rotate the module down until it clicks into place. If you do not feel
the click, remove the module and reinstall it.
NOTE: If the memory
module is not installed
properly, the computer
may not boot properly. No
error message indicates
this failure.
5
Insert the 3 securing tabs on the DIMM1 cover into the notches above
the memory module connector and tighten the captive screws.
NOTI CE: If the DIMM1 cover is difficult to replace, remove the module and
reinstall it. Forcing the cover to close may damage your computer.
6
Replace the keyboard.
7 Insert the battery into the battery bay, or connect the AC adapter to
your computer and an electrical outlet.
8 Turn on the computer.
As the computer boots, it detects the additional memory and automatically
updates the system configuration information.
To confirm the amount of memory installed in the computer:
• In Windows XP, click the Start button, click Help and Support, and
then click Computer Information.
• In Windows 2000, right-click the My Computer icon on your desktop,
and then click the General tab.
Adding a M odem
If you ordered the optional modem at the same time that you ordered your
computer, Dell installed the modem for you.
CAUTI ON: Before working inside your computer, read the safety
information in your
System I nformation Guide
.
NOTI CE: Handle components and cards by their edges, and avoid touching
pins and contacts.
1
Ensure that the work surface is flat and clean to prevent scratching the
computer cover.
2 Save and close any open files, exit any open programs, and then shut
down the computer.