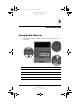
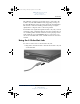
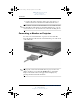
367426-xx1.book Page 1 Tuesday, August 24, 2004 4:02 PM DRAFT Revised: 8/10/04 File: Chap5.fm PN: HP-367186-001 5 Multimedia Using Audio Features The following figure and table describe the audio features of the tablet PC. Component Description 1 Volume mute button Turns off tablet PC sound. 2 Volume down button Decreases tablet PC sound. 3 Volume up button Increases tablet PC sound. 4 Internal microphone Records sound.
367426-xx1.book Page 2 Tuesday, August 24, 2004 4:02 PM DRAFT Revised: 8/10/04 File: Chap5.fm PN: HP-367186-001 Multimedia Component Description 5 Audio-out (headphone) jack Produces system sound when connected to optional powered stereo speakers, headphones, headset, or television audio. 6 Audio-in (microphone) jack Connects an optional monaural or stereo microphone. 7 Speaker Produces tablet PC sound. Using the Audio-In (Microphone) Jack The tablet PC is equipped with a stereo microphone jack.
67426-xx1.book Page 3 Tuesday, August 24, 2004 4:02 PM DRAFT Revised: 8/10/04 File: Chap5.fm PN: HP-367186-001 Multimedia The stereo (dual-channel) headphone jack is used to connect headphones, and also to connect the audio function of an audio/video device such as a television or VCR. When connecting a device to the headphone jack: ■ Use only a 3.5-mm stereo plug. ■ For best sound quality, use 24-ohm to 32-ohm headphones. ■ The internal speaker is disabled.
367426-xx1.book Page 4 Tuesday, August 24, 2004 4:02 PM DRAFT Revised: 8/10/04 File: Chap5.fm PN: HP-367186-001 Multimedia ■ Windows volume control: 1. Click the Volume icon in the notification area (at the far right of the taskbar). 2. Increase or decrease the volume by moving the slider up or down. (You can also select the check box next to Mute to mute the volume.) - or 1. Double-click the Volume icon. 2.
367426-xx1.book Page 5 Tuesday, August 24, 2004 4:02 PM DRAFT Revised: 8/10/04 File: Chap5.fm PN: HP-367186-001 Multimedia The tablet PC can support one S-Video device connected to the S-Video out jack while simultaneously supporting an image on the tablet PC display and on any other supported external display. The S-Video connection usually provides an image of higher quality than a composite-video connection provides.
367426-xx1.book Page 6 Tuesday, August 24, 2004 4:02 PM DRAFT Revised: 8/10/04 File: Chap5.fm PN: HP-367186-001 Multimedia 2. Connect the other end of the cable to the video device, as instructed in the documentation included with the device. S-Video out jack on the tablet PC is not accessible because ✎ Ifthethetablet PC is docked into an optional docking device, you can connect the device to the S-Video out jack on the docking device.
367426-xx1.book Page 7 Tuesday, August 24, 2004 4:02 PM DRAFT Revised: 8/10/04 File: Chap5.fm PN: HP-367186-001 Multimedia Using CD and DVD Software The following software is supported for use with the tablet PC: ■ Windows Media Player—Plays audio CDs and video DVDs and copies audio and data CDs. This software is included with the Windows operating system. ■ InterVideo WinDVD—Plays video CDs and DVD movies. This software is preinstalled on select tablet PCs.
367426-xx1.book Page 8 Tuesday, August 24, 2004 4:02 PM DRAFT Revised: 8/10/04 File: Chap5.fm PN: HP-367186-001 Multimedia Installing Software To install software from a CD that is included with the tablet PC: 1. Insert an appropriate optical drive into an external MultiBay or MultiBay II. 2. Connect the tablet PC to a reliable AC outlet. 3. Close any open applications. 4. Insert a software CD into the optical drive. ❏ If Autorun is enabled, an installation wizard is displayed.
367426-xx1.book Page 9 Tuesday, August 24, 2004 4:02 PM DRAFT Revised: 8/10/04 File: Chap5.fm PN: HP-367186-001 Multimedia Enabling AutoPlay AutoPlay is an option in Windows that turns the Autorun feature on or off. Autorun starts a program or plays a title on a disc as soon as the disk is inserted into the drive and the drive door is closed. By default, AutoPlay is enabled on the tablet PC.
367426-xx1.book Page 10 Tuesday, August 24, 2004 4:02 PM DRAFT Revised: 8/10/04 File: Chap5.fm PN: HP-367186-001 Multimedia Using Windows Media Player Windows Media Player is included with the Windows operating system. It can be used to play CDs and DVDs and create audio and data CDs. To play a CD or DVD: 1. Insert the CD or DVD into the optical drive, and then close the tray. 2. Wait several seconds, and then: ❏ If AutoPlay is enabled, Windows Media Player is opened.
367426-xx1.book Page 11 Tuesday, August 24, 2004 4:02 PM DRAFT Revised: 8/10/04 File: Chap5.fm PN: HP-367186-001 Multimedia WinDVD Creator Plus must be installed using a DVD/CD-RW or DVD+RW/R and CD-RW Combo Drive only. If you do not use one of the these drives, WinDVD Creator Plus will not be installed. For more information about WinDVD Creator Plus capabilities and instructions on creating DVDs and Video CDs, refer to the WinDVD Creator Plus online help after installing the software.
367426-xx1.book Page 12 Tuesday, August 24, 2004 4:02 PM DRAFT Revised: 8/10/04 File: Chap5.fm PN: HP-367186-001 Multimedia play the DVD, you must change the region setting on your DVD drive. DVD region settings can be changed through the operating system or through some DVD players. Changing Settings Using the Operating System To change settings through the operating system: 1. Open Device Manager by selecting Start > My Computer.
367426-xx1.book Page 1 Tuesday, August 24, 2004 4:02 PM DRAFT Revised: 8/24/04 File: Chap6.fm PN: HP-376186-001 6 Wireless If your notebook is equipped with an integrated wireless device such as 802.11 or Bluetooth wireless devices, you have a wireless notebook. ■ An 802.11 wireless notebook can connect to wireless networks in corporate offices, your home, and public places. Wireless networks include wireless local area networks (WLANs) or “hotspots.
367426-xx1.book Page 2 Tuesday, August 24, 2004 4:02 PM DRAFT Revised: 8/24/04 File: Chap6.fm PN: HP-376186-001 Wireless Your notebook has a button that may be used to enable and disable the 802.11 and Bluetooth wireless devices and an associated light to indicate the state of the wireless devices. The following illustration shows the wireless button 1 and light 2.
367426-xx1.book Page 3 Tuesday, August 24, 2004 4:02 PM DRAFT Revised: 8/24/04 File: Chap6.fm PN: HP-376186-001 Wireless Wireless Local Area Network (Select Models Only) With the 802.11 wireless device, you can access a wireless local area network (WLAN), which is composed of other computers and accessories linked by a wireless router or a wireless access point.
367426-xx1.book Page 4 Tuesday, August 24, 2004 4:02 PM DRAFT Revised: 8/24/04 File: Chap6.fm PN: HP-376186-001 Wireless 802.11b and 802.11g. For information on identifying the type of device in your notebook, refer to the “Identifying a WLAN Device” section in this chapter. Connecting Your Wireless Notebook to a Corporate WLAN Contact your network administrator or IT department for information on connecting your notebook to your corporate WLAN.
367426-xx1.book Page 5 Tuesday, August 24, 2004 4:02 PM DRAFT Revised: 8/24/04 File: Chap6.fm PN: HP-376186-001 Wireless Setting Up a WLAN in Your Home To set up a WLAN and connect to the Internet in your home, you need the following equipment. The illustration below shows an example of a completed wireless network installation that is connected to the Internet.
367426-xx1.book Page 6 Tuesday, August 24, 2004 4:02 PM DRAFT Revised: 8/24/04 File: Chap6.fm PN: HP-376186-001 Wireless Using a WLAN Connection To use a WLAN connection: ■ Verify that all drivers required by the 802.11 wireless device are installed and that the 802.11 wireless device is correctly configured. ✎ If you are using an integrated 802.11 wireless device, all required drivers are installed and the adapter is preconfigured and ready for use. ■ If you are using an integrated 802.
367426-xx1.book Page 7 Tuesday, August 24, 2004 4:02 PM DRAFT Revised: 8/24/04 File: Chap6.fm PN: HP-376186-001 Wireless Using Wireless Security Features When you set up your own WLAN or access an existing WLAN, always ensure that security features are protecting the WLAN. If you do not enable security on your WLAN, an unauthorized wireless user can access your notebook data and use your Internet connection without your knowledge.
367426-xx1.book Page 8 Tuesday, August 24, 2004 4:02 PM DRAFT Revised: 8/24/04 File: Chap6.fm PN: HP-376186-001 Wireless Identifying a WLAN Device To install HP WLAN software for an integrated 802.11 wireless device, you need to know the name of the integrated 802.11 wireless device on your notebook. To identify an integrated 802.11 wireless device: 1. Display the names of all the 802.11 wireless devices on your notebook: a. Select Start > My Computer. b. Right-click in the My Computer window. c.
367426-xx1.book Page 9 Tuesday, August 24, 2004 4:02 PM DRAFT Revised: 8/24/04 File: Chap6.fm PN: HP-376186-001 Wireless The WLAN software is also available as a SoftPaq at the HP Web site. To access, download, and install the SoftPaq, use either of the following procedures: ■ Select Start > Help and Support. -or- ■ Visit the HP Web site at http://www.hp.com/support: a. Choose your language and region. b. Select the Download Drivers and Software radio button c.
367426-xx1.book Page 10 Tuesday, August 24, 2004 4:02 PM DRAFT Revised: 8/24/04 File: Chap6.fm PN: HP-376186-001 Wireless Bluetooth (Select Models Only) The Bluetooth device provides short-range wireless communications that replace the physical cable connections that traditionally link electronic devices such as ■ Network access points. ■ Computers (desktop, notebook, PDA). ■ Phones (cellular, cordless, smart phone). ■ Imaging devices (printer, camera). ■ Audio devices (headset, speakers).
367426-xx1.book Page 11 Tuesday, August 24, 2004 4:02 PM DRAFT Revised: 8/24/04 File: Chap6.fm PN: HP-376186-001 Wireless ■ Bluetooth serial port—Transfers data over the Bluetooth link using a virtual COM port. ■ Hands-Free—Enables a vehicle-embedded, hands-free unit or a notebook serving as a hands-free unit to establish a wireless connection to a cellular phone and to act as the Bluetooth cellular phone audio input and output mechanism.
367426-xx1.book Page 12 Tuesday, August 24, 2004 4:02 PM DRAFT Revised: 8/24/04 File: Chap6.fm PN: HP-376186-001 Wireless Turning On, Turning Off, Enabling and Disabling the 802.11 Wireless and Bluetooth Devices The wireless button 1 enables and disables 802.11 wireless and Bluetooth devices in conjunction with Wireless Assistant. By default, the 802.11 wireless and Bluetooth devices and wireless light 2 are turned on when you turn on the notebook.
367426-xx1.book Page 13 Tuesday, August 24, 2004 4:02 PM DRAFT Revised: 8/24/04 File: Chap6.fm PN: HP-376186-001 Wireless You can enable and disable the wireless devices in Computer Setup. For more information about using Computer Setup to control the 802.11 and Bluetooth wireless devices, refer to Chapter 9, “Computer Setup.” You can also enable and disable the wireless devices with the wireless button.
367426-xx1.book Page 14 Tuesday, August 24, 2004 4:02 PM DRAFT Revised: 8/24/04 File: Chap6.fm PN: HP-376186-001 Wireless Turning On the 802.11 Wireless and Bluetooth Devices If And ■ Wireless Assistant shows that both WLAN and Bluetooth are off ■ Wireless light is off You want to turn on either or both devices Then 1. Right-click the Wireless Assistant icon in the notification area. 2. Select the device or devices you want to turn on.
367426-xx1.book Page 15 Tuesday, August 24, 2004 4:02 PM DRAFT Revised: 8/24/04 File: Chap6.fm PN: HP-376186-001 Wireless want your wireless devices to be turned on when you turn ✎ Ifonyou your notebook, you must turn them on before you shut down or restart. Turning Off and Disabling the 802.
367426-xx1.book Page 16 Tuesday, August 24, 2004 4:02 PM DRAFT Revised: 8/24/04 File: Chap6.
367426-xx1.book Page 1 Tuesday, August 24, 2004 4:02 PM DRAFT Revised: 8/24/04 File: Chap7.fm PN: HP-367186-001 7 Q Menu Software Q Menu The Q Menu provides quick access to many of the system tasks accessed with the buttons, keys, or hot keys found on most tablet PCs. You can program the Q Menu to access alternative system tasks or to any item on a drive, a network, or the Internet. Identifying Q Menu Controls The jog dial 1 and the Q Menu button 2 are used in Q Menu procedures.
367426-xx1.book Page 2 Tuesday, August 24, 2004 4:02 PM DRAFT Revised: 8/24/04 File: Chap7.fm PN: HP-367186-001 Q Menu Software Displaying and Closing the Q Menu The Q Menu can be displayed or closed at any time by using any of the following procedures: ■ To display the Q Menu, press the Q Menu button or select the Q icon in the notification area (at the far right of the taskbar). If the Q icon is not displayed in the notification area (at the far right of the taskbar): 1. Press the Q Menu button. 2.
367426-xx1.book Page 3 Tuesday, August 24, 2004 4:02 PM DRAFT Revised: 8/24/04 File: Chap7.fm PN: HP-367186-001 Q Menu Software 4. Select OK. If the icon is not displayed, select Show Hidden Icons in the notification area (at the far right of the taskbar). ■ To close the Q Menu, press the Q Menu button or select anywhere outside of the Q Menu. For information about setting a pen-activated button to open and close the Q Menu, refer to Chapter 4, “Pen and Command Controls.
367426-xx1.book Page 4 Tuesday, August 24, 2004 4:02 PM DRAFT Revised: 8/24/04 File: Chap7.fm PN: HP-367186-001 Q Menu Software Setting Q Menu Preferences The Q Menu can display up to 40 items. Several system-defined items are displayed by default. Additional system-defined and user-defined items can be added. All items, including the default items, can be removed. The items on the Q Menu are managed from the Items to Display On Q Menu list.
367426-xx1.book Page 5 Tuesday, August 24, 2004 4:02 PM DRAFT Revised: 8/24/04 File: Chap7.fm PN: HP-367186-001 Q Menu Software Adding a Q Menu Item An item must be displayed on the Items to Display On Q Menu list before it can be added to the Q Menu. The Q Menu and the Items to Display on Q Menu list can include no more than 40 items. If the list currently contains 40 items, the Add button is dimmed and unavailable.
367426-xx1.book Page 6 Tuesday, August 24, 2004 4:02 PM DRAFT Revised: 8/24/04 File: Chap7.fm PN: HP-367186-001 Q Menu Software 4. In the Add New Menu Entry window, you can add the item by typing or by browsing: ❏ To add the item using the keyboard, type a name for the item in the Display Name field and type the path to the item in the File Name field. If you prefer to type the Display Name, but browse for the File Name, leave the File Name field blank.
367426-xx1.book Page 7 Tuesday, August 24, 2004 4:02 PM DRAFT Revised: 8/24/04 File: Chap7.fm PN: HP-367186-001 Q Menu Software 4. Select Modify. ❏ To change the Display Name or File Name of the item using the keyboard, type the new name for the item in the Display Name field or type the new path to the item in the File Name field. If you prefer to type the Display Name, but browse for the File Name, leave the File Name field blank.
7426-xx1.book Page 8 Tuesday, August 24, 2004 4:02 PM DRAFT Revised: 8/24/04 File: Chap7.fm PN: HP-367186-001 Q Menu Software Removing an Item from the Items to Display on Q Menu List System-defined items cannot be removed from the Items to Display on Q Menu List. To remove a user-defined item: 1. Press the Q Menu button or select the Q icon in the notification area (at the far right of the taskbar). 2. Select Q Menu Settings. 3. Select the item you want to remove. 4. Select Remove. 5.
367426-xx1.book Page 9 Tuesday, August 24, 2004 4:02 PM DRAFT Revised: 8/24/04 File: Chap7.fm PN: HP-367186-001 Q Menu Software Using a System-Defined Item As shipped, the Q Menu displays only the items identified below as default. All the items described below can be added or removed from the Q Menu. For instructions, refer to “Setting Q Menu Preferences,” earlier in this chapter.
367426-xx1.book Page 10 Tuesday, August 24, 2004 4:02 PM DRAFT Revised: 8/24/04 File: Chap7.fm PN: HP-367186-001 Q Menu Software Capture Window Select Capture Window to copy the image of the currently active window on the tablet PC screen to the Windows clipboard. To save or print the image, open an application which supports a screen image, such as Microsoft Word or Microsoft Paint, then paste the image. For example, to copy the an image of the currently active window into a Word document: 1.
367426-xx1.book Page 11 Tuesday, August 24, 2004 4:02 PM DRAFT Revised: 8/24/04 File: Chap7.fm PN: HP-367186-001 Q Menu Software External Display When an optional display device, such as an external monitor or projector, is connected to the external monitor connector on the tablet PC: To display the image only on the display device: » Select External Display. ✎ Selecting External Display turns off the Extended Desktop option.
367426-xx1.book Page 12 Tuesday, August 24, 2004 4:02 PM DRAFT Revised: 8/24/04 File: Chap7.fm PN: HP-367186-001 Q Menu Software Presentation Mode On/Off (Default) Ä CAUTION: Presentation mode is integrated with the Q Menu software. If the Q Menu software is uninstalled or disabled, presentation mode will not function.
367426-xx1.book Page 13 Tuesday, August 24, 2004 4:02 PM DRAFT Revised: 8/24/04 File: Chap7.fm PN: HP-367186-001 Q Menu Software Portrait-Secondary To switch the image counterclockwise to portrait view from landscape view: » Select Portrait-Secondary. The default Portrait-Primary item switches the image clockwise to portrait view. Left-handed users may find the Portrait-Secondary item, which switches the image counterclockwise to portrait view, more convenient.
367426-xx1.book Page 14 Tuesday, August 24, 2004 4:02 PM DRAFT Revised: 8/24/04 File: Chap7.fm PN: HP-367186-001 Q Menu Software Standby To initiate Standby: » Select Standby. Hibernate To initiate Hibernation if Hibernation is enabled: » Select Hibernate. ✎ Hibernation is enabled by default. If Hibernation is not enabled, selecting Hibernate initiates Standby. To verify that Hibernation is enabled: » Select Start > Control Panel > Performance and Maintenance > Power Options > Hibernate tab.
367426-xx1.book Page 15 Tuesday, August 24, 2004 4:02 PM DRAFT Revised: 8/24/04 File: Chap7.fm PN: HP-367186-001 Q Menu Software Q Menu Settings (Default) To open the Q Menu Settings window: » Select Q Menu Settings. Tablet PC Button Driver The tablet PC button driver allows you to customize the pen-activated buttons and jog dial. You can program the buttons to perform various functions or open specific programs.
367426-xx1.book Page 16 Tuesday, August 24, 2004 4:02 PM DRAFT Revised: 8/24/04 File: Chap7.