
Installation Guide


4
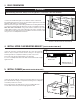
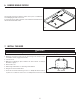
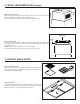
3. BUILD FRAMEWORK
HD1291A
FramINg behIND Drywall
wall stuDs
34-15/16” = bottom oF hooD 24” above cooktop
40-15/16” = bottom oF hooD 30” above cooktop
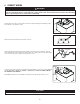
WARNING
VQ0010
!
!
• When cutting or drilling into wall, do not damage electrical wiring and other hidden utilities.
• When building framework, always follow all applicable construction codes and standards.
Construct wood wall framing that is even with the surface of wall studs.
Wood wall framing must be at least 1/2” thick and 3” high. Fasten wood wall
framing to wall studs for a solid installation.
Make sure that the height of the framing will allow the mounting bracket to be
secured to the framing within the dimensions shown (see illustration at right).
After wall surface is finished, using a level, draw a vertical line up to the
ceiling starting from the center of the planned hood location. Carefully center
and level the hood mounting bracket over installation location. Secure it to wall
using 3 no. 8 x 1½" Phillips flat head screws.
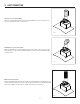
4. INSTALL UPPER FLUE MOUNTING BRACKET (ducted installation only)
Center the upper flue mounting bracket with the center line previously
drawn in step 3 and place it flush with the ceiling. Use the upper flue
mounting bracket as a template to mark the position of its screws.
Secure the upper flue mounting bracket to the wall using
2 no. 8 x 1½" Phillips flat head screws. Make sure that the bracket is tight
against the wall.
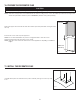
Center the plenum with the center line previously drawn in step 3 and
place it flush with the ceiling. Use the plenum mounting slots as a template
to mark the position of its screws.
Secure the plenum to the wall using 2 no. 8 x 1½" Phillips flat head
screws. Make sure that the plenum is tight against the wall.
5. INSTALL PLENUM (non-ducted installation only)
C
L
HD1163
ceNter oF INstallatIoN
upper Flue mouNtINg
bracket slots
mouNtINg bracket
Flush wIth ceIlINg
ceIlINg
L
C
HD1299
ceIlINg
pleNum
Flush wIth
ceIlINg
ceNter oF
INstallatIoN
pleNum
mouNtINg
slots