
Instructions / Assembly


Page 2
MODEL QTX110HL
INSTALLATION
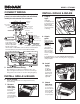
2. Mount
housing.
Secure hous-
ing to ceiling
structure with (4)
mounting screws.
Make sure bottom
of housing will be
flush with finished
ceiling material.
1. Insert
mounting
brackets.
Slide the (4)
mounting brack-
ets into the chan-
nels on each end
of the housing.
3. Attach
damper
/ duct
connector
to housing.
Snap damper /
duct connector
onto housing.
Make sure
connector is
flush with top of housing and damper flap falls closed.
4. Install
6-inch
round
ductwork.
Connect 6-inch
round ductwork
to damper / duct
connector. Run
ductwork to a
roof cap or wall
cap. Tape all ductwork connections to make them secure
and air tight.
WARNING: To reduce the risk of fire, do not store
or use gasoline or other flammable vapors and
liquids in the vicinity of the heater.
CAUTION: High temperature, risk of fire, keep
electrical cords, drapery, furnishings, and other
combustibles at least 3 feet (0.9 m) from the front
of the heater and away from the side and rear.