
Instructions / Assembly
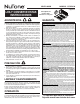


Page 3
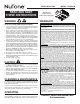
VENTILATION FAN MODEL QTXEN150
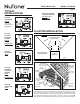
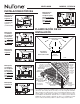
1b. Mount housing anywhere between
trusses, joists, or I-joists using hanger
bars.
Sliding hanger bars are provided to allow for accurate positioning
of housing anywhere between framing. They can be used on all
types of framing (I-joist, standard joist, and truss construction)
and span up to 24”.
Attach the MOUNTING CHANNELS to the housing using the
SCREWS supplied.
Extend HANGER
BARS to the width of
the framing.
Hold housing in place
so that bottom edge of
housing will be flush
with finished surface
of ceiling. For 1/2”
thick ceiling material,
position bottom of
each mounting flange
flush with bottom of
joist.
OR
INSTALL HOUSING & DUCT
1a. Mount
housing to
joist.
Hold housing
in place so that
bottom edge
of housing will
be flush with
finished surface
of ceiling. For
1/2” thick ceiling
material, position bottom of each mounting flange flush
with the bottom of joist. The housing mounts with four (4)
screws or nails. Screw or nail housing to joist through low-
est holes in each mounting flange, then through highest
holes. NOTE: Mounting to I-JOIST (shown) requires use
of SPACERS (included) between the highest hole of each
mounting flange and the I-joist.
2. Attach
damper/duct
connector.
3. Install
6-inch round
ductwork.
Connect 6-inch
round ductwork
to damper / duct
connector. Run
ductwork to a roof
cap or wall cap.
Tape all ductwork
connections
to make them
secure and air tight.
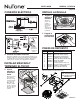
SPACER
(use for
mounting
to I-Joist)
TOP AND BOTTOM FLANGES
REMAIN OUTSIDE OF HOUSING
I-JOIST
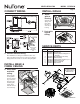
SCREW
FROM
PARTS BAG
INSERT
TAB INTO
SLOT IN
HOUSING
To ensure a noise-free
mount: Secure hang-
ing bars together with
SCREWS and use a
pliers to crimp mount-
ing channels tightly
around hanger bars.