
Use and Care Guide


4
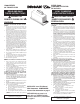
FIG. 11
USE AND CARE
Always turn your hood on before you begin cooking to
establish an air flow in the kitchen. Let the hood run for
a few minutes to clean the air after you turn the range
off. This will keep the whole kitchen cleaner and brighter.
Controls
The hood is “OFF” when the drawer is pushed com-
pletely in.
LIGHT - The light will turn “ON” when the drawer is pulled
out approximately 1/2 inch.
BLOWER - The blower will turn “ON” when the drawer
is pulled out approximately 1-1/2 inches.
The blower speed is set using the slide control, located
to the right of the drawer.
Heat Sentry
™
Your hood is equipped with a Heat Sentry™ thermostat.
This thermostat is a device that will turn on or speed
up the blower if it senses excessive heat above the
cooking surface.
If your blower is not on, or if it is running at low speed,
the Heat Sentry™ will sense excessive cooking heat,
override the normal blower control and turn the blower on
to high speed. The blower will run until the temperature
drops to normal operating level. The blower
will then
automatically return to its original setting.
Cleaning
WARNING
ALWAYS DISCONNECT ELECTRIC POWER SUP-
PLY BEFORE SERVICING HOOD.
Use a mild detergent suitable for painted surfaces. DO
NOT USE ABRASIVE CLOTH, STEEL WOOL PADS,
OR SCOURING POWDERS. Vacuum blower to clean.
Do not immerse blower in water.
Wash the foam filter in a mild detergent solution.
The glass drawer assembly and light lens are easily
removable for cleaning:
See Step 13 on page 3 for removal of glass drawer
assembly. DO NOT clean in a dishwasher.
Remove the light lens by opening the filter panel
(Step 6, page 3) and rotating the 2 metal clips
holding the lens in place.
Light Bulb Replacement
Your hood uses a 24" long F20T12 fluorescent tube and
an FS-2 starter, which are available at most hardware
stores or home centers.
To check or replace tube: 1) Pull drawer out. 2) Rotate
filter panel clips and lower filter panel.
If the tube flickers or does not light, check the prongs
on the ends of the tube to make sure they are properly
seated in the tube holders.
If the tube continues to flicker or does not light, replace
the tube. Slide the tube into the holders and rotate the
tube so that the prongs in the holders grip the tube and
hold it in place.
If the ends of the tube light but the center does not, the
starter may require replacement. The starter is located
behind the filter panel on the right hand side. Install
the new starter by pushing the starter in and turning
it clockwise.
If the tube still does not light, order a 99270651 Ballast
Transformer available from your Broan distributor or from
the Broan Service Department. Write Broan-NuTone
LLC, PO Box 140, Hartford, WI 53027.
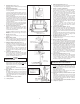
FRONT MOUNTING
HOLE SEE STEP 8.
HUECO FRONTAL
PARA MONTAR.
VEASE PASO 8.
INSERT
SCREWS HERE
INSERTE TOR-
NILLOS AQUI
CONTROL BOX
CAJA DE CON-
TROL
FIG. 12
MOUNTING BRACKET
SOPORTE MONTANTE
OR
FIG. 13
FIG. 14
GROUND SCREW
TORNILLO DE TIERRA
WIRE BOX COVER
TAPA DE LA CAJA DE
CABLEADO
FIG. 15
FIG. 16
USO Y MANTENIMIENTO
Siempre prenda el extractor antes de que comience a guisar
para establecer un flujo de aire en la cocina. Deje que el
extractor funcione por unos pocos minutos para limpiar el
aire después de que haya apagado el fogón. Esto mantendrá
toda la cocina más limpia y más clara.
Controles
El extractor está apagado (“OFF”) cuando se ha empujado
al cajón completamente hacia adentro.
LUZ - La luz se prenderá (“ON”) cuando se ha tirado el cajón
hacia afuera aproximadamente 1,27 cm.
ABANICO - El abanico se prenderá (“ON”) cuando se ha
tirado el cajón hacia afuera aproximadamente 3,81 cm.
A la velocidad del abanico se la fija usando el control desli-
zante, localizado a la derecha del cajón.
Heat Sentry
™
Su extractor está equipado con un termóstato Heat Sentry.™
Este termóstato es un dispositivo que prenderá o acelerará la
velocidad del abanico cuando perciba calor excesivo encima
de la superficie de fogón.
Si su abanico no está prendido, o está funcionando a baja
velocidad, el Heat Sentry™ percibirá el calor excesivo del
fogón, quitará el control normal del abanico, y acelerará al
abanico a alta velocidad. El abanico funcionará hasta que
la temperatura baje al nivel normal de operación. El abanico
entonces automáticamente regresará a su fijación original.
Limpieza
PRECAUCION
SIEMPRE DESCONECTE LA ENERGIA ELECTRICA
ANTES DE DAR SERVICIO AL EXTRACTOR.
Use un detergente suave apropiado para superficies
pintadas NO USE TRAPOS ABRASIVOS, ALMOHADILLAS
DE LANA DE ACERO O POLVOS DE FREGAR. Aspire el
abanico con una aspiradora para limpiarlo. No meta el
abanico en el agua.
Lave el filtro de espuma en una solución de detergente suave.
Al ensamblaje del cajón de vidrio y al lente de la luz, se los
puede quitar con facilidad para limpiarlos:
Véase paso 13 en página 3 para saber como sacar el
ensamblaje del cajón de vidrio. NO lo limpie en una
lavadora de platos.
Quite el lente de la luz abriendo el panel del filtro (Paso
6, página 3) y dando vuelta a dos grapas de metal que
sostienen al lente en su sitio.
Reemplazo del Bombillo de Luz
Su extractor usa un tubo fluorescente de 60,96 cm de largo
F20T12 y un arrancador FS-2, disponible en la mayoría de
las ferretarías o centros que venden árticulos para la casa.
Para chequear o reemplazar el tubo: 1) Saque el cajón. 2)
Dé la vuelta a las grapas del panel del filtro y baje el panel
del filtro.
Si el tubo de luz parpadea o no se prende, chequee las
puntas del fin de tubo para asegurarse que estén bien
asentadas en los sostenes del tubo.
Si el tubo continúa parpadeando o no se prende, reempláce-
lo. Resbale el tubo y dele vuelta de manera que las puntas
en los sostenes agarren al tubo y lo sostengan en su sitio.
Si los extremos del tubo se prenden, pero el centro no se
prende, es posible de que haya reemplazar el arrancador.
El arrancador está localizado detrás del panel del filtro a
mano derecha. Instale un nuevo arrancador empujándolo y
dándole la vuelta en dirección horaria.
Si el tubo todavía no se prende, ordene el transformador de
lastre #99270651 disponible donde su distribuidor Broan o
del departamento de servicio de Broan. Escriba a Broan-
NuTone LLC, PO Box 140, Hartford, WI 53027.
PLASTIC CAP
TAPA DE PLASTICO
DRAWER SLIDE
DESLIZADOR DEL CAJON
THUMB SCREWS
TORNILLOS DE
DEDO
CONTROL TRIM
ADORNO DE CONTROL
DRAWER CLAMP
ABRAZADERA DE CAJON
THUMB SCREWS
TORNILLOS DE DEDO
VERTICAL ADJUST-
MENT SCREW
TORNILLO PARA
AJUSTE VERTICAL
#8-18 x 1"
#8-18 x 2"
#8-18 x 1/2"
FRONT TRIM
ADORNO DEL
FRENTE
3-1/4" X 10"
DUCTWORK
DUCTO
DRAWER TRIM
ADORNO DEL CAJON