
Instructions / Assembly


MODELS 192 • 194 • 198
Page 5
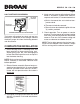
HALF-WATTAGE CONVERSION
The heater will produce less heat and use less
electricity if converted to half-wattage. Remove
the black jumper wire from the heating element
and discard wire.
HEATER CONVERTED TO HALF-WATTAGE
REMOVE THIS
JUMPER WIRE
TOP / FRONT
OF HEATER
COMPLETE THE INSTALLATION
1. Install housing mask. A housing mask has
been provided to keep construction dust,
drywall spray, paint, etc., from damaging the
heater. Bend the flap on the mask and push it
into the heater housing.
NOTE: Mask can be put into place before or after
heater assembly is reinstalled. Remove mask
before operation.
2. Reinstall heater assembly. Secure heater as-
sembly to housing with four (4) screws. Check
thermal overload button marked “RESET”.
Heater will not operate unless this button is
depressed.
3. Install grille. Place grille over heater and attach
with four (4) screws. Push knob onto thermo-
stat stem.
4. Attach security cover to grille (optional). When
heater is installed in a public area without a
separate wall control, it is recommended that:
a) Built-in thermostat be set to desired tem-
perature level.
b) Thermostat knob be removed.
c) Security cover be attached to grille with two
(2) screws, provided.
5. Check operation. Turn on power at service
entrance. Turn thermostat to its highest setting
and make sure heating element and blower
come on. Then turn it to its lowest setting and
make sure element and blower shut off.
NOTE: The fan delay prevents the fan from com-
ing on until the element is hot. Likewise, it keeps
the fan running until the element cools down.