
Installation Guide


3
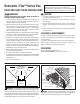
Mount fan to ceiling
structure.
Mount housing to ceiling
structure with appropriate
fasteners in locations shown.
1
8
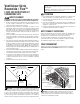
RETROFIT INSTALLATION
Remove old
fan and prepare
ceiling.
2
10½-in.
9¾-in.
JOIST
1
Fold mounting ears
at against housing.
1
5
1
6
Existing fan housings are typically attached to the structure:
•
with screws, nails, or staples, which must be removed.
•
with hangers or rails which are fastened to joists and must be removed along
with housing.
A pry bar may be needed to remove the old housing.
Leave ductwork and wiring in place.
1
7
Connect wiring.
Connect power cable to wiring plate
(from parts bag) using UL approved
connector. Connect house wiring to
fan wiring. Refer to wiring diagram for
connection details. Use screw (from
parts bag) to secure wiring plate to fan
housing. Re-install wiring panel and
secure with screw from parts bag.
Enlarge ceiling opening (if
necessary) to 9¾” parallel to
joist) by 10½” (perpendicular
to joist). (Some models have
a cut-out template on side of
carton.)
1
8
Connect wiring.
Finish ceiling.
Then continue with Step 10.
Connect power
cable to wiring
plate (from
parts bag) using
UL approved
connector.
Connect house
wiring to fan
wiring. Refer to
wiring diagram
for connection
details. Use screw (from parts bag) to
secure wiring plate to fan housing. Re-install
wiring panel and secure with screw from
parts bag.
1
9