BRAN INSTALLATION AND USE & CARE INSTRUCTIONS N SAFETY Please visit our websites www.broan.com, or www.broan.ca to register this product and to view installation tips and videos. Installer: Leave this manual with the homeowner. READ AND SAVE THESE INSTRUCTIONS A WARNING A To reduce the risk of fire, electric shock, or Injury to persons, observe the following: » Use this unit only in the manner interceded by the manufacturer.
ALL INSTALLATIONS Start here. . COOKING AREA N\, Do not install above or < N inside this area N / N NOT FOR USE IN B COOKING AREA, Cooking Equipment Floor IMPORTANT The ducting from this fan to the outside of the building has a strong effect on the air flow, noise and energy use of the fan, Use the shortest, straightest duct routing possible for best performance, and avoid installing the fan with smaller ducts than recommended. Insulation around the ducts can reduce energy loss and inhibit mold growth.
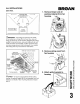
BM 6. Connect 4-in. round duct. T~ INSTALLATION AND USE & CARE INSTRUCTIONS INSTALLATION o NEW CONSTRUCTION For Retrofit installation Skip to Page 5. ] 4, Attach damper/duct connector fan housing. Push connector through opening from inside of housing. Engage tabs and secure with screw from pasts bag, 7. Connect wiring. Bend 1ab to expose desired access hole. Cornet power cable to housing with appropriate UL approved connector. Connect back fo black, white to white and green to green or bare wire.
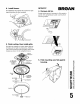
8. Install blower, RETROFIT BR&Q‘N Re-install blower. Secure blower with 2 resews from parts bag and plug blower into black receptacle. 4. Remove old fan. Enlarge ceiling opening (il necessary} to 9%, parallel to joist) by 10%, (perpendicular fo joist). Leave duct work and wiring in place. 9. Finish ceiling, then install grille. Plug light into receptacle in housing. Attach grille pan to housing with (2) grille mounting screws. Install (2) 18W, GU fluorescent bulbs (included).
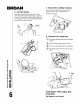
INSTALLATION AND USE & CARE INSTRUCTIONS INSTALLATION ) 6. Connect wiring. Bend tab to expose desired access hole. Connect power cable to housing with appropriate UL approved connector. Connect black to black, white to white and green fo green or bare wire, Re-install wiring panel and secure with screw from parts bag. 7. Mount fan to ceiling structure. Mount housing to ceiling structure with standard drywall or wood screws in locations shown. *Center hale optional. 8. Connect 4-in. round duct.
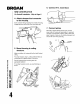
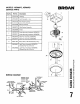
MODELS AERATES, ABSORB SERVICE PARTS Key No.| Part No.
BRAN INSTALLATION AND USE & CARE INSTRUCTIONS ©O WARRANTY Limited Warranty Warranty Period and Exclusions: Brian-NuTone LLC (the. Company) warrants to the original consumer purchaser of its product { you,) that the product (the, Product,) will be free from material defects in the Product or its workmanship for a period of three (3) years from the date of original purchase.
CONSTRUCTION NEUVE Pour une rénovation passez 8 la page 12. 4. Fixez le clapet/raccord de conduit au boîtier de ventilateur. Poussez fe raccard au travers de torturer par figuriniste du bolier. Engagez fes ergots et fez fe Toul avec les vis se trouvant dans le sachet de pièces. 5. Montage du boîtier a la charpente du plafond. Rendez-vous que le dessus du bottier affleure la surface finie du plafond.
BRAN DIRECTIVES D’INSTALLATION, D’UTILISATION ET D'ENTRETIEN INSTALLATION 8. Installez le ventilateur. Reposez le ventilateur. Fixez-le avec 2 vis du sachet ds pinces et branchez-le dans la prise noire. 9. Finissez le plafond, puis installez la grille. Branchage la lumière dans fa prise de courant du boîtier. Fixez la pirogue de grille au bolivar avec Jes deux (2) vis de montage de ia grille.
BECAN INSTRUCCIONES DE INSTALACIÓN, USO Y CUIDADO o SEGURIDAD Visite nuestros sitios web: www.broan.com o www.broan.ca para registrar este producto y ver consejos y vídeos para la instalación. Aviso al instalador: Deje este manual con el duenario de la casa. LEA'Y CONSERVE ESTAS INSTRUCCIONES A ADVERTENCIA A Para reducir el riesgo de incendios, descargas eléctricas o fisiones personales, observe las siguientes precauciones: * Use la unidad solo ds la manera indicada por &l fabricante.
INSTRUCCIONES DE INSTALACIÓN, USO Y CUIDADO INSTALACIÓN N Q BECAN 6. Conecte el cableado. Doble la engrilleta para exponer e ricia de acoso deseado. Conecte el cable eléctrico a la cubierta con una conexión apropiada aprobada por L. Conecte negro con negro, bance con banco y verde con verde o con el hilo desmido. Vigila a instalar el parle do cacicazgo y filo con e omito de fa bolsa de piezas. 7. Monte el ventilador en la estructura del cielo raso.